
Is it the gear or the photographer?
Every once in a while, I see discussions about the role of equipment in creating outstanding photographs. There are some folks who believe if they had better gear they would be a much better photographer. So how important is the role of the equipment and all the technology that goes into the high-end gear, as opposed to the skill of the photographer? I thought I would share my point of view in this short writeup.
The relative importance of equipment strongly depends on your subject and goals. For example you do not need advanced AF, a fast camera or a super-telephoto lens to create landscape photographs but if you want to make great sports or birds in flight photographs you need a fast camera with a capable AF system and good high ISO performance. To this extent, equipment is a tool that has to be right for the job. Just as you can’t win the NASCAR in a Kia, it is also difficult to make certain flight images with a short lens or a slow camera under usual circumstances. You do need to have the right tool for the job. Take the example below, a few months ago I found a burrowing owl nest near a golf course in Mountain View, CA where the juveniles were active for a short period of time. I only had an hour with few very short flight opportunities when the juveniles flew with the sun still in the sky. I managed to make a dozen frames including a few that I had envisioned before but never had the opportunity to capture. I had the right tool for the job too, the EOS 1DX and the EF 600 MK II. A light-weight rig with unparalleled AF speed and accuracy, near zero shutter lag and 12 fps was undeniably instrumental in creating the image below. Peak of action and the right pose happens for a fraction of a second and usually there is no second chance.
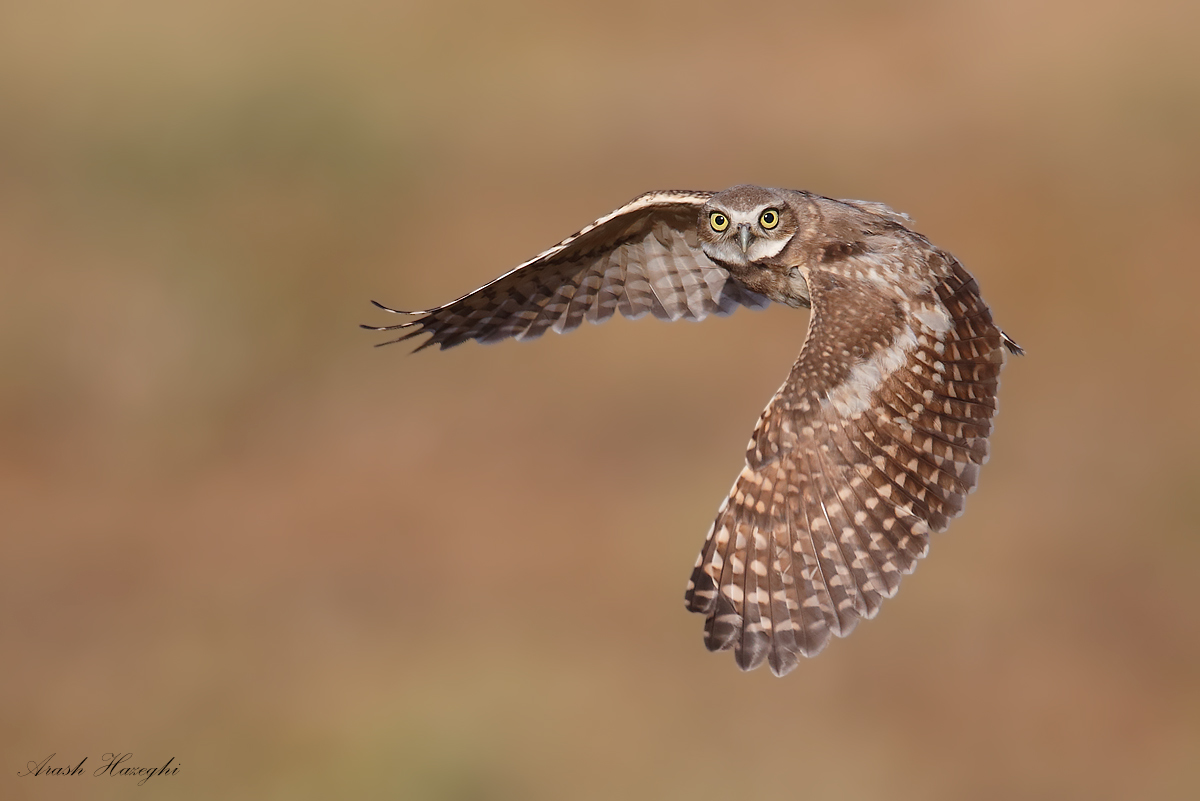
Juvenile Burrowing owl. EOS 1DX EF 600mm f/4 IS II + EF Extender 1.4X III f/5.6 1/3200sec ISO 640, handheld. Click to enlarge.
So having the right tool for the job is important too, after all, if I had to use an EOS 7D with a short lens in this condition I would have missed the opportunity. In fact, most likely I would have just packed and gone home given this particular subject and field conditions. So what about the photographer’s skill?
Well, in my opinion the photographer’s skill still plays a more important role than the equipment they use. Many people have top-of-the-line equipment but no images in their portfolio to justify owning such equipment. Unfortunately many internet websites have become more focused on gear rather than the art of making great photographs. The fact is that if I did not have the skills and experience I would have still gone home with zero keepers. In my view, what is important is knowing your gear and how to use it efficiently and productively. That is the difference between a great photographer and an average person with a camera. A photographer with modest equipment who has mastered their gear and technique get much better results than someone with the top notch gear but without the skills.
Knowing your gear includes understanding its limitations and strengths and coming up with creative ways to increase your field productivity. This often yields better results than just buying better equipment. That is not to say you should not upgrade when you have the resources, but only if you are certain you have used and exhausted your current gear to its full potential. If you don’t have a super telephoto lens and a camera body with fast AF, you can still concentrate on setting up nice perches to attract a variety of species and photograph them from a blind. Try to travel to locations where birds are more approachable, settings are nice and there is a wider variety of species you can photograph. Remember that you have a great size and weight advantage over folks who have large/heavy rigs, this makes you very mobile in the field. Use it to your advantage. Learn how to approach birds where possible. If your camera cannot handle high ISO/low light, go to locations where light is better and you can photograph in better light. Sometimes this is just an hour drive or an hour flight, yet the difference in your output can be night and day. In short, try to focus your efforts and time on subjects and in locations where it is most productive with your gear. Remember a photograph of a common specie with an interesting pose in great light and with a pleasing background is much better than a poor quality image of a rare raptor that was too far for your lens or too fast for your camera.

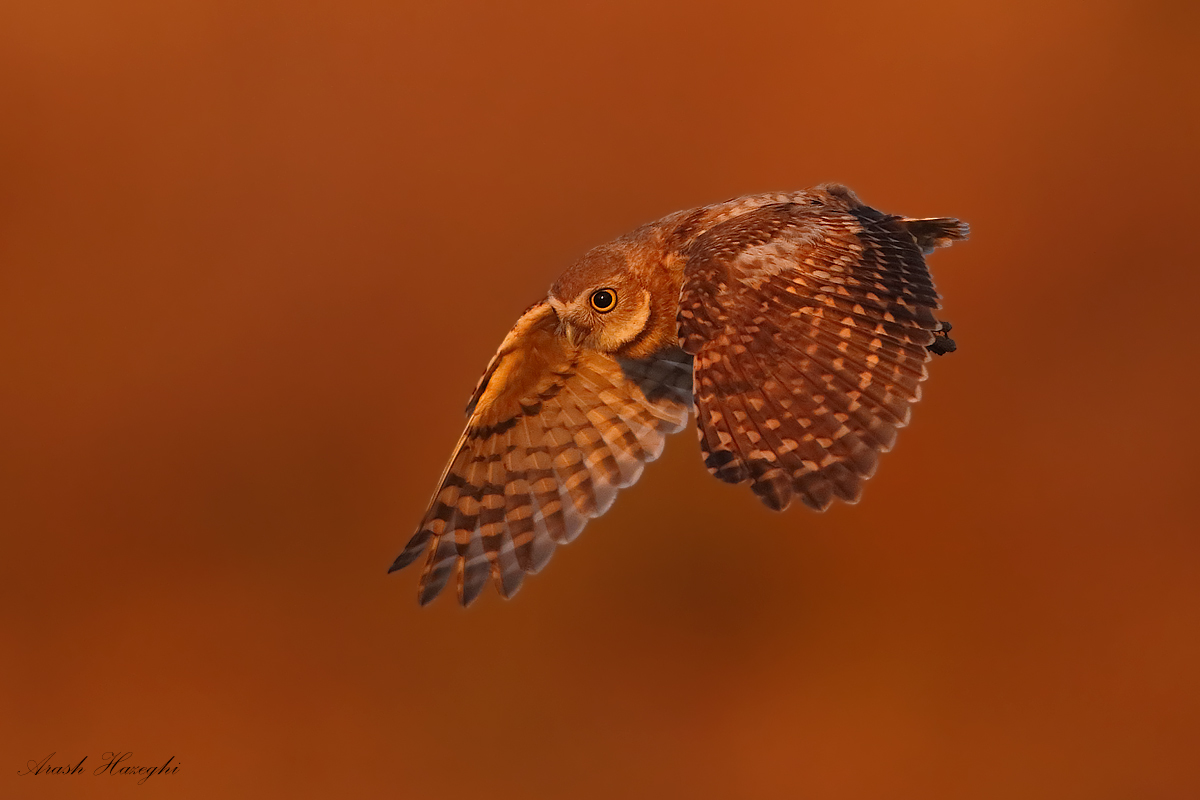
Diving juvenile Borrowing owl. EOS 1DX EF 600mm f/4 IS II. + EF Extender 1.4X III f/5.6 1/3200sec ISO640. Handheld. Click to enlarge.
So is equipment a factor in making great photographs? yes it is. But the photographer’s skill is more important. Part of this skill is knowing your equipment, its strengths and limitations and try to use it efficiently in the field for best results
Last but not least, here I explain the story behind one of the burrowing owl images:
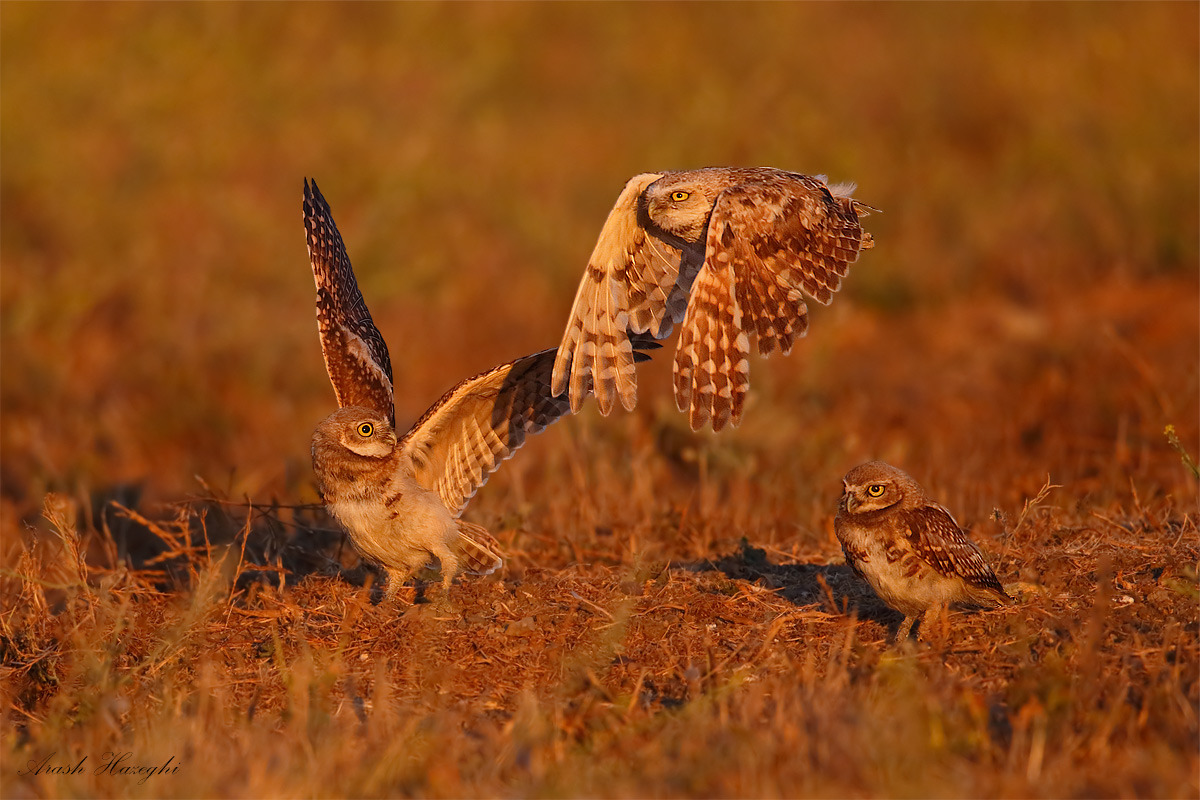
A juvenile burrowing low (left) watches as an adult suddenly flew between the juveniles. EOS 1DX EF 600mm f/4 IS II f/5.6 1/3200sec ISO 2000. click to enlarge.
I had initially focused on the juvenile on the left waiting for him to take off when the adult suddenly entered the frame, I reacted quickly firing a short burst and ended up with four files with all three owls in the frame. Luckily, one of the frames had the adult with a better wing position. In this situation there was no time to grab focus on the flying adult or even think about any other adjustment as the adult owl entered and exited the frame quickly. Since I had only 4 frames at 12fps, the window of action with three owls in the frame must have lasted for only 1/3 of a second!
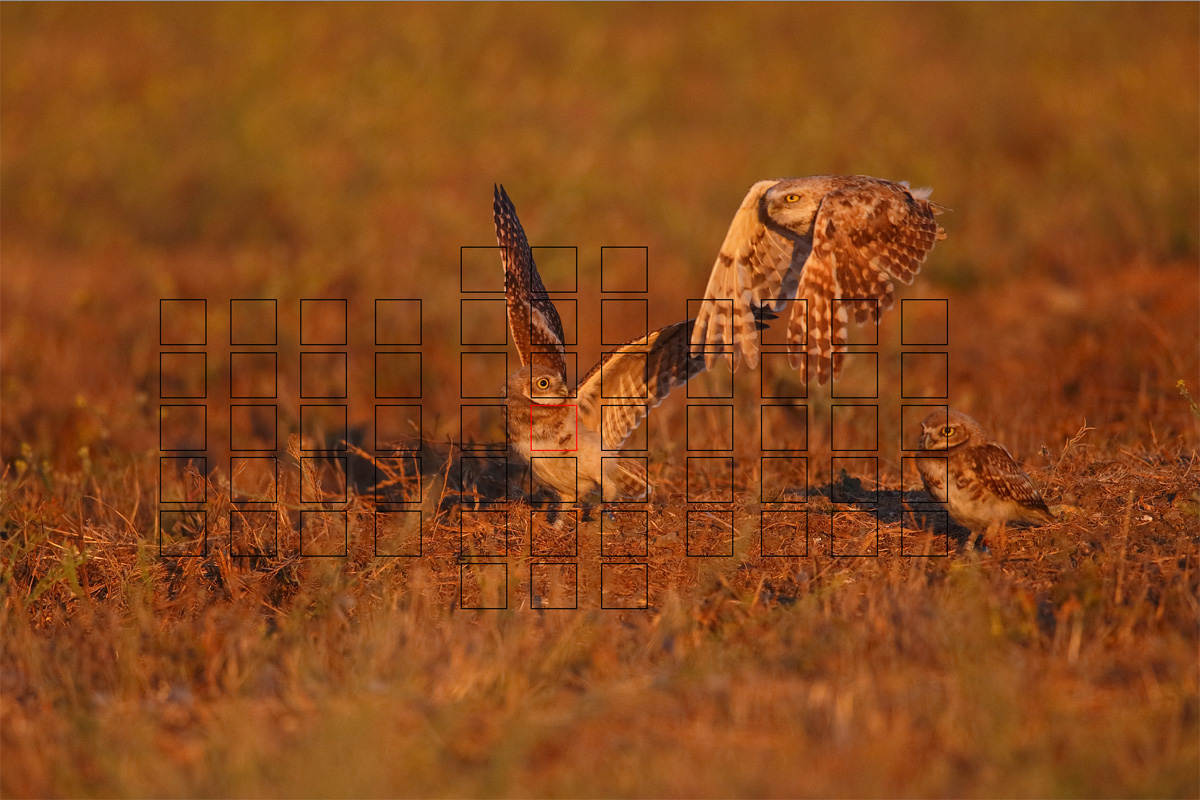
screen capture from Canon DPP showing the active focus sensor at the time of capture.
Normally, depth of field is not deep enough to cover all three birds, but I was really lucky here as burrowing owl is a very small bird compared to other raptors. Plus the three birds were relatively close to each other so each was at about the same distance from the camera. Nevertheless, the two owls on the right were noticeably softer than the juvenile I had acquired focus on, but they had not entirely lost feather details. In order to equalize sharpness between the owls during post processing I put each owl on a separate layer in CS6 and applied different amounts of sharpening to each : I first applied a baseline sharpening (smart sharpen, strength=100, radius=0.5) to all three. The juvenile on the left looked very sharp, as expected, while the other two looked somewhat softer. In situations where the bird is slightly outside DOF it is best to use lower strength and larger radius (a bit coarser sharpening). Using a high strength with low radius won’t emphasize the edges sufficiently and might increase the noise. I used strength = 50 radius = 0.8 for the adult and strength = 40 radius = 0.7 for the juvenile on the right. After this step, the two owls that were slightly outside DOF looked sharp enough for presentation.
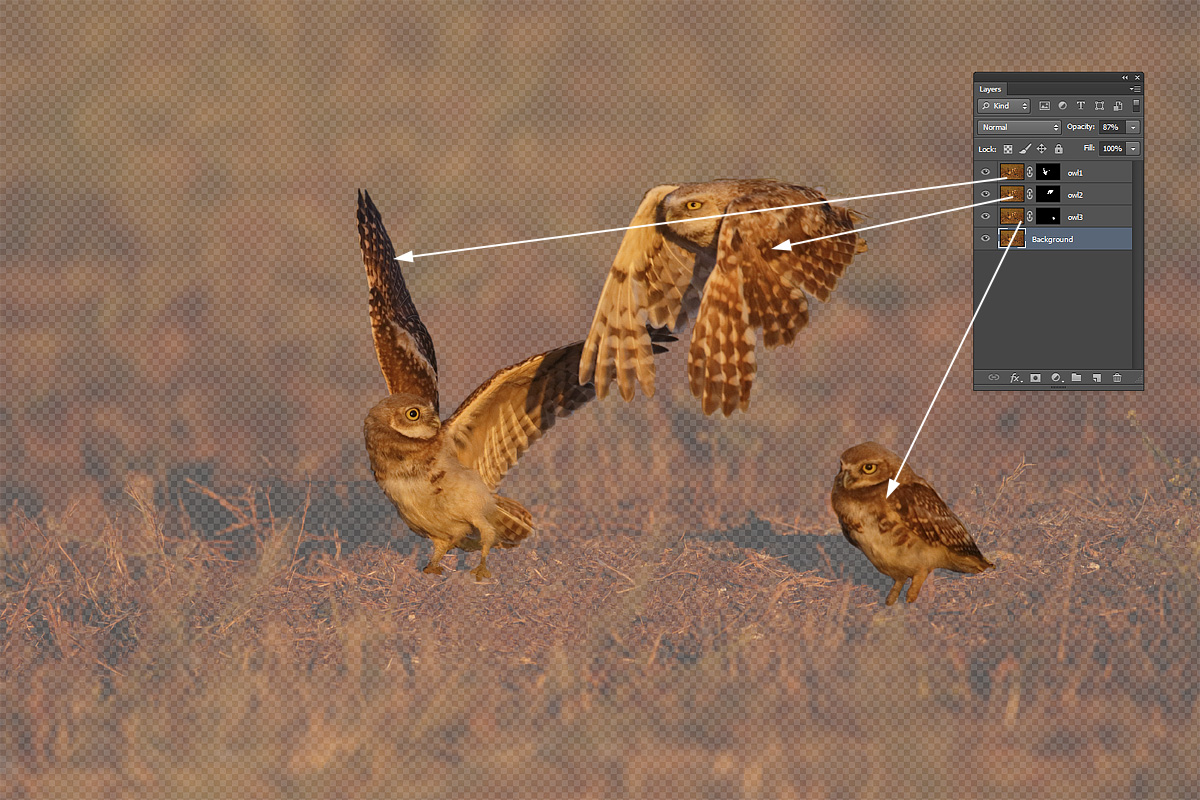
Putting owls on separate layers for sharpening in Photoshop CS6. For details of processing please refer to my guide.
Always remember that sharpening should be applied as the final step in processing, i.e. after resizing to the desired output size.
I hope you found this quick tip useful. This was the last frame of the day.
Juvenile Burrowing owl in last light. EOS 1DX, EF600mm f/4 IS II + EF extender 1.4X III, f/5.6 1/3200sec ISO 2000. handhold. click to see larger.
Nice article, but you say sharpening after output resizing : i sharpen the tiff file and then resize for web (jpg).
Should i make a tiff and then resize for the web output and the sharpen the jpg ??
Hi,
Don’t sharpen the master TIFF file, do your processing first, then resize to desired dimensions and then sharpen before saving as JPEG for final presentation. If you sharpen before resizing, the effect of sharpening will be reduced by resizing.
best
ok so i do my processing on the RAW file, and the i resize it to TIFF without sharpening then , and when i resize the TIFF to JPG i will sharpen the JPG
is this correct?
yes that’s right
Ari,
Your images are fantastic! And your post was very helpful! Thanks for taking the time to educate. I have your guide on noise reduction and just yesterday purchased your flight guide and am waiting to receive. I look forward to studying your techniques. Thanks again.
Thanks for the info. The images above excellent and very interesting. You do great work!! I will be getting a new email address soon, at that time I will sign up for your mailing list.
I wonder if you might be missing something by focusing so much on the technology and not considering the art. I believe outstanding photographs have an artistic component that transcends the gear.
Knowing your tools and how to use them efficiently allows you to be competent at your craft. Outstanding photographs transcend craft.
Hi Henry,
Thanks for your comments. I believe any successful artist has two distinct qualities, creative/artistic vision and great execution skills. you need both. Technology, i.e. equipment is a part of the execution. A tool that helps you transform your artistic vision from an idea into a photograph. You need to develop a deep understanding of your equipment in order to use it efficiently, especially for a specialized subject such as birds in flight.
But just focusing on technology alone and overlooking artistic vision will not get you far either. It is unfortunately a common issue on the internet forums. You see many folks talk about gear, many times without even having touched the gear they talk about. They have very strong opinions, but when you look at their portfolios, you don’t find a single worthy photograph. Artie Morris calls them “internet experts” because sitting on a chair and talking about gear is much easier than going out and actually making photos. As I mentioned in the article, my personal advice is to know your gear well but then go out there and explore!
best,
Thank you for sharing your amazing images. Some of the best BIF I have seen.
I enjoyed viewing and reading about your Burrowing Owls photos, but my comments were intended for your entire website.
Absolutely breathtaking pictures , I thank you for sharing them and the knowledge given , I can’t wait to get out and try your techniques . Your blog is straight forward with how to do tips without being intimidating, great job.
Steve
Ari it is really great the way you unselfishly share your knowledge. Your images set the standard for us to achieve. Do you ever pre-sharpen in Camera Raw before you open in Photoshop?
Peace
Greg
Hi Greg,
Thanks for your comment. I use Canon DPP for my RAW conversion, I use RAW sharpness=3 that is calculated during conversion but I don’t do other sharpening before I re-size for final presentation
best
Ari, your photos are breathtaking, a perfect confluence of top-quality equipment and highly developed skills, not to mention artistic sensibility.
Arash
I want to thank you for sharing your time and knowledge. Your work is truly inspiring and full of art, also as you state, it is a combination of gear, skills and vision.
Take care.
arash, is this work flow correct; ?
Raw file processing if needed and then crop the Raw file and make a Tiff file and on that Tiff file i do noise reduction
Then i resize it to a smaller Tiff file (that have the same size as the later JPG file) and do sharping on that smaller Tiff file
Then i will convert it to the final JPG .
gr
erik
Hi Erik,
I think you are refering to post processing. if so yes, this sounds right.
best