Focus micro adjustment, is it always needed?
One of the technical challenges in bird photography is making sharp photographs at long focal lengths. Many photographers often complain about the lack of sharpness in their RAW capture. There are many factors that affect critical sharpness at focal lengths longer than 500mm, accurate focus is one of them. Because of the various tolerances in manufacturing, there might be a small residual offset in the focus mechanism of DSLR cameras. In the past, photographers needed to send their camera and lens to the manufacturer to calibrate the focus system for such offset. Starting from early 2010, Canon introduced AF micro-adjustment, this feature enables photographers to calibrate their camera body and lenses at home. Back then, I wrote an article explaining how to do micro-adjustment using the tethered USB method. Since then a number of companies have introduced micro-adjsument solutions including a target and a software that automates the process. Some folks are even willing to pay a third party to micro-adjust their gear. There are many discussions about the process of micro-adjustment on various internet forums. However, one question that is often overlooked is whether a lens/camera actually needs micro-adjustment at first place. In fact, most of the time what is really operator error is attributed to focus micro-adjustment. As a result, many users do not see any improvement in their field results even after calibrating their gear several times, and sometimes with different methods. In this short article I will point out some common issues that lead to soft images but cannot be fixed with micro-adjustment.
shutter speed/support: Long lenses need fast shutter speed and a steady platform. When pixel-level sharpness is a concern, the old 1/focal length rule does not apply. It is important to note that photos that are soft form the lack of shutter speed do not necessarily show a motion blur pattern. Motion blur is only evident at very slow shutter speeds, at moderately slow speeds, the resulting softness is visually indistinguishable from that of a photo with incorrect focus. Below is an example where I intentionally reduced shutter speed to produce a soft file while hand holding my EF 600mm f/4 IS II. By increasing the shutter speed and raising the ISO, image became tack sharp. I got similar results when supporting my lens with a mono-pod (which I would not recommend for bird photography).
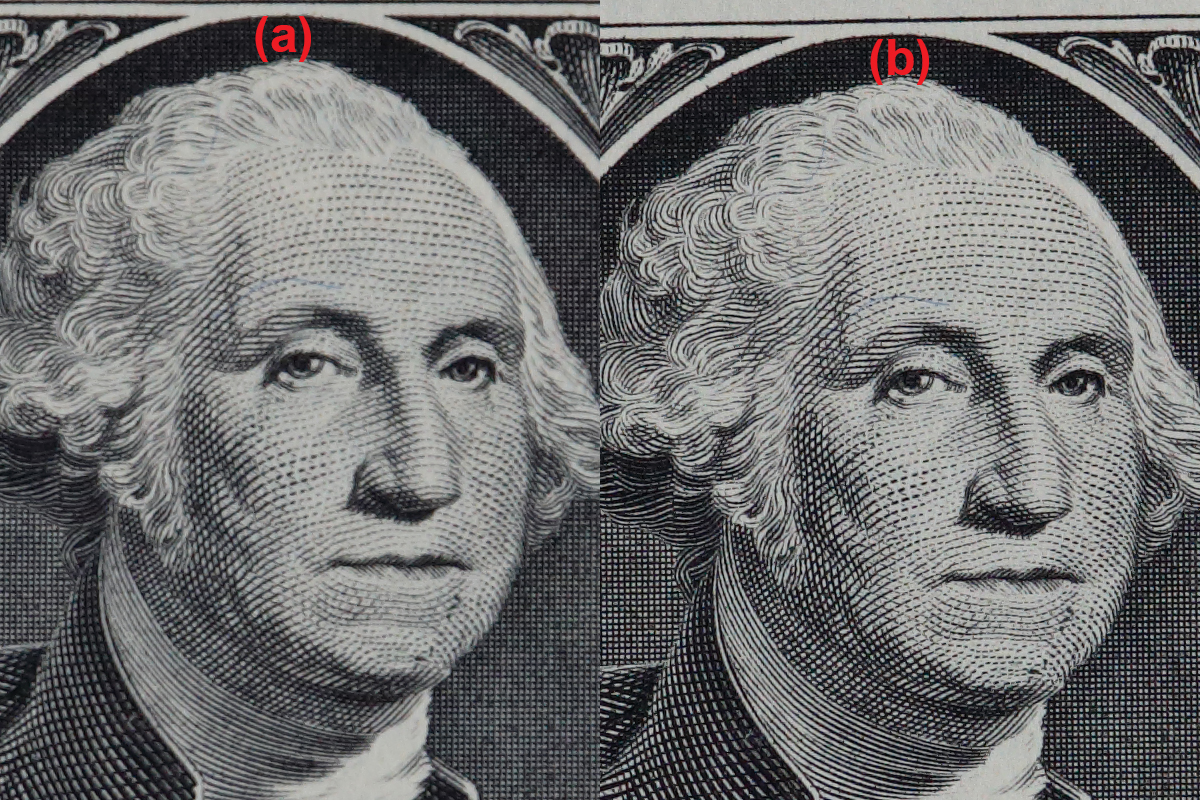
100% crop from RAW. The Dollar bill was photographed with EOS 1D-X and Ef 600mm f/4 IS II plus extender 1.4X III. f/5.6 at (a) 1/125sec, ISO 400 (b) 1/1000sec, ISO 3200. Note the softness as a result of the slow shutter speed. Also note that there is no obvious motion blur pattern visible. Click on the image to expand.
A steady platform means either good hand holding technique or a steady tripod with a quality gimbal head. Remember that subject movement can also cause motion softness. A flying bird obviously needs a fast shutter speed. Perched birds can sometimes be deceiving as they look stationery from a distance, while up close, they are making all kinds of small sudden movements that can cause softness at slow shutter speeds.
When hand holding the EF 600mm f/4 IS II for flight shots, I prefer to shoot at 1/3200 sec. In low light, I sometimes drop my shutter speed to 1/2500sec but that’s only when I absolutely need to. For perched birds I like to stay above 1/1000sec although I have made sharp files with shutter speeds as slow as 1/250sec. It is difficult to specify a strict shutter speed limit for obtaining sharp files as every photographer is different in their technique (and strength when hand holding), but the key message is to try to use the fastest shutter speed that you can. Don’t hesitate using higher ISO settings in your camera or opening up the aperture. A sharp photo that is a bit grainy is far better than a soft photo with less noise, the latter cannot be salvaged while the former can be corrected with post processing.
Atmospheric refraction: When using long lenses, sharpness may suffer from atmospheric dispersion effects. Pockets of cool or hot air between the subject and the lens have a different refractive index than the surrounding environment. The refraction of light when it travels trough these pockets causes photos to look hazy. This can happen even when the temperature is not high, on a cloudy day, or even on a very cold day. Thin water vapor or dust have the same effect. Sometimes the heat shimmers are so strong that it is possible to see them in the viewfinder but they are invisible to the naked eye most of the time. Unfortunately it is not possible to overcome the heat refraction, the only solution is to wait until the air temperature stabilizes. Shimmers are stronger in late morning when the ground starts to warm up and in early afternoon. It is less of an issue in early morning and late evening. The example below shows the effect of heat shimmers on an overcast day when temperature was in the high 50’s. The sequence of 10 frames all exhibit the same softness.
However after a few minutes a breeze cleared the air and the images made from the same point became sharp.
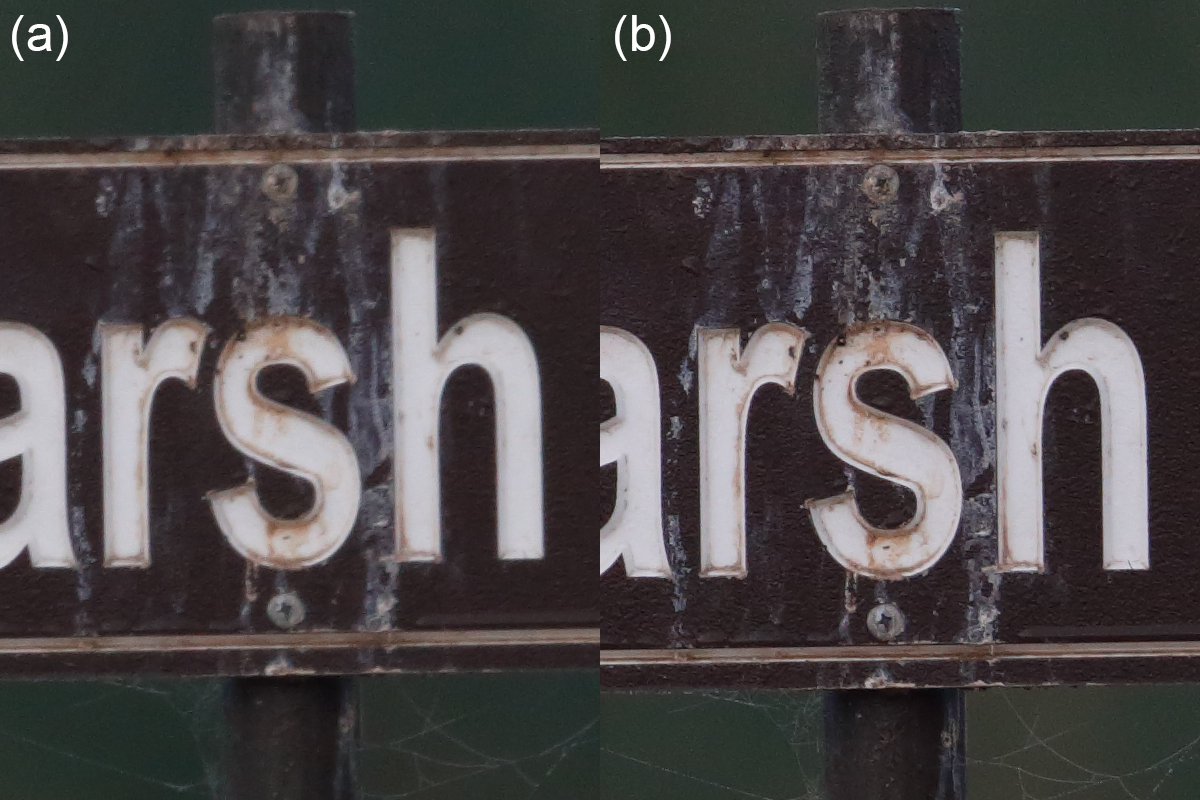
100% crop from RAW. (a) Image affected by heat refraction (b) same image after a breeze a few minutes later. Both images made from the same position with the EOS 1D-X and EF 600mm F/4 IS II plus Extender 1.4X III. ISO 2000. f/5.6 at 1/12500sec. Click on the image to expand.
Sometimes the focus will show hunting in presence of heat shimmers as contrast changes with moving shimmers. If your camera is on a tripod, you can use live view with high magnification to check for the heat refraction. With strong shimmers present, the image will appear to be slightly wobbling and remain hazy even if you try to manually adjust the focus.
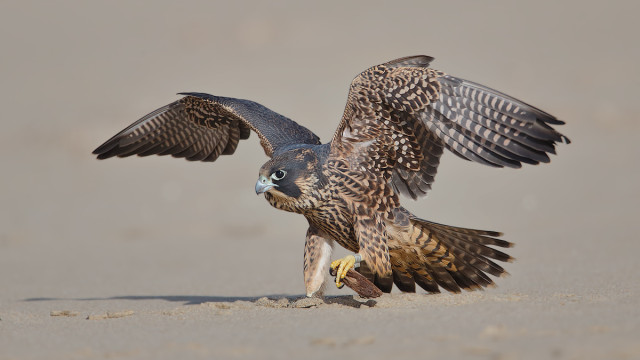
This video shows the strong heat shimmers at the beach despite cool (55F) and windy conditions. Subject was a juvenile Peregrine Falcon next to a kill.
Here is what a photograph would look like under these conditions, many folks might mistake this for focus miss-calibration.

Peregrine Falcon photographed in presence of atmospheric refraction. EOS 1D-X EF 600mm f/5.6 IS II, Extender 1.4X III. ISO 640, 1/3200sec at f/5.6. hand held. Notice the lack of contrast.
An hour later, the same camera and lens produced tack sharp images when the sun was lower in the sky.
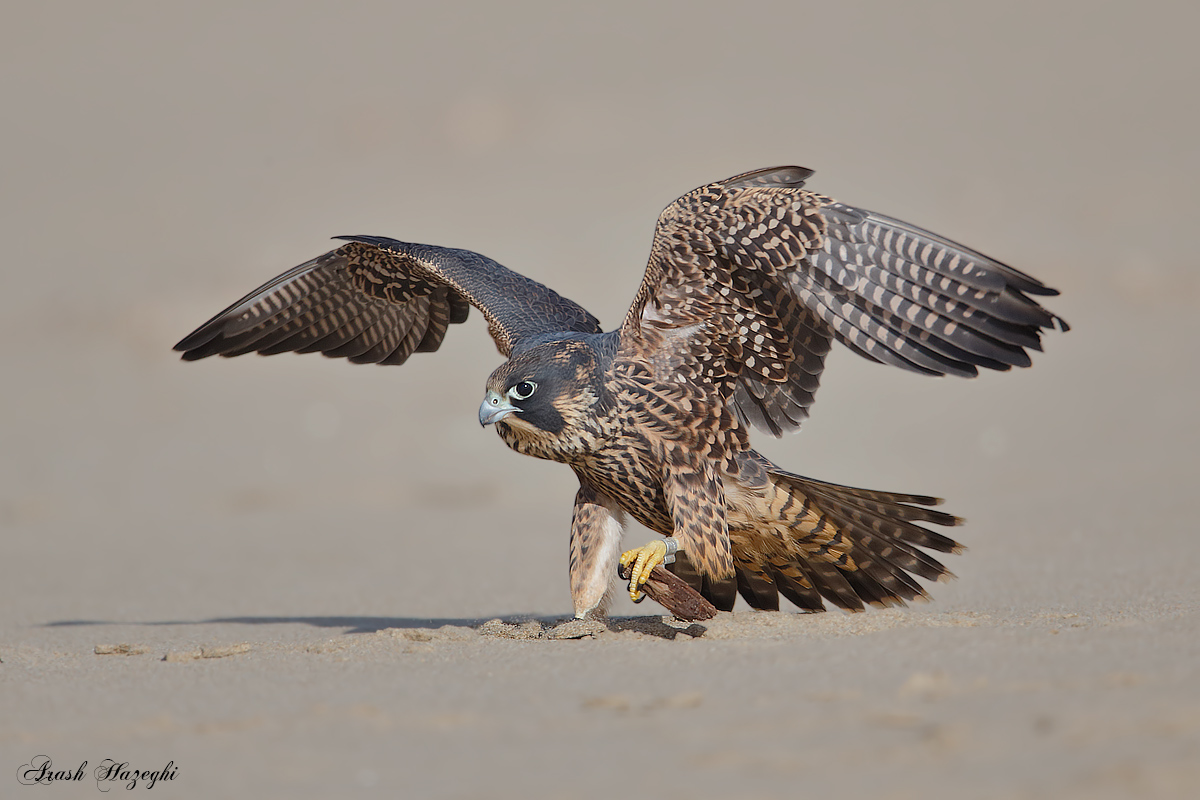
Juvenile Peregrine Falcon. EOS 1D-X, EF 600mm f/4 IS II plus Extender 1.4X III. ISO 1600. 1/3200sec at f/5.6. Hand held. Click to expand.
AI-servo and moving subjects
If you are getting soft frames when shooting moving subjects such as birds in flight, micro-adjustment is unlikely to help you. Micro-adjustment is for making tiny adjustments in the position of the focus plane in order to achieve perfect sharpness for static subjects, especially when DOF is shallow. During a flight sequence, the exact position of the focus plane will depend on many parameters, most of which are out of the photographer’s control. Critical focus may shift from the head to the belly as the bird drifts off center, or to the near wing during a down stroke. The best approach when tracking BIF is to keep the bird centered in the frame and rely on DOF to get the head sharp. The most attractive flight shots are usually the frames with the bird banking parallel to the photographer, or at least with the wings in full up or down position. In these positions, with most of the wing surface parallel to the back of the camera, it is possible to get most of the bird sharp even when working with long focal lengths at close range. The image below (almost a full frame) is a good example.
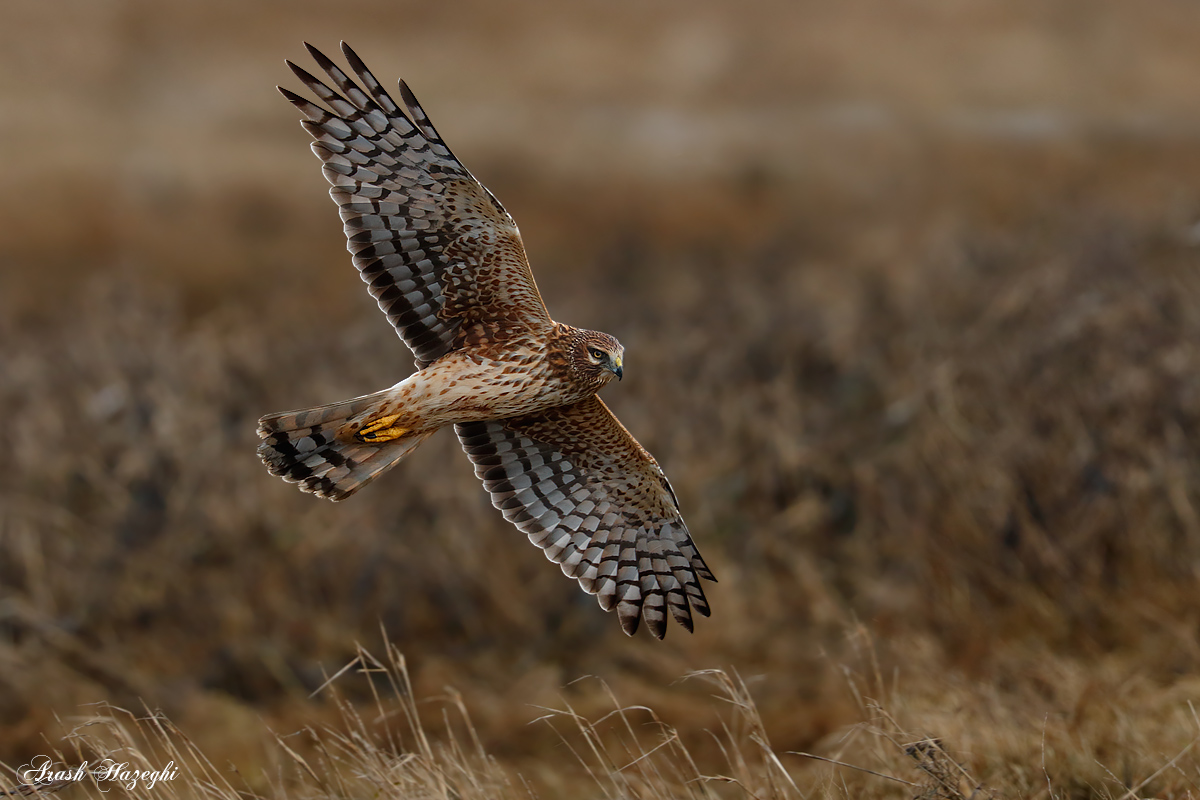
Female Northern Harrier flight in habitat. Shot with EOS 1D-X and EF 300mm f/2.8 II plus Extender 2X III. ISO 2000. f/5.6 at 1/2000sec. Hand held. Click on the image to expand
So it is very difficult, if not impossible, to control the precise positioning of the focus plain when shooting birds in flight. In addition to that, there is always a tolerance in the AI-servo system. It depends on the camera body and the lens used. The pro bodies such as the 1D cameras tend to have a tighter tolerance than the consumer models such as the 7D series. Nevertheless, there is always a non-zero tolerance which will result in small shot-to-shot variation in AF when tracking an erratic moving subject. This variation is usually comparable to a few units on the micro-adjustment scale. So a micro-adjustment setting of -3 or +4 is somewhat meaningless when you factor in all the variables and the AI servo tolerance when shooting birds in flight. The truth is that the majority of soft flight shots are a result of operator error, poor atmospheric conditions or both as explained earlier.
In conclusion micro-adjustment is for fixing a constant, perfectly repeatable and consistent back or front focus problem when shooting a static subject. Unless the focus offset is too large, micro-adjust is unlikely to help you with soft/hazy frames during AI-servo tracking of a bird in flight. Before spending your time (and money) in calibrating your gear, first make sure you rule out the issues mentioned above and work on your technique.
Hi Arash,
Great article! All details are well covered and explained. Not so important as above issues but to complete the topics I would add the impact of improper IS mode usage too.
Cheers,
Miro
Thanks Miro, I will soon add that too
Best
Thanks for this article, very informative. Explained in a way easy to understand and grasp. Next time in the field I shall put the information to use.
Excellent article Arash. In my experience (many bodies and long lenses), I’ve only had to micro adjust a single lens-camera combination (1Dx + 300 mm f/2.8 II). Operator error and heat shimmer are the usual culprits when focus problems occur. But it’s nice to have the ability to micro adjust without having to send your body and lens back to the camera manufacturer.
Hi Arash,
The phenomenon you describe in your last paragraph hits the nail on the head for my 7D2 + 500II + 2.0xIII. I have done micro focus adjust on that combination, but it changes value every single time I perform an MFA test. I have sent the camera off to Canon to see what they do. I routinely shoot @ 1000mm F8 on the 5D3 handheld with no MFA needed.
Great article, and thanks for sharing your technique.
Thanks for this very useful article. I have variable results with my BIF shots at 400mm (f/5.6L, on a 60D) and have always presumed that it was my technique at fault, and that I just had good days and bad days. Well, yes, but now you remind me about “transparency” and “seeing” effects of water vapor, dust, heat Schlieren – not just for astronomy and sun-baked highways.
Excellent stuff. I learned a ton. Please share your thoughts on low light/low contrast situations where AF does not have a chance to track accurately such as when the AF point is on the black breast of a vulture on a cloudy day. thanks, artie
Hi Artie,
Thanks for your comment. On a cloudy day there is not enough contrast on the black breast of a vulture, the focus can even give a false lock in a situation like this resulting in a totally OOF file. It doesn’t indicate a malfunction or camera problem.
Hope you had a good flight back home
Thank you for this information. Last weekend, I was practicing bif photography on mallards at the local pond. The light was poor heavy cloud cover, the water is dark and the mallard heads are of course dark. Most of my images looked muddled for lack of a better term even at ISO 640 with my 5d iii. This has never really happened to me before. The images were sharp but there seemed to be noise and lack of detail. Later in the morning, I photographed songbirds in more direct but soft light and the images were sharp, detailed, and noise free even at ISO 1250. Have you ever experienced the type of results that I mention aboce. Thanks
steve
To clarify; in my comment I used the word sharp should have said in focus but they were not sharp due to the noise and lack of detail (muddled appearance).
Hi Steve,
Without seeing the files it is difficult to make a call why they came out soft.
Hi,
i often have focus issues with the 7DII, 100-400 IS II with an without Konverter. Sometimes i refokus a few times, use different AF-Fields, but ic get no sharp images. I am not shure if it is my fault…but when i use another body like the 5DIII it works…here you see an example with Konverter….
http://www.naturfotografie-kruse.de/images/Konverter.jpg
If the 5D3 works under the same conditions the 7D2 is defective, I would return it or send to Canon for repair.
Looking at Helmut’s images, I’d say neither one was critically sharp and the one on the right is totally out of focus. I can’t tell if there is simple blur or motion blur without a 100% view and an image of the entire frame.
Don’t forget that the 7dii has a 1.6x magnification factor compared to the full-frame 5diii, so there is that additional component affecting sharpness. Magnifying an image also magnifies it’s defects.
Further, there are too many variables when examining an image from the field, rather than one done in best controlled conditions. I’m sure the birds were moving at least a little; maybe there was some wind also causing movement of the subjects. Was the camera hand-held? It looks like full-sun, was there heat distortion? What was the shutter speed?
In order to truly test the accuracy of focus and image quality, set up test of a stable subject indoors with a firmly mounted camera and use either a cable/remote release and mirror lock-up or self-timer so your hand is not on the camera during exposure. If you get the same blurry images that way, there is something wrong with the hardware, otherwise it is field conditions or your technique.
I also agree with Frank, looks like none came out sharp here. He has some good suggestions for you yo try (controlled test)
If you want to do MA, you do need to use a good tripod with a stationary subject etc. I recommend using the tethered technique explained on my site.
Hi Ari,
I would to know about autofocus that you use,
if you use Spot or Expand autofocus ?
Thanks
Arie.
Hi Arie,
I don’t use spot focus. I use expansion mode. the size of the expansion depends on the subject, background and distance. I cover all of the details in my birds in flight photography guide.
Best
Hi Ari,
Okay, thanks
Regards
Arie.
I bought a 400mm DO Canon lens, which produces sharp images when used alone on my 77D. However, when I mount a 1.4X, the autofocus consistently is in error, focusing slightly behind the subject. I’ve used the same 1.4X with other primes, with excellent results. Any ideas? Currently I can’t use the 1.4X with this lens, a shame since that is why I bought it. Thanks!
Hi Gary it’s the camera body, unfortunately the AF system for Canon cameras below 5D series is not very consistent/accurate. I suggest you upgrade your body when you have so much invested in the lens, the body is holding it back. You can also try micro-adjusting AF, it may help but I am not sure if 77D has this feature.
Hello Ari, my current equipment is Nikon D5 and Afs vr 600 mm F4 and I usually mount the Tc EII 1.4x and I notice that it is very prone to be degraded by atmospheric refraction. Before I used the same lens and tc with D4s and I did not notice that I was so sensitive to this topic. It may be possible that the smaller the size of the photosite, the greater the incidence of atmospheric refraction? I hope you understand the question, using google translator.
Hi Nino, I have the new Nikon 600mm f/4 E, I don’t have much experience with the older Nikon lenses but when I tried the old 500 VR I also fund that it wasn’t as sharp as Canon lenses and it really struggled with the TC. The pixel size difference between D4 and D5 is minute and does not affect sharpness.
best
Thanks Ari for answering. I had 500 mm too but I had almost no problems with the refraction. Very interesting your work. Greetings from Argentina and thanks
Ari, I have used your micro adjustment technique on my 70D, and mostly my prime canon 300 f4 and 500 f4 with and without 1.4 tc. I prefer your method over the others I have tried, dot tune has some interest.
My question is I just purchased the Canon 5D M4, and love it, but want to micro adjust my lenses on it. In your instructions you indicated ” Make sure AF is in phase detect mode (quick mode AF) that uses camera’s main AF sensor “: I don;t have a quick mode AF on this camera, do you have a work around for this? The only choices I see are “face tracking”, FlexiZoneAF-Multi” and FlexiZone-Single:.
Your response will be greatly appreciated, as I am sure you are busy taking photos 🙂
Hi Randy, you cannot focus with mirror up with the 5D4. This feature has been eliminated in the new bodies.
This is an excellent article for a newbie like me to bird and BIF photography. I was referred to this link by FM forum member Arbitrage. A great set of pictures and great explanation.
[…] background are all signs of the heat shimmers. I originally wrote about heat shimmers on my blog about a decade ago. Needless to say today’s high resolution sensors, such as the 50-mega pixel sensors in the […]