Sony A9 II for BIF, initial impressions and comparison vs. Nikon/Canon
For the past couple of months I have been shooting with the Sony A9 II mirror-less interchangeable lens camera (MILC). I have been receiving many requests to compare the Sony with the pro DSRL’s given my prior experience with both Nikon D5 and Canon 1D series camera and 600mm lenses. While I have not been able to do extensive photography due to the COVID-19 pandemic I have shot enough with the Sony to form an opinion of the camera compared to my current Nikon and previous Canon setups.
I will cover the differences in ergonomics, menu system, image quality etc. in a detailed review of the A9 II later. Here I am only going to talk about the fundamental difference in focus tracking for bird in flight subjects.
Lens first
It is meaningless to talk about birds in flight and serious bird photography in general without looking at super-telephoto lenses first, in particular the 600mm f/4 lenses, aka “the Big Six”, a bird photographer’s primary weapon of choice. Without a super-telephoto lens, a camera system falls short for serious BIF work in my view. The Sony 600mm f/4 GM (and the Canon 600mm f/4 MK III) are both about 2lbs lighter than the Nikon 600mm f/4E FL. While I can hand hold the Nikon all day long and hike with it too, a lighter lens is always better for more accurate tracking and placement of the bird. It causes less fatigue and it’s also easier to handle from a vehicle. The Sony lens is so light I can grab it by the hood and due to the reduced lever action, I can precisely pan with the subject. Something that can’t be done with the heavier lens.
All three bare lenses are tack sharp on any camera and equally tack sharp with the 1.4X TC. There is no point in comparing them in this regard. However there are suddenly significant differences when it comes to the 2X TC. The Sony 2X TC is not just tack sharp but it is also very thin and light. It doesn’t add much weight to the rig or change the center of gravity of the rig. In comparison the Canon 2X III is very thick and somewhat heavier, it will extend the center of gravity further from the camera body. The Canon 2X III is reasonably sharp but it is not as tack sharp as the Sony 2X which is a newer design. The Canon 2X TC III can show a bit fringing (chromatic aberration) when used with Canon’s 600mm f/4, especially when shooting far subjects this combo is used for. The CA can shows in some subjects such as terns, white-tailed kites, skimmers with low contrast white feathers, but overall it is more than usable. The Sony 2X TC on the other hand is almost perfect. On top of that Canon’s AF at f/8 is a hit and miss and not something that can be used in all conditions for BIF. The Sony, on the other hand, appears to take no hit from the 2X TC in terms of AF (more on this later). In fact 90% of the images I made with the A9 II were with the 600GM + 2X TC (1200mm). The Sony AF makes it incredibly easy to shoot at 1200mm to the point that you don’t think about it. The 2X TC can be literally glued to the lens and forgotten.
The Nikon 2X TC is unfortunately outright soft, it shows strong fringing at pixel level and its aging optics is no match for the competition. I advise against using it, simply swap the D5 for the D500/D850 when more reach is needed and you will get day and night better results than the 2X on a D5.
because of these factors Sony wins in the optics category, in terms if weight and the maximum reach (1200mm) with full blown AF performance and sharp files. Canon 600 III gets the second place because of weight compared to Nikon.
the table below compares the lenses

A revolution in AF technology, not an evolution
In order to understand the differences between MILC and DSLR cameras we need to explain how the DSLR camera focuses first”
DSLR stands for Digital Single Lens Reflex, basically an old SLR camera with a digital image sensor in place of the film roll plus an LCD monitor and loads of modern electronics. In these cameras a mirror is used to reflect the light incident by the lens towards a prism which then reflects the light towards the viewfinder and the eye. So how does the camera auto focus? There are a few spots on the main mirror (near the center) where the mirror is made transparent by etching of the reflective coating. A fraction of the light goes through these spots. A secondary mirror behind the main mirror is placed at angle to reflect the light towards the base of the camera body. This secondary mirror is called the “sub-mirror“. The sub-mirror is attached to and moves with the main mirror. When the mirror is up for exposure, no light can get to the AF sensor.
The light then passed through a group of small lenses before being reflected by a third fixed mirror at the base of the camera. This mirror bounces the light towards another group of small lenses which will spread it on the AF sensor. The function of the tiny lenses in the light path is to make the optical path between the lens and the AF sensor equal to the path between the lens and the image sensor. So when the image is in focus on the AF sensor, it will also be in sharp focus on the image sensor. This system has essentially been the same since the introduction of Auto Focus (AF) SLR cameras back in late 1970’s in the film days. Although many subtle and evolutionary improvements have been made through the decades, the concept of the system remains unchanged. The system is very complex, has both fixed and moving parts and has to be aligned and calibrated perfectly to the tee. This is part of the manufacturer know how and partially responsible for 6000+ USD price tag of a pro DSLR body. It has been getting the job done, most of the time.
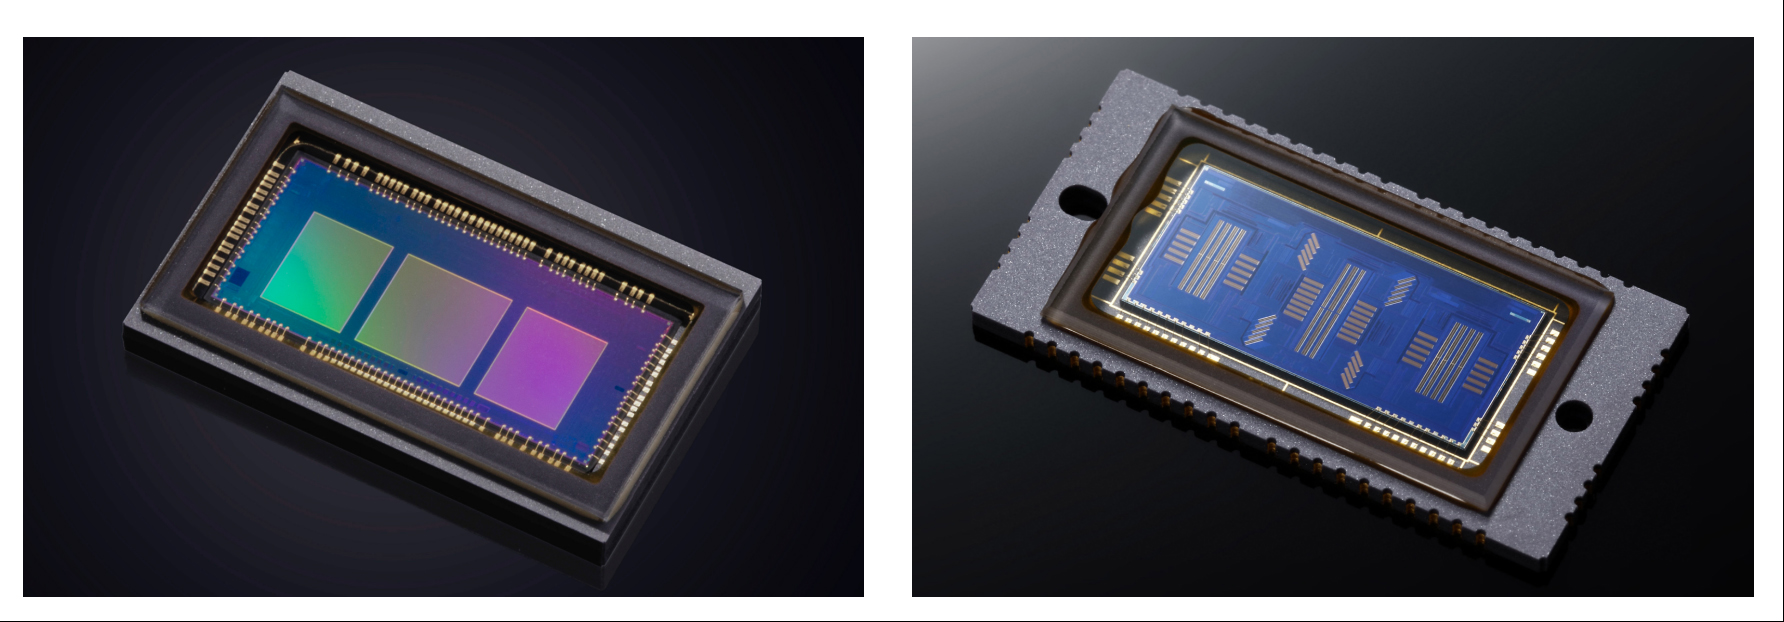
The schematics below (source Canon CPS 1DX Mark II publication) shows the light path to the AF sensor in the Canon 1D X series camera. The 2nd image below shows a cutaway of the the Nikon D4 with the entire AF system in this camera (borrowed from the Digital Camera World)
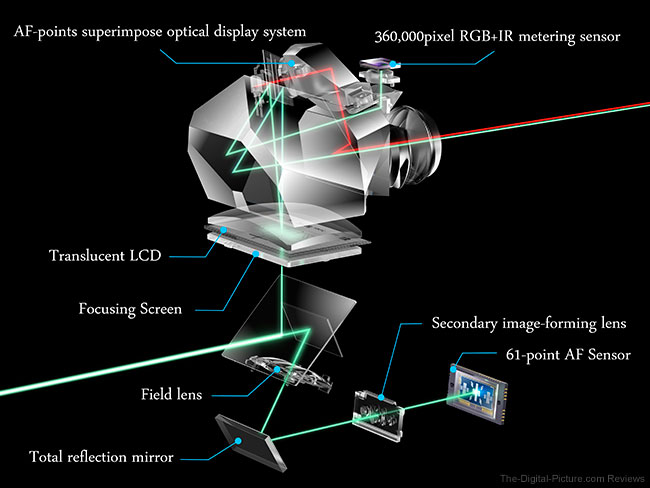
Optical path from the lens to the AF sensor shown for the Canon EOS-1D X MK II. Only a fraction of light is transmitted to the sub-mirror where it is reflected towards the base of the camera body. After bouncing from a 3rd mirror and the image forming lens, the light hits the AF sensor. Source: Canon publication

Cutaway of Nikon D4 showing the entire AF system. Source: https://www.digitalcameraworld.com/
As you can imagine since most of the light has to go to the viewfinder, only a fraction will make it to the AF sensor, projecting a relatively dim circle on the AF sensor. This is why DSLR cameras can only focus with a max. aperture of f/8 or faster and have some limitations when focusing at f/8 or even f/5.6 relative to f/4 or f/2.8. With each stop loss of light the illuminated circle on the AF sensor get dimmer and smaller, although the scene may not appear so dim. It’s remarkably they can still focus at f/8. This is also the reason why the outer focus points become inactive or lose precision at f/8.
The other issue is the AF coverage, the fraction of light that makes it thought the AF system is not able to illuminate a circle large enough to cover the corners of a full-frame image. That’s why the AF sensor can only cover the central part of the image (typically the center 25% area). The image below shows the evolution of the AF sensors since the almost decade-old EOS-1DX and Nikon D4 to the current EOS-1DX III as well as the Nikon D6. As you can see the AF grid’s outer coverage hasn’t really changed much given this fundamental limit.
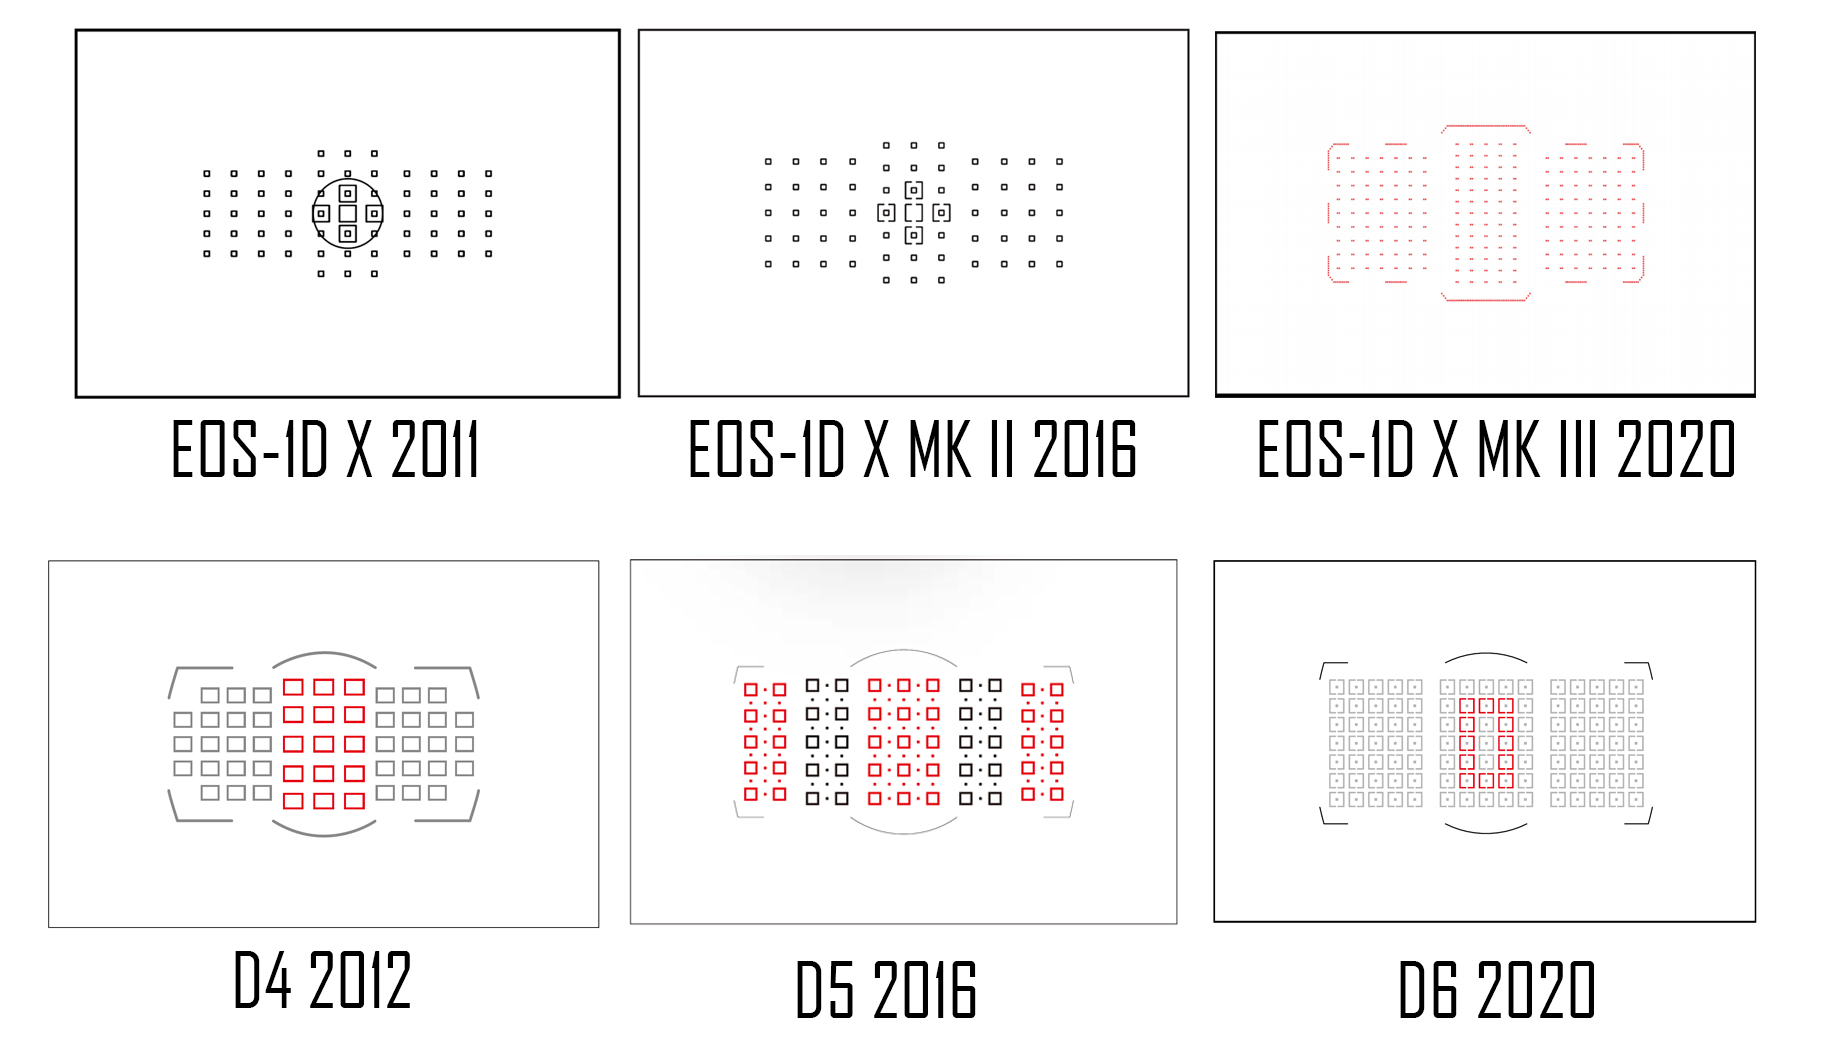
Evolution of DSLR AF sensor in the past decade. The number of points and density has increased, the coverage remains at approx. 25% area of the frame. (clustered at the center)
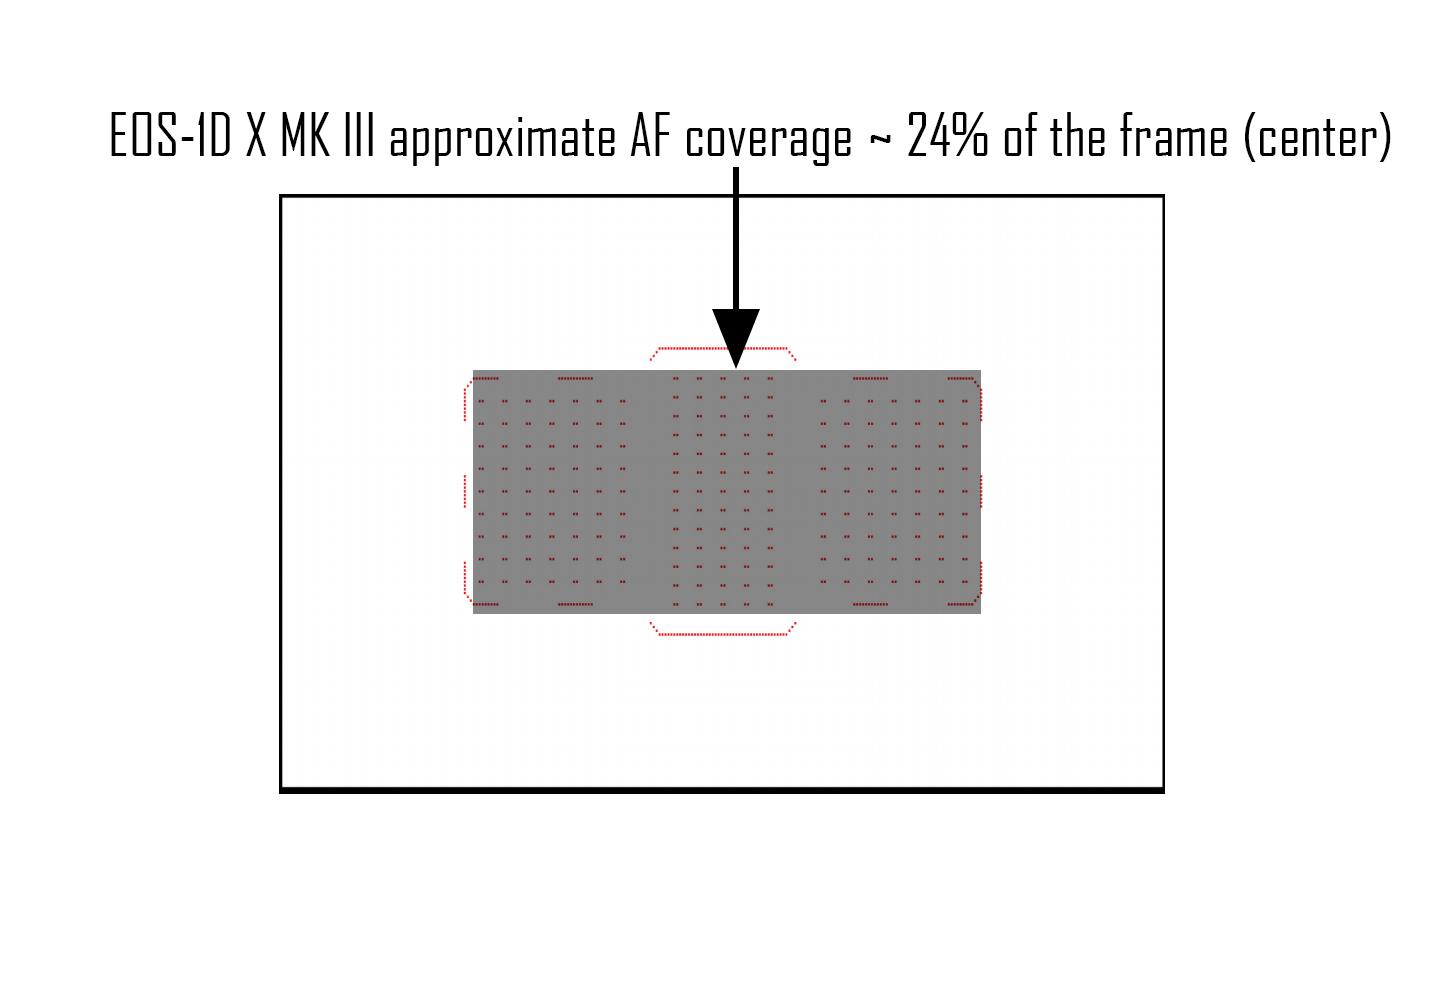
AF coverage for the EOS-1D X Mark III is roughly 24% of the full frame area, i.e. the shaded area divided by the total viewfinder area shown by the black frame.
The MILC cameras on the other hand do not require an AF sub-system. There is no dedicated AF sensor and no optical sub-system associated with it. The main image sensor is used for focusing as well. The advantage of this method is that the AF sensor has all the light projected by the lens available to it at all times. The Sony A9 II can focus all the way down to f/13 and does not show a noticeable hit in AF when attaching a TC to a prime lens. Also the entire area of the image sensor can be used for focus detection so the AF coverage is virtually 100% of the frame.
Initially the MLIC cameras could AF by contrast detection (CD) only. This process is accurate but very slow and causes AF hunting, it is not suitable for action shooting at a high frame rate. But today the sensors perform phase-detect (PD) AF by partially masking the micro-lens on the pixels that are used for the AF system to create the right and left split images. The phase detection is coupled with contrast detection to offer both speed and accuracy.
Another difference is the number of focus points available to the camera for focus detection. As explained above the DSLR AF system has to make due with a much dimmer image therefore the AF sensor needs to have very large pixels to read the contrast. In the past the AF sensors were simple fabricated line sensors as seen in the EOS-1D X Mark II’s AF sensor image below. This meant very few AF sensors (typically about 60) were available. While 60 sensors sounds like many to choose from, it doesn’t have the resolution to do any meaningful pattern recognition by methods of machine learning (ML) or artificial intelligence (AI) despite the claims made by some manufacturers. The camera then had to rely on the RGB metering sensor (which has about 1K pixels) for subject recognition. Subject recognition by RGB (color) obviously does not work for subjects that are small and have similar color as the background. In my Canon and Nikon BIF guides I explain this issue in detail.
The phase-detect AF sensor of 1DX MK III (left) compare to the old 1DX MK II (right). The 1DX MK II used the old line sensor configuration providing only 61 sensors while the new sensor in the 1DX Mark III uses ~6um square pixels providing 199 sensors. The Nikon D5 and D6 sensors are similar to the 1DX MK III but with fewer sensors. Source: Canon
The Nikon Multi-CAM 20K found in the D5, D850 and D500 moved to a square pixel design for the AF sensor back in 2016, multiplying the number of sensors to more than 150. This gave a distinct and measurable advantage to Nikon cameras when it came to tracking BIF against varied backgrounds as I explained in my Nikon D5 review. It provided the best overall AF and tracking experience when shooting BIF and caused many respected bird photographers to move to a Nikon setup. The Canon EOS-1D X Mark III followed this trend increasing the number of focus points to 199, I yet have to try the 1DX III in the field to evaluate how it stacks up against the D5. In the past Canon’s tracking algo’s were notoriously unstable and inconsistent for BIF photography. Throughout a decade of shooting with the 1D series camera I developed a series of techniques and tricks (please see my Canon BIF guide) which were required to tame the camera’s erratic behavior when it came to photographing BIF and improve the percentage of sharp frames.
Nikon’s AF system was a significant improvement for BIF, however the AF technology seems to have plateaued even in Nikon DSLR’s. From the spec’s, Nikon’s new D6 does not look like a major improvement over the D5, which is an excellent body given the fundamental DSLR focusing barriers that I just explained. Strangely the D6 went the opposite way reducing the total number of sensors to just 105 from 153 but the sensor are now larger and have less dead space between them. (shown below). The larger pixels will improve the low-light performance and the smaller gaps reduce chances of losing the subject, yet the sampling resolution is lower.
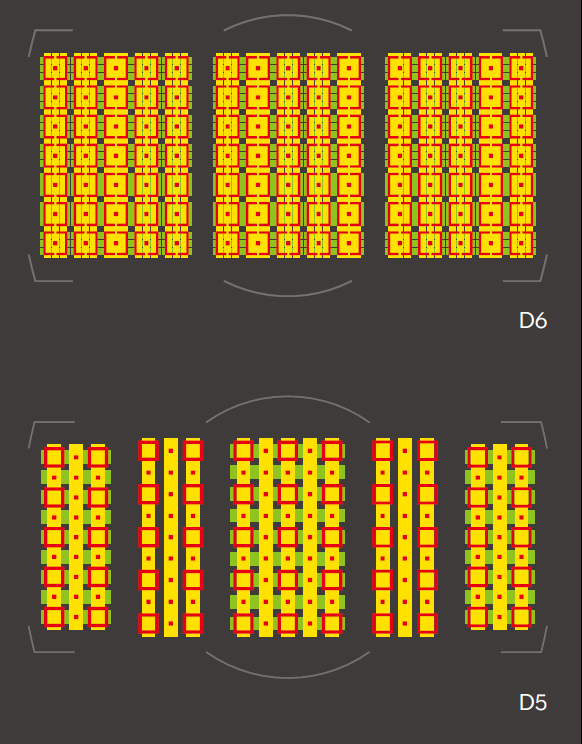
The AF outer coverage has hardly changed between the D5 and the D6. D6 has fewer AF points (105 vs. 153) but each sensor is now larger and some of the inner gaps have been eliminated. This is a modest evolutionary improvement. Source: Nikon
Nevertheless, it is going to be very difficult to do pattern recognition or subject detection with 100-200 pixels. The image below is a typical BIF frame, if we digitize it to just 200 pixels not much is left for the algorithm to work on. in this example, for effective subject recognition at least 1000 pixels are needed. The MILC cameras on the other hand can-in theory-have many thousands of focus points available for subject recognition and tracking.
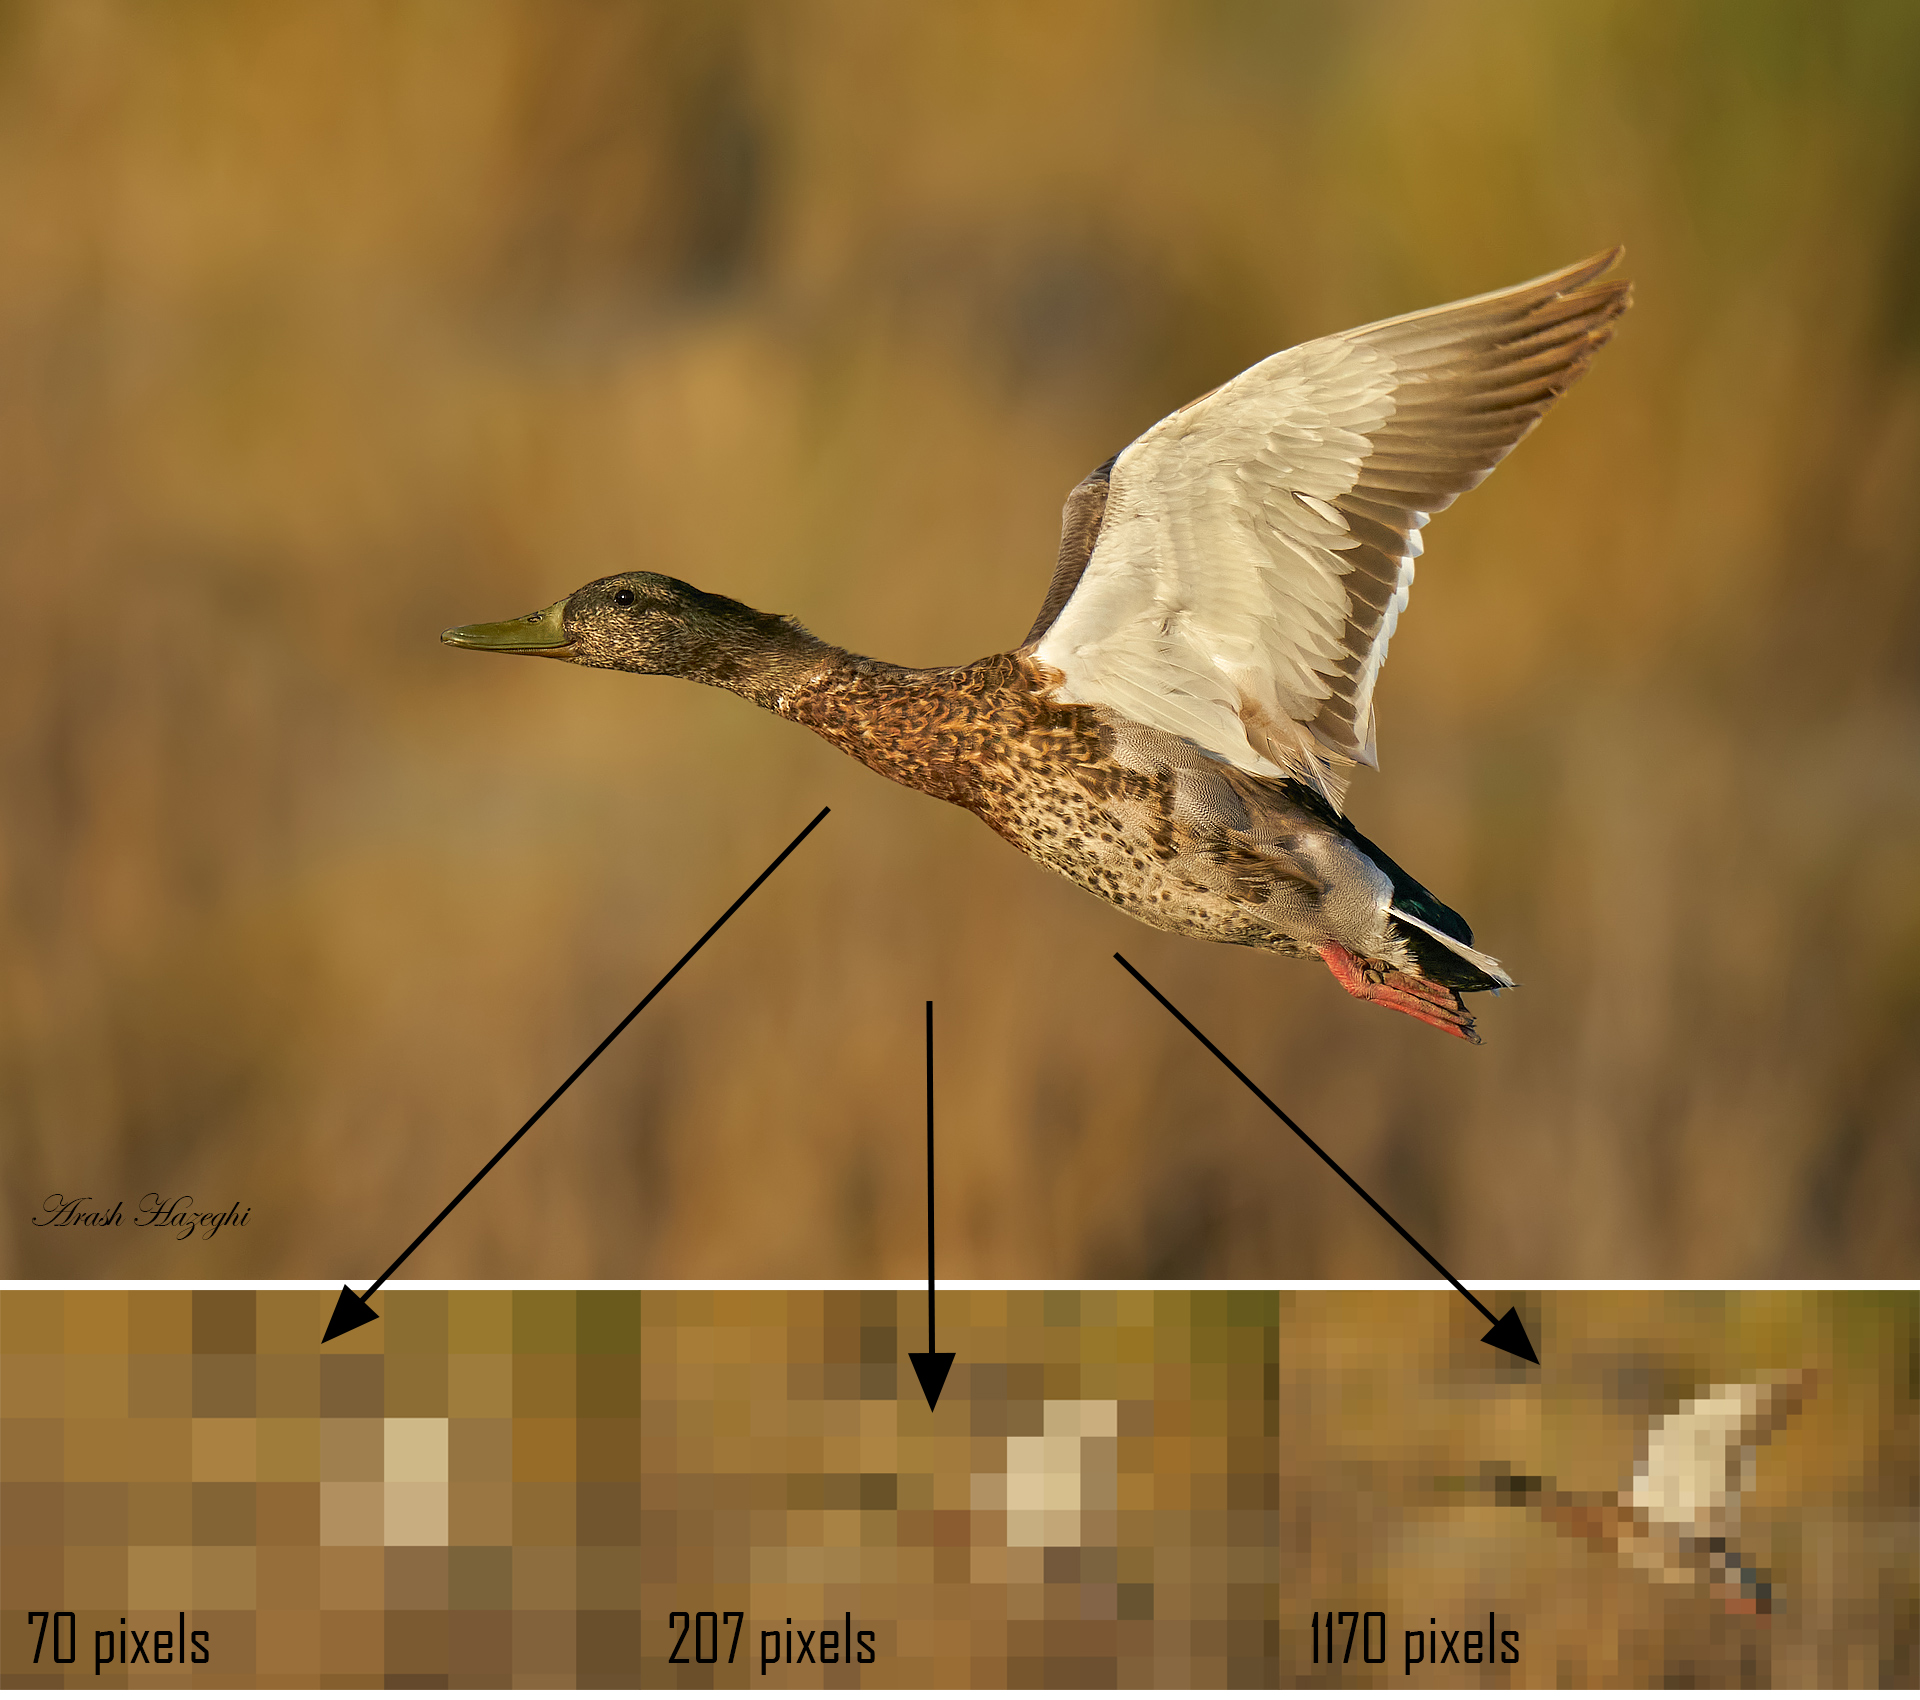
Top: BIF (mallard against similarly colored BG). Bottom: Same image pixelated to simulate 1DX II (~70 AF points), 1DX III (~200 AF points) and Sony A9 (~1170 points). The duck is only discernible in the last image. It is safe to assume BIF subject recognition is simply not possible with the AF sensor alone in DSLR cameras.
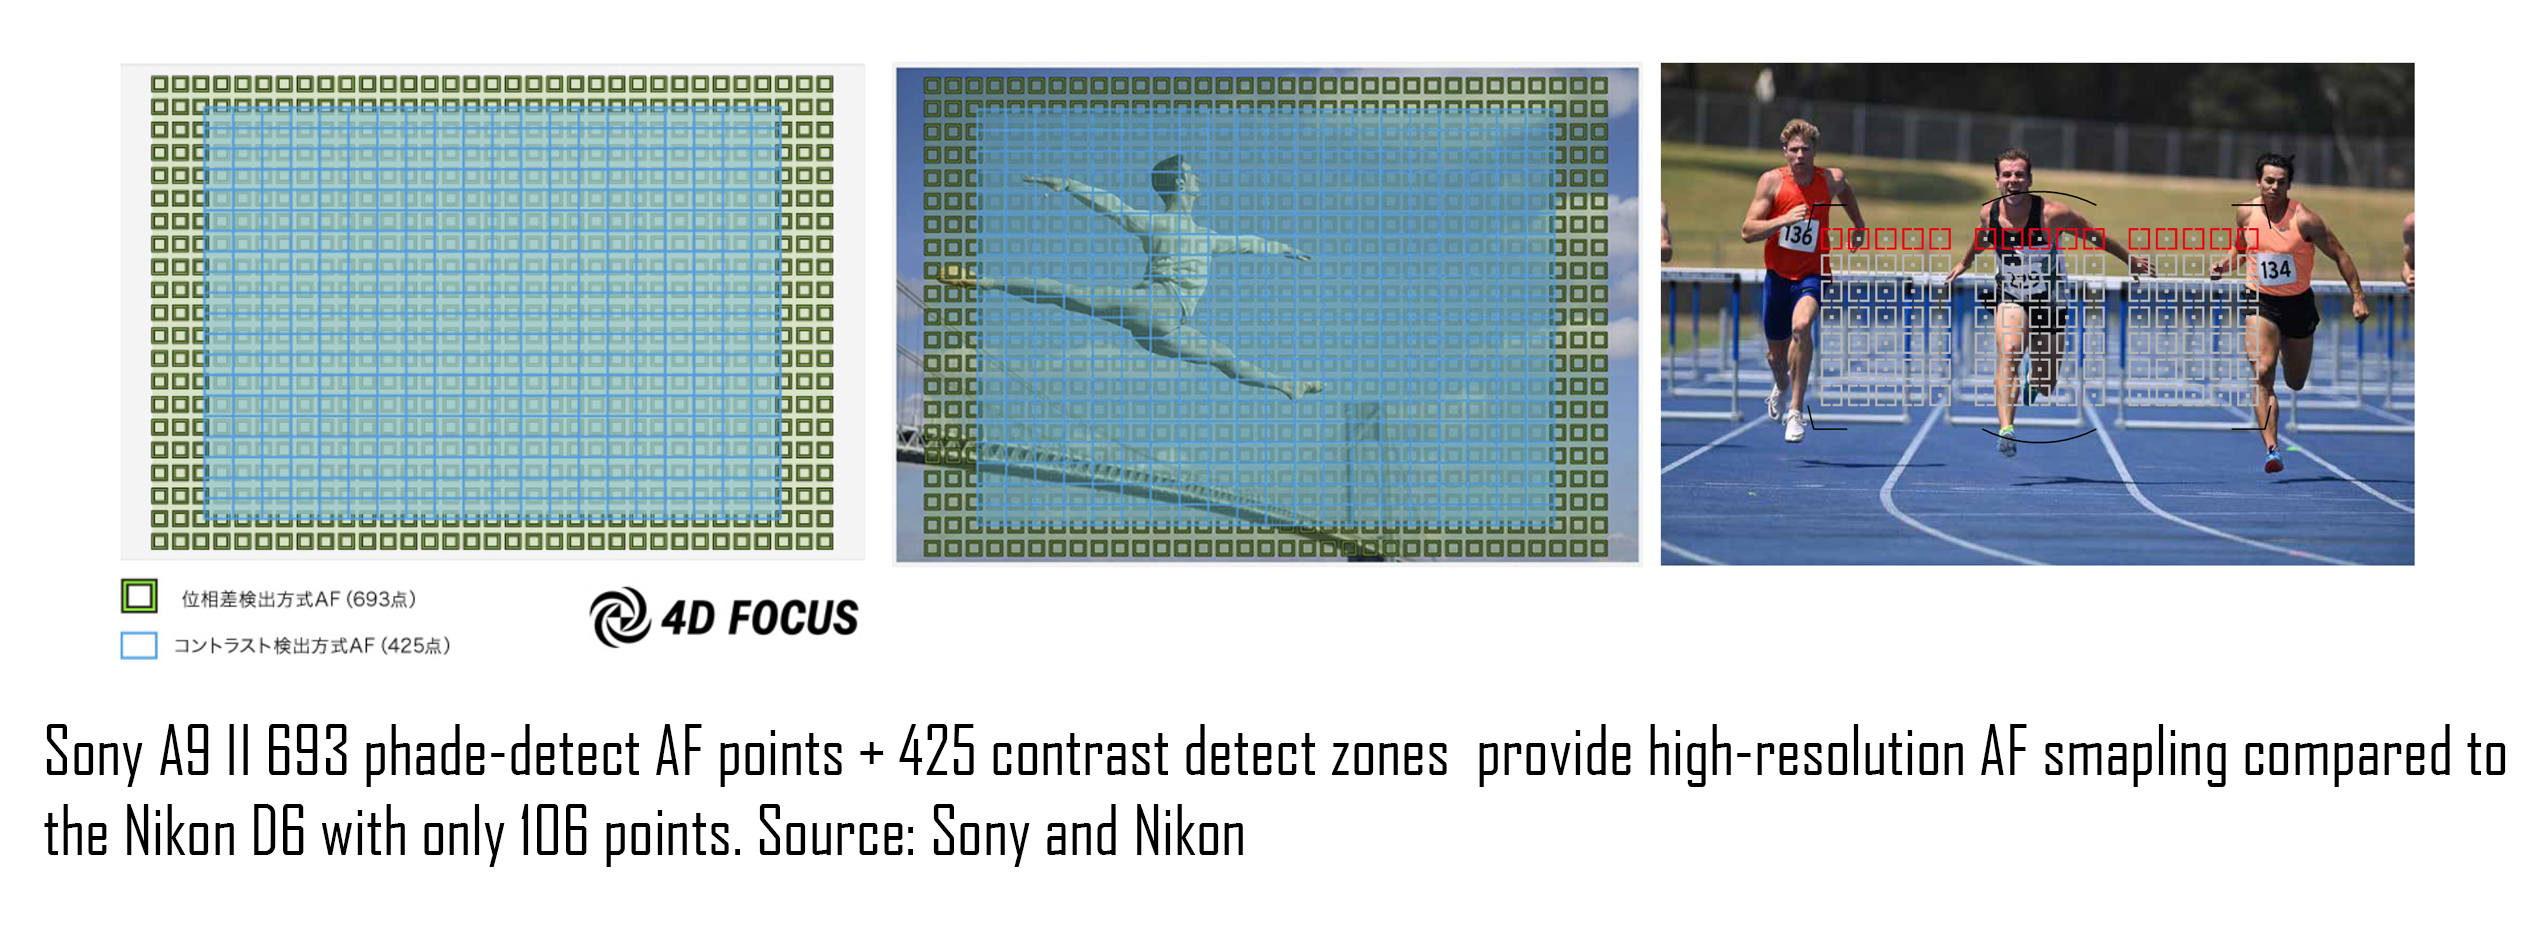
The Sony A9 II has a combination of more than 1100 (693 PD + 425 CD) focus points available to it which eclipses the competition by an order of magnitude . Of course the camera’s CPU must be powerful enough to process all the data in real time and perform AF seamlessly at 20 fps, at the time of writing this article no camera other than the Sony A9 series has the kind of fire power required for real time pattern recognition and subject tracking. Most MILC cameras are actually not there yet, not even close. I expect this to improve with time though. There will be a time when an entry level MILC camera will easily dominate today’s best pro DSLR’s
These fundamental differences make a mature MILC AF system inherently superior for complex and challenging subjects such as BIF against varied BG’s. For many other subjects the stat-of-the-art DSLR AF is already so good it, it cannot be improved much further. The images below are just examples to demonstrate the prowess of the A9 II’s subject tracking system.
Please note: These are straight out of the camera with no sharpening or enhancement applied. You need to click on each image to see it at full size. On a small monitor they may look compressed.
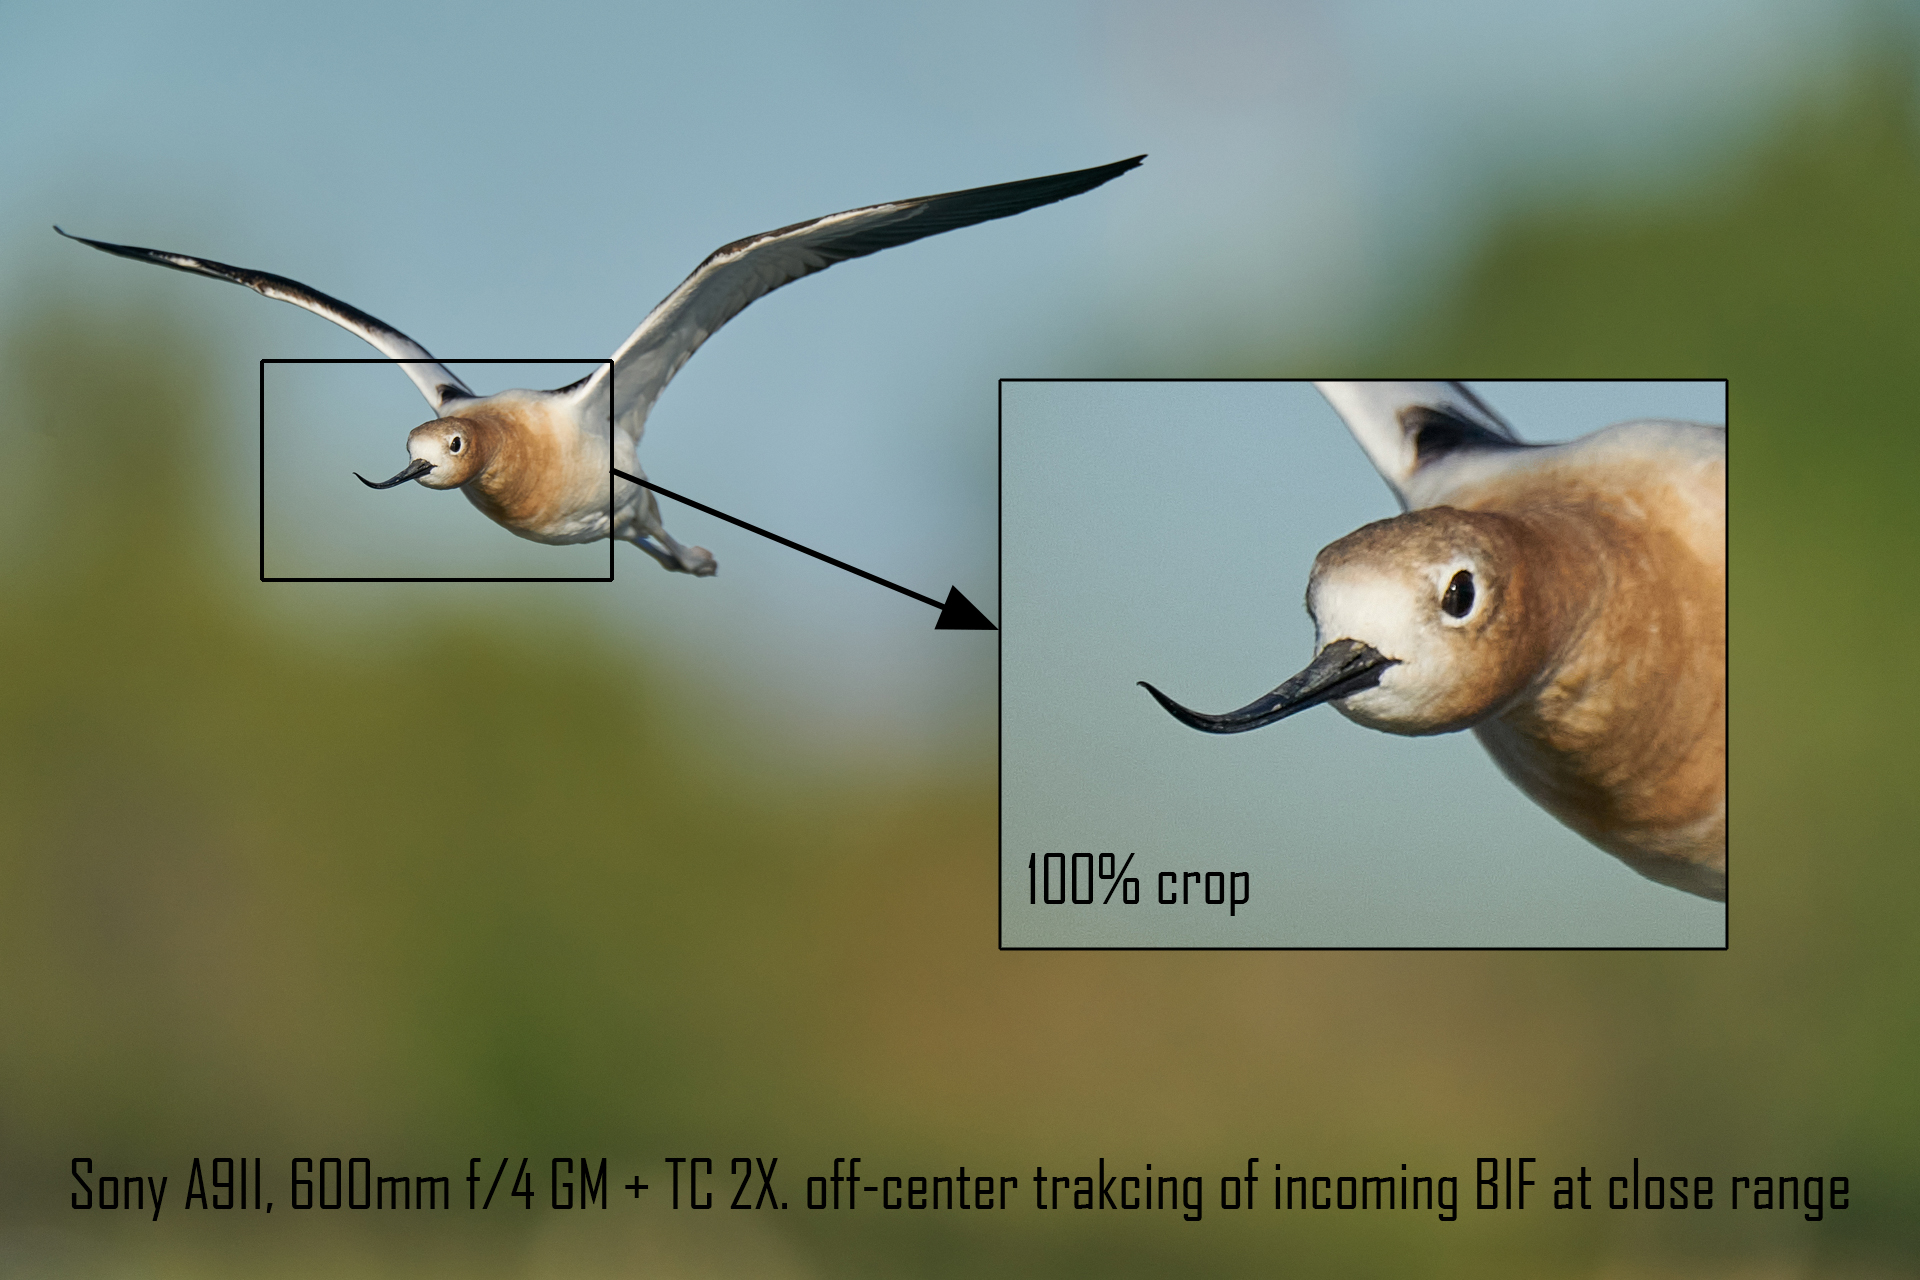
Example of off-center AF tracking with Sony A9 II at close range, 1200mm at f/8. Click on the image to enlarge. the only way to get the off center subject in focus with the D5/1D X cameras is by luck.
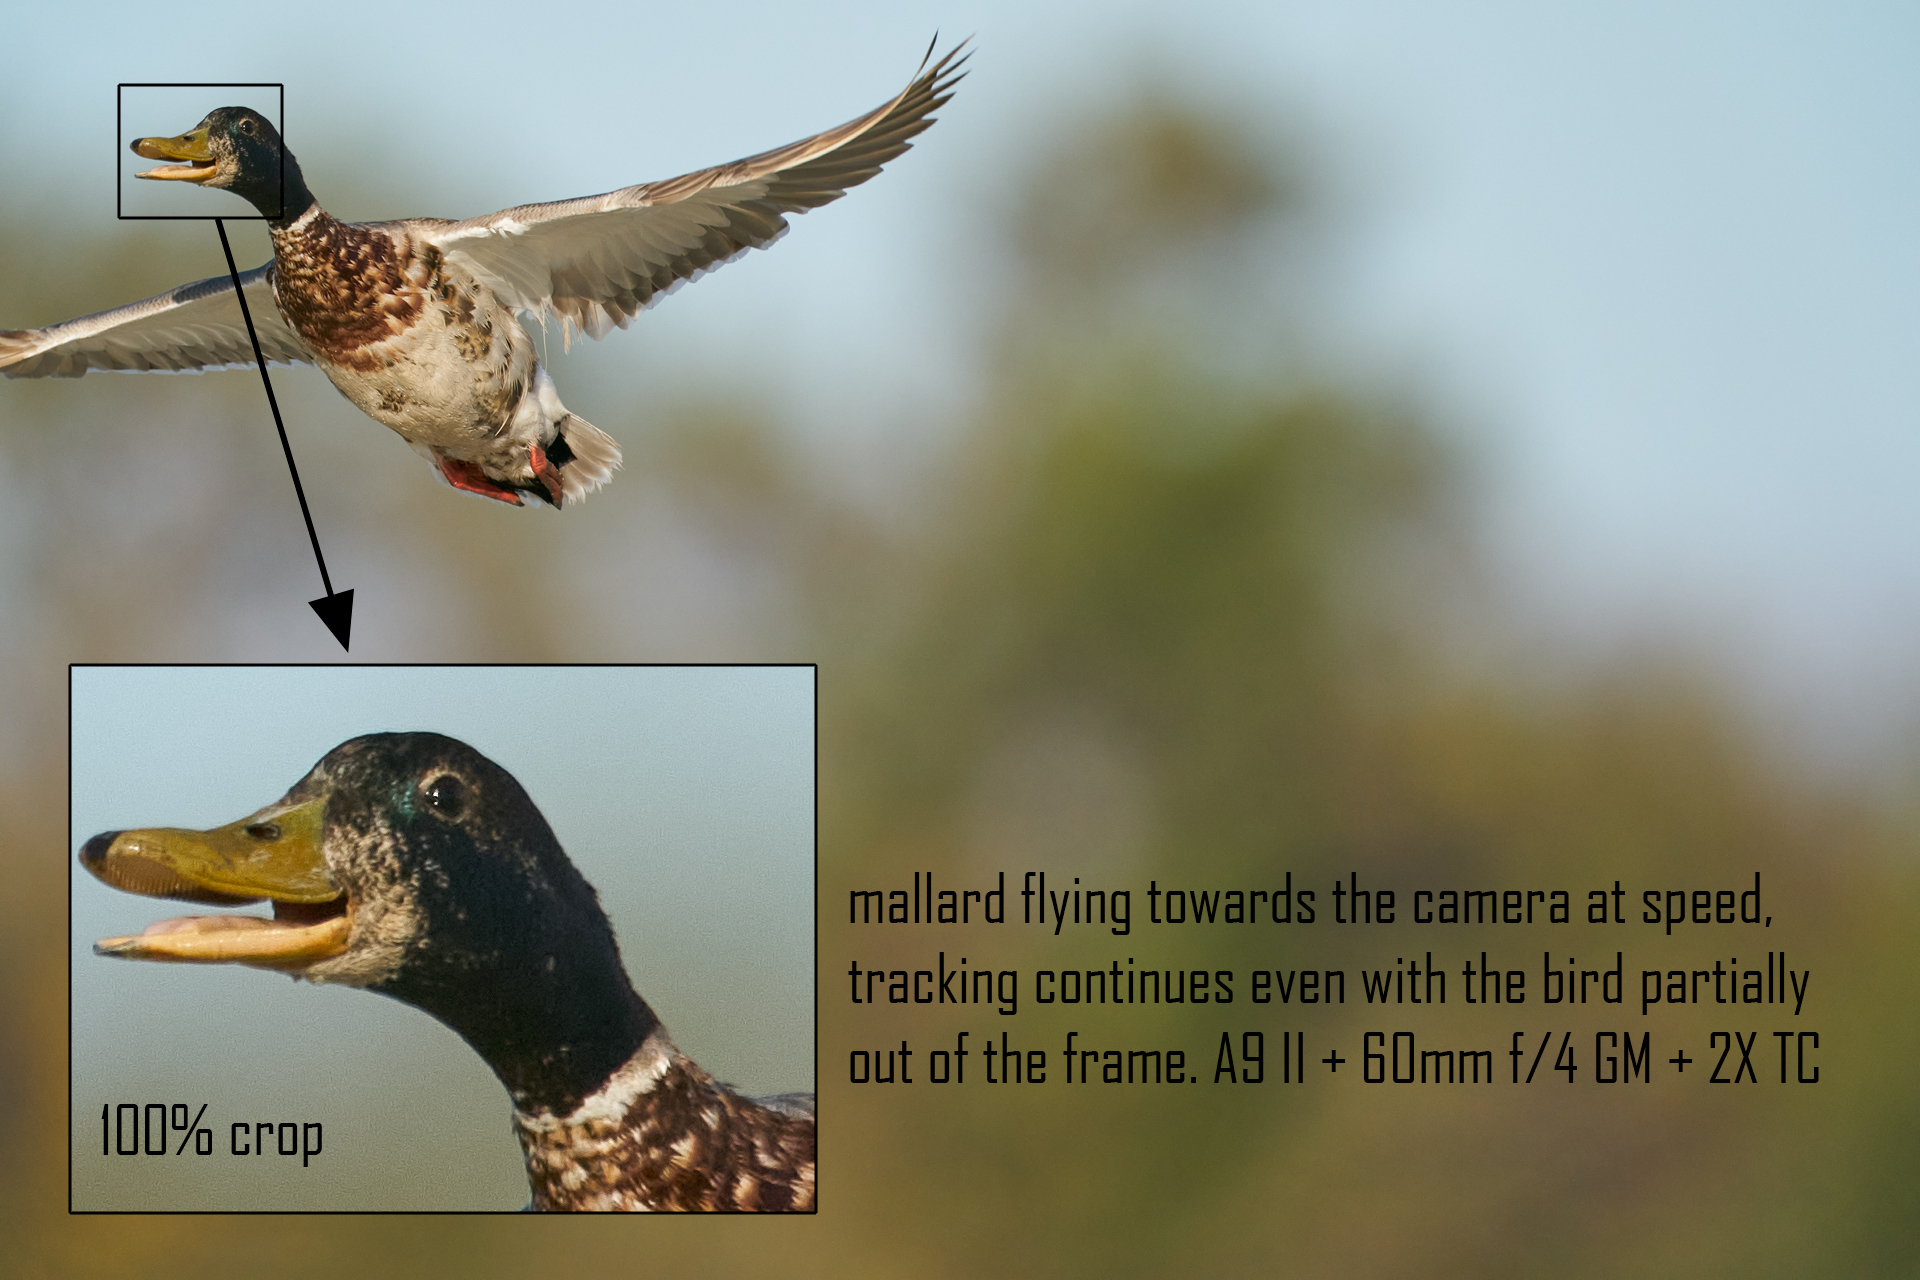
Insane tracking at close range and at 1200mm with the bird partially out of the frame! click on the image to enlarge.
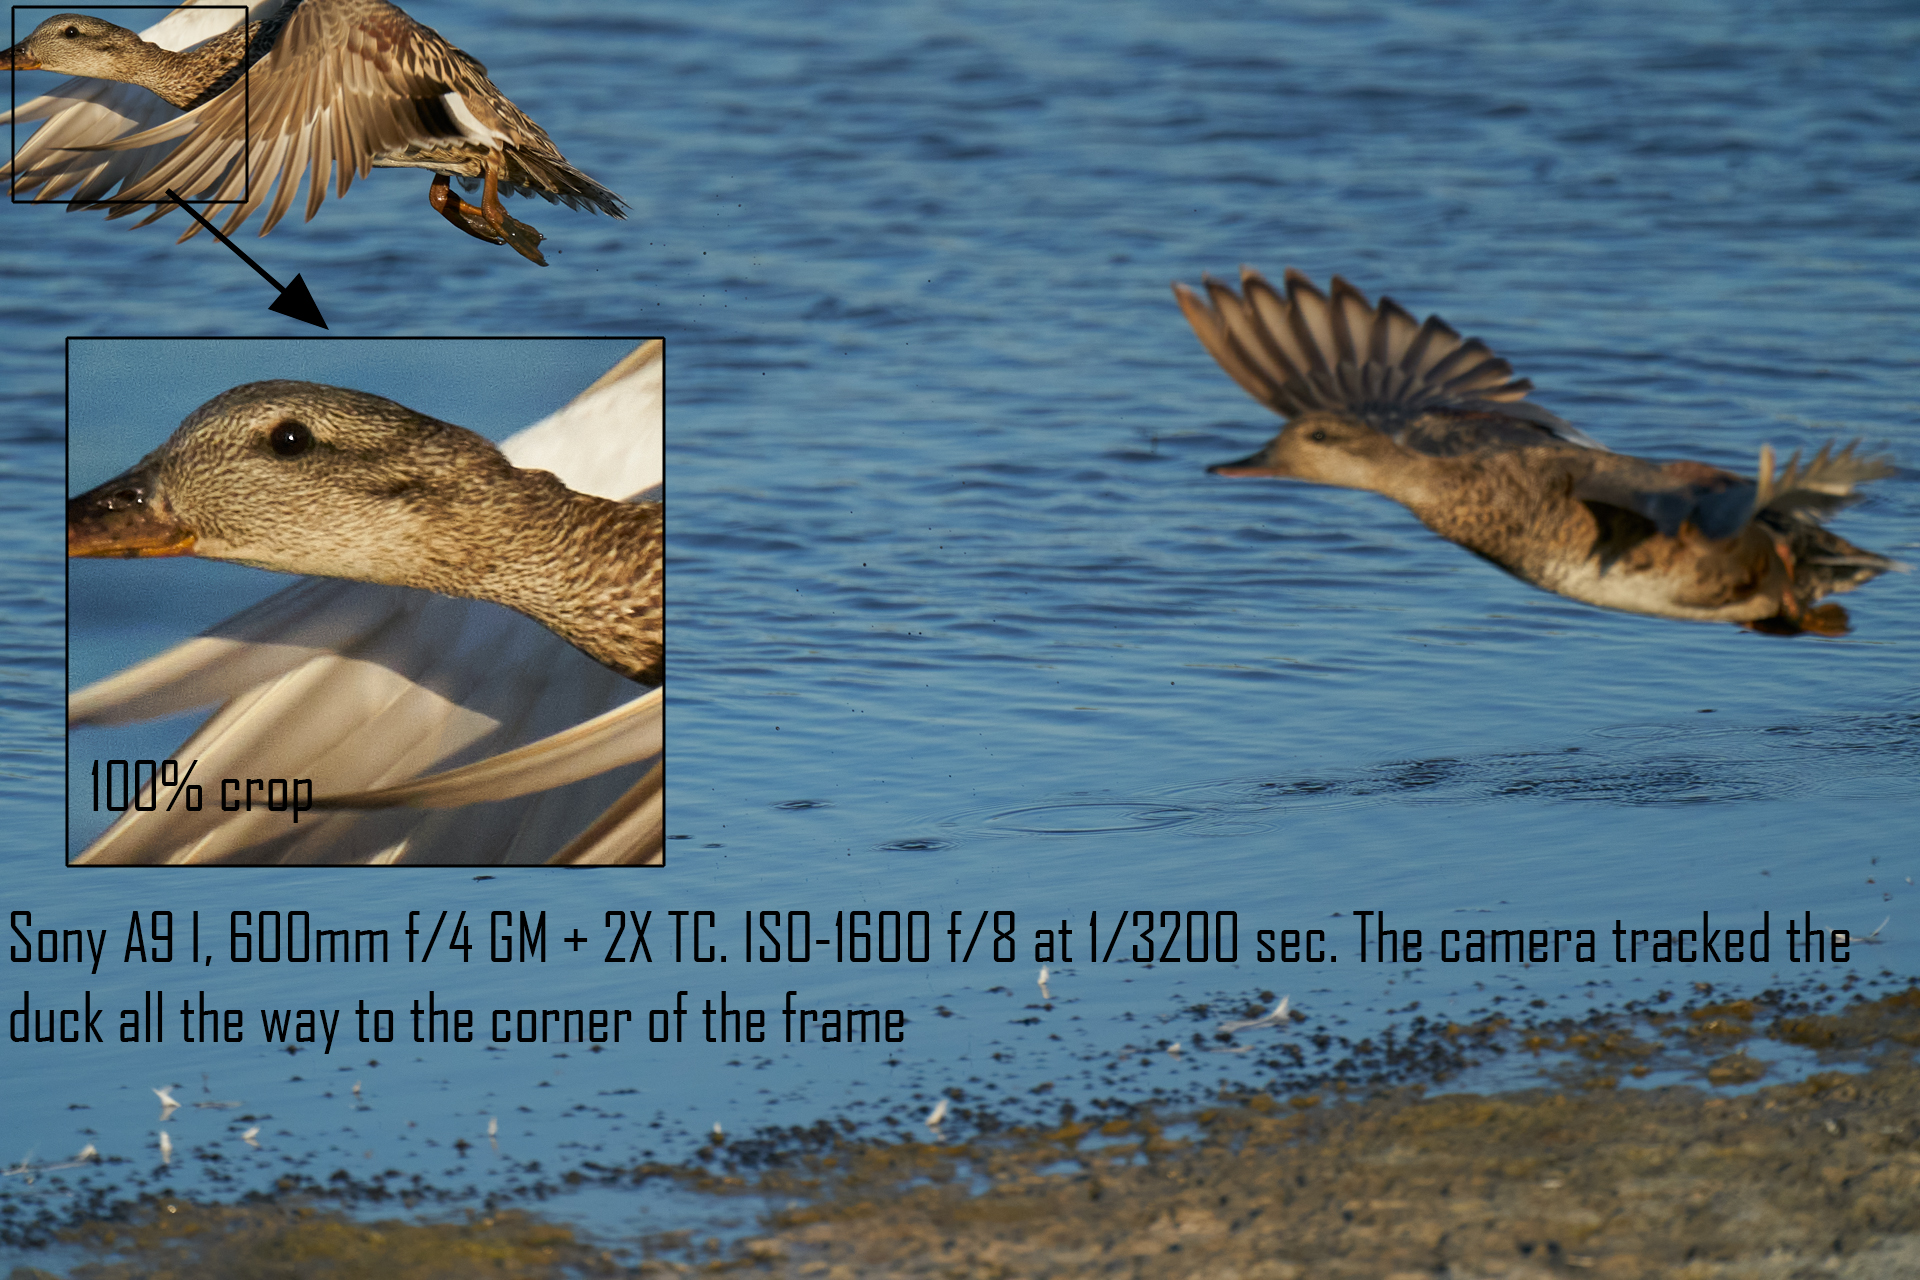
Another example of extreme tracking. Click on the image to enlarge
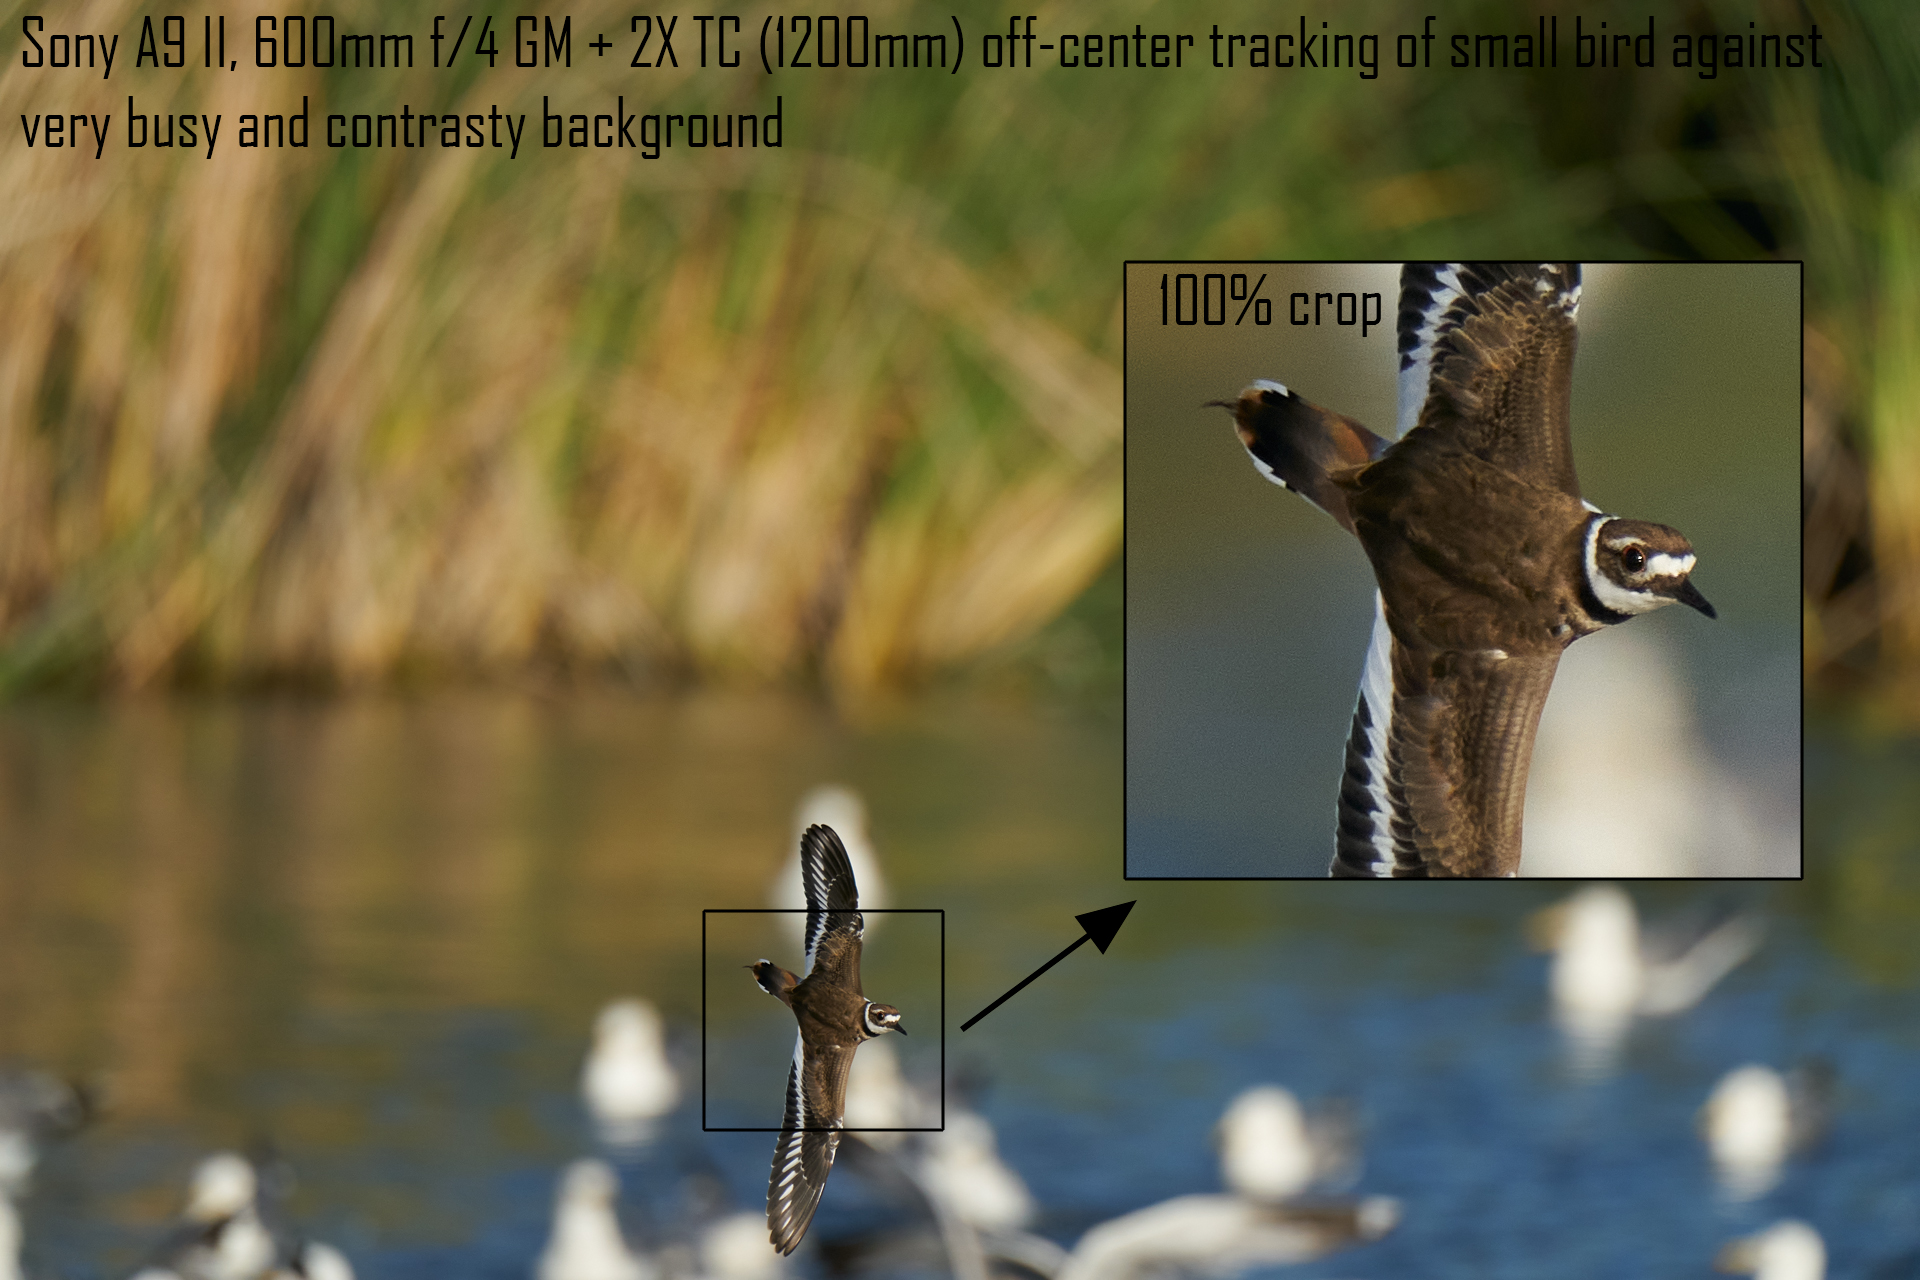
Another example. Click on the image to enlarge. The killdeer is nowhere near the center of the frame and is zipping against a very busy and contrasty BG. Again the only way a DSLR can remain locked on the bird is such scene is pretty much by luck.
and these aren’t just a few lucky frames that any camera can get in a perfect day… they are repeatable
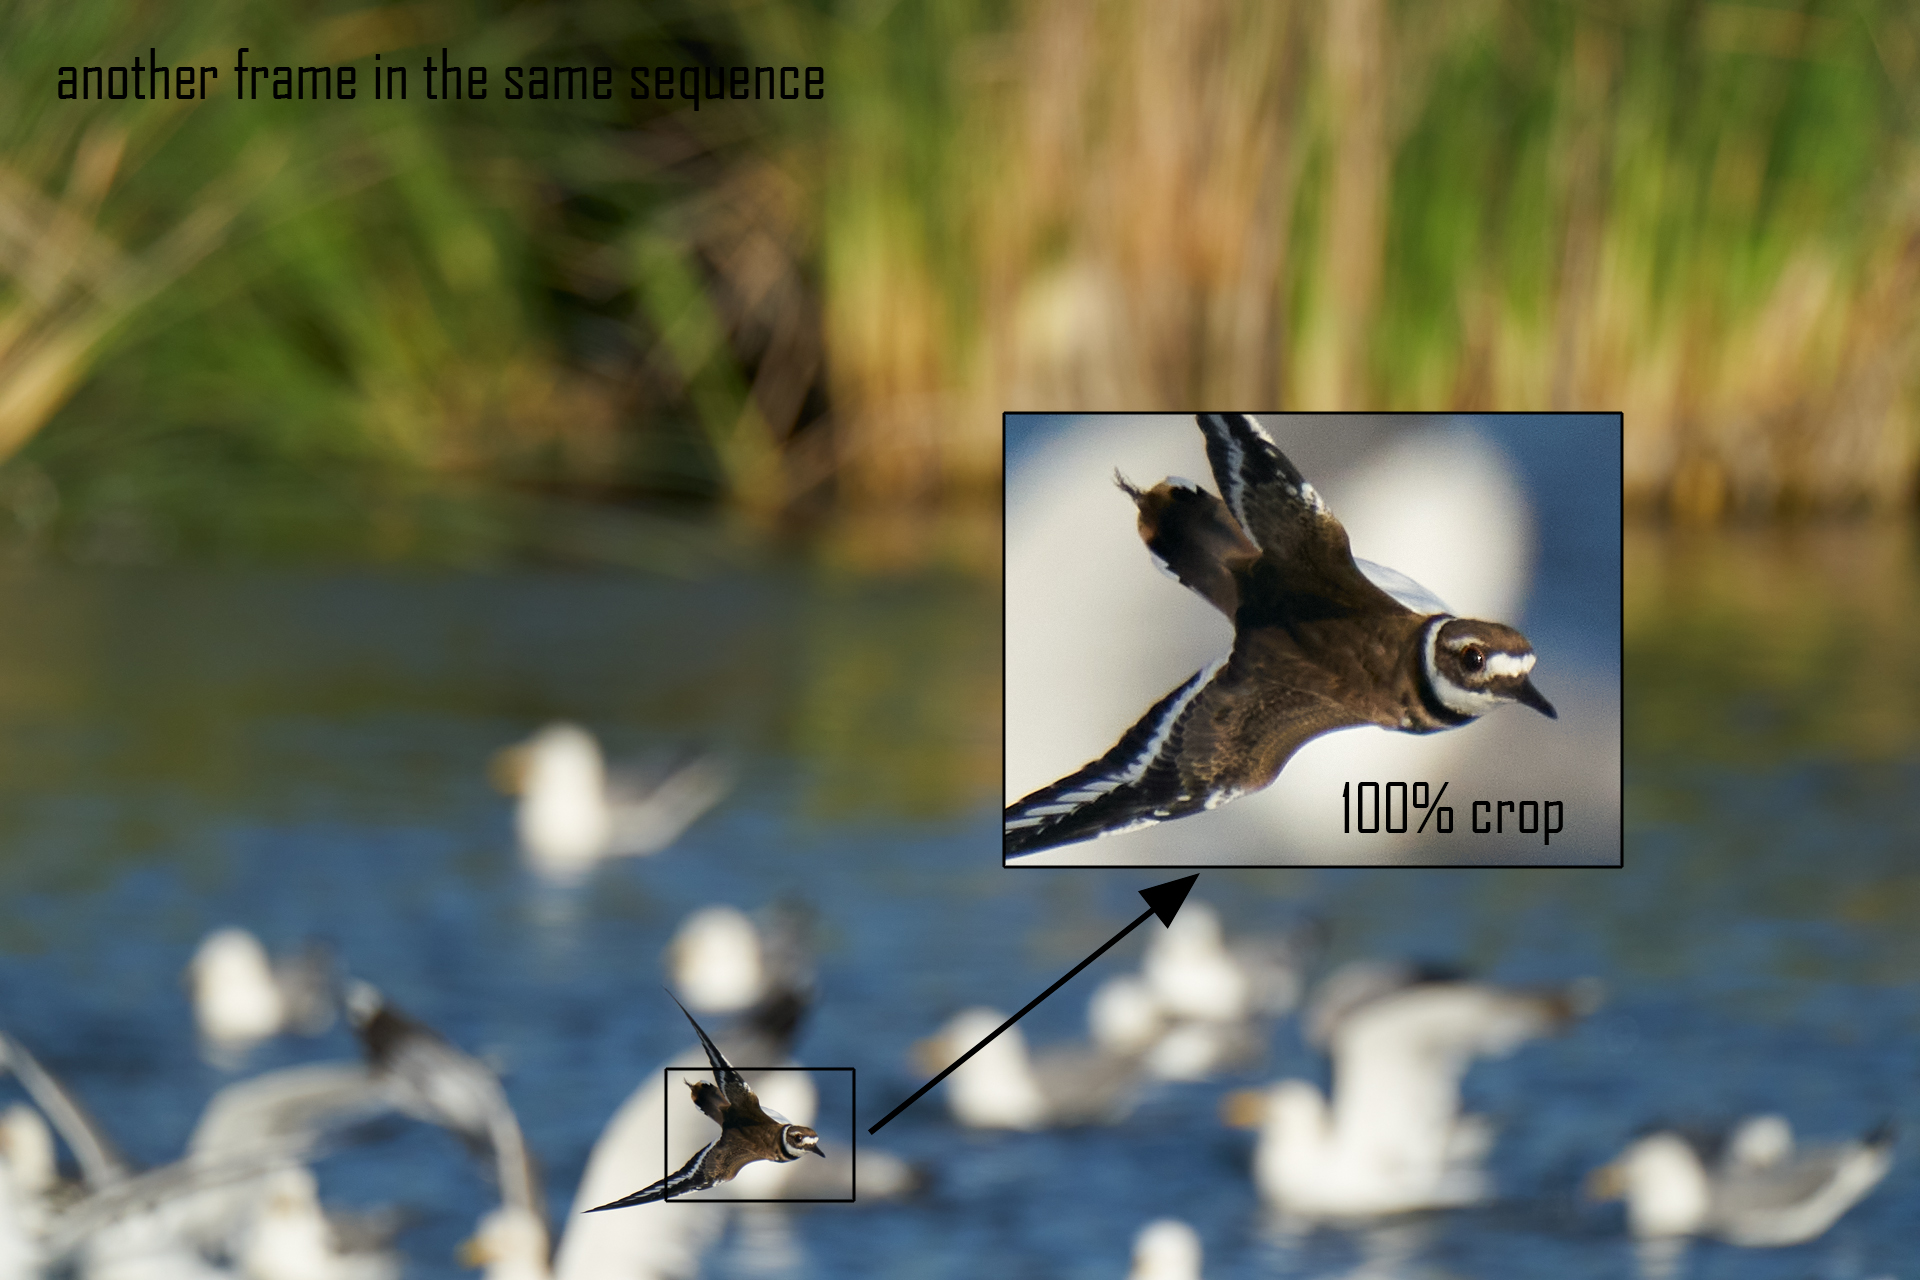
Next frame in the same sequence where the killdeer is almost lost in the BG. Click on the image to enlarge
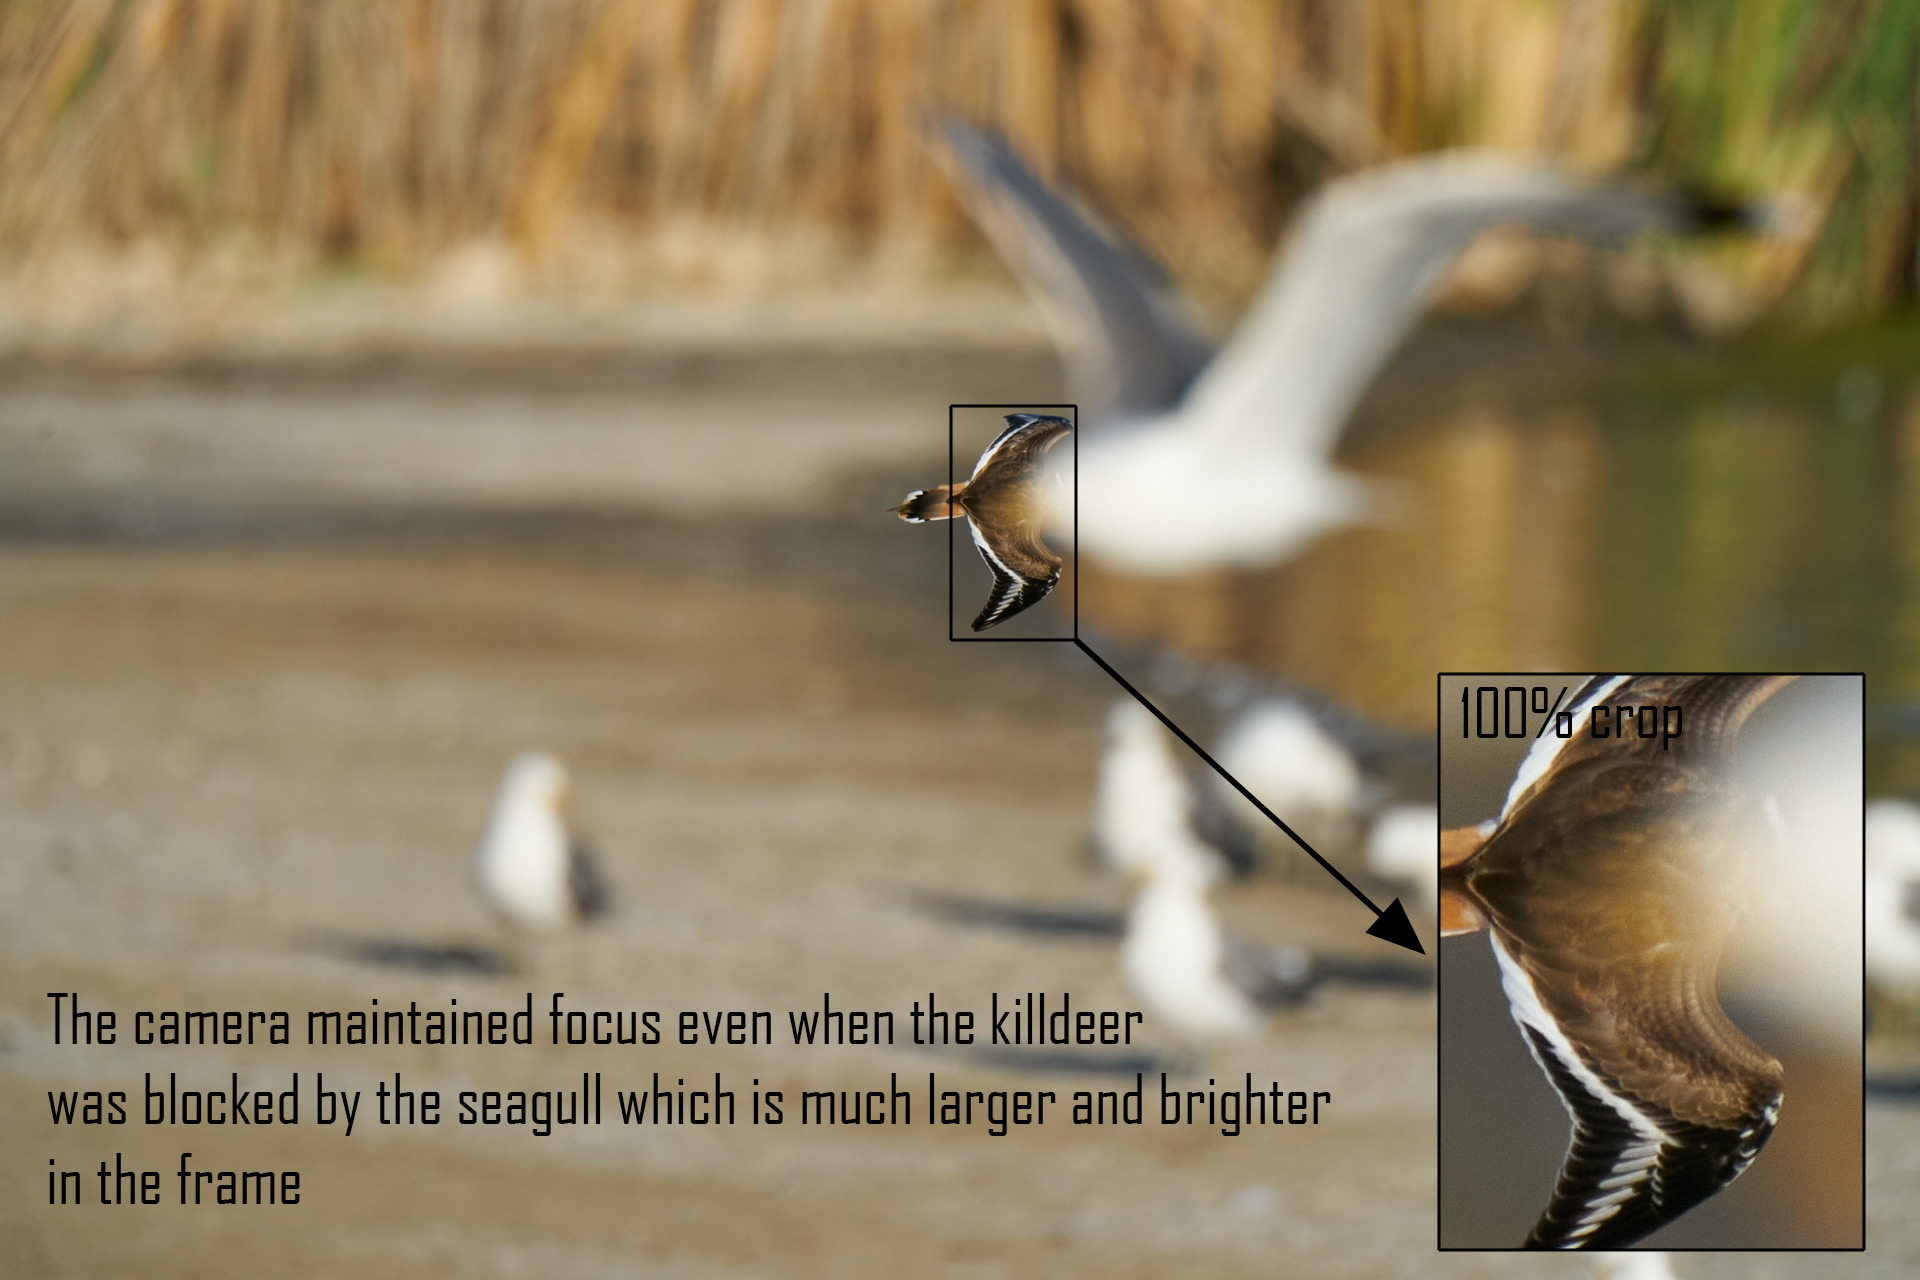
Subject recognition and tracking means the camera will not be fooled even when the small subject is blocked by a large contrasty subject
tracking against a busy BG becomes an easy job for the A9 II

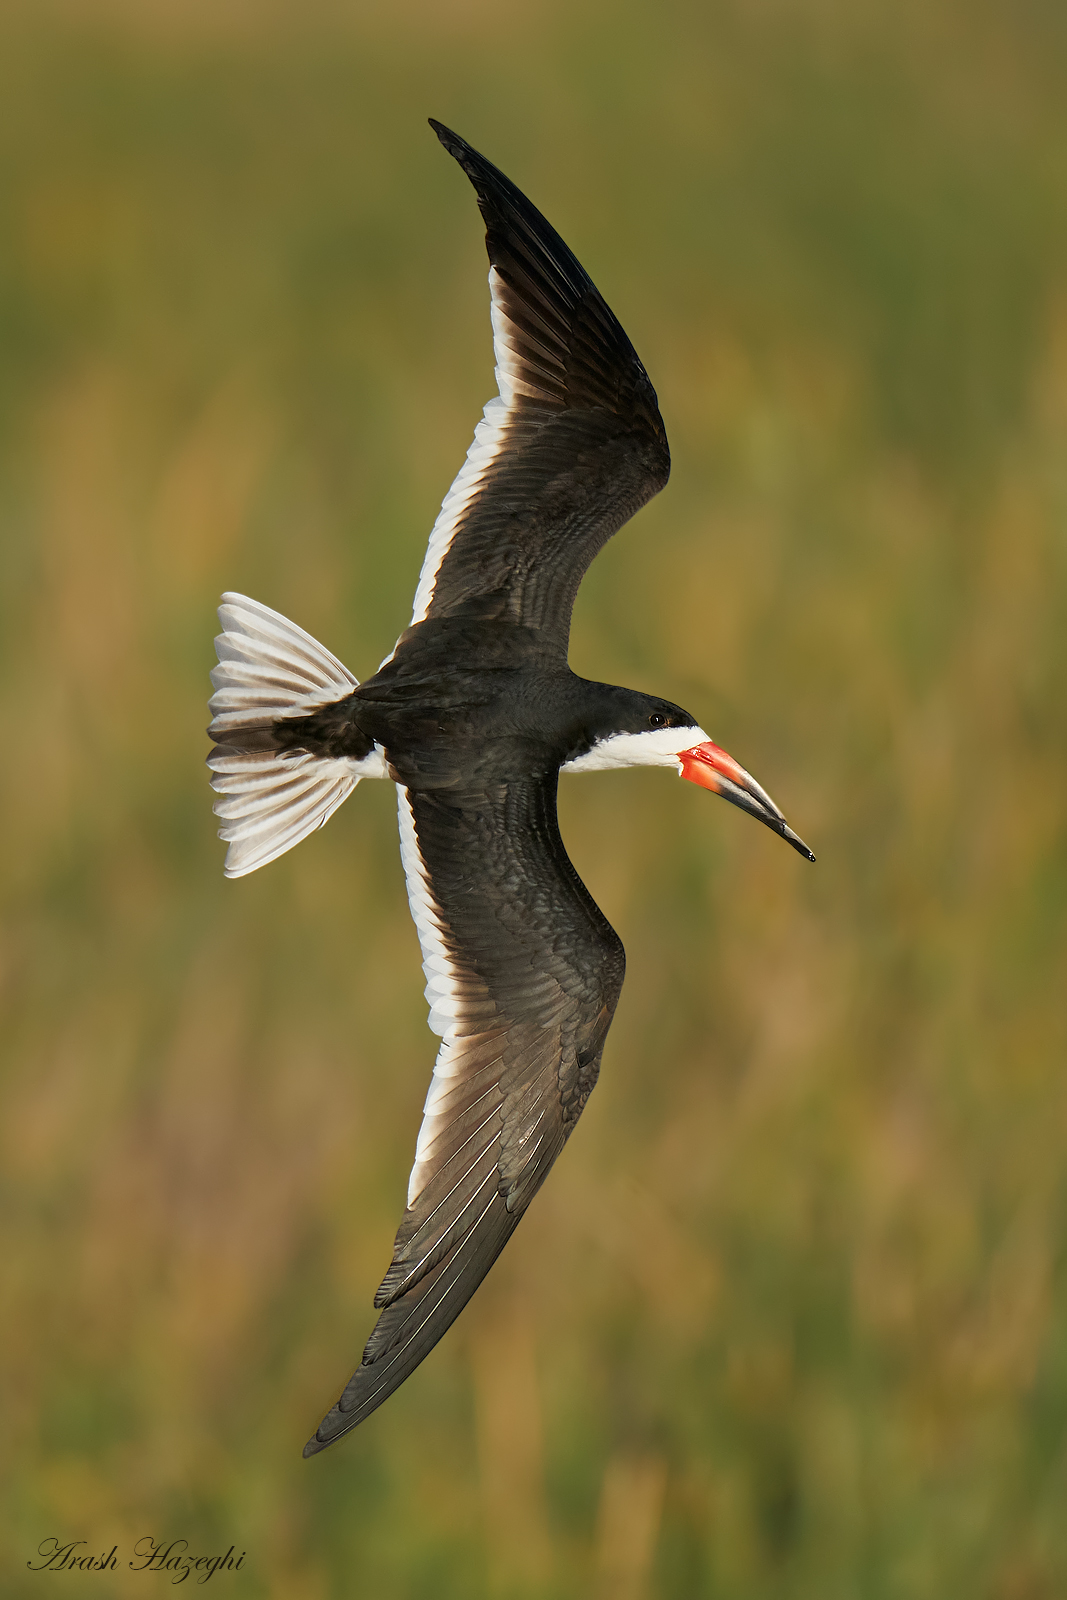
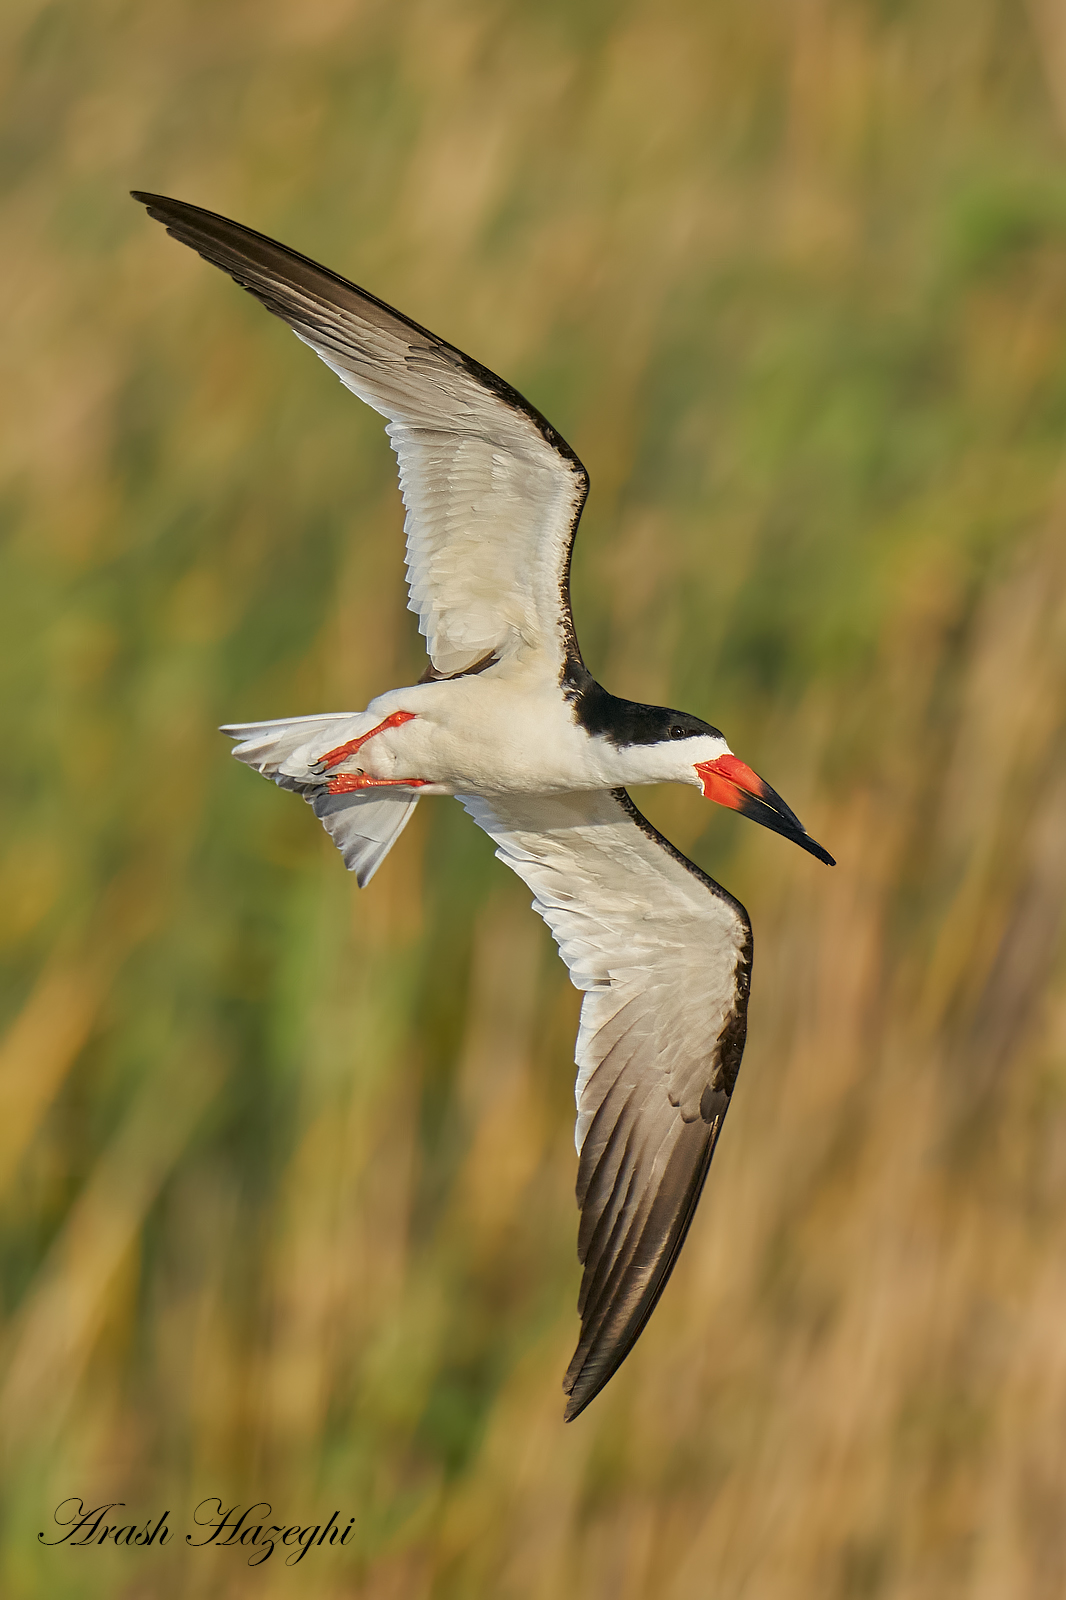
Example of tracking a black skimmer suddenly pulling up against a very distracting BG. A9 II, 1200mm. Click to enlarge
of course there are many more examples like these …
It’s not just AF:
However the differences in AF are not the only factor that make the Sony A9 II based system superior to the DSLR’s for BIF application. The other perhaps equally important advantage is the blackout-free EVF. Going back to the DSLR, when exposing a photo the mirror has to raise in order to reveal the sensor. When the mirror is up, no light gets to the viewfinder, it is totally black. It takes time for the mirror to rise, the shutter to open, and the mirror to return back to the lower position. This time referred to as black out time is about 40 msec in the pro DSLR’s and as long as 120 msec in consumer models. Canon used to publish this figure but they no longer provide it. It is limited by the mass and the mechanics of the mirror assembly and cannot be made much faster. The vibrations caused by an under-damped mirror mechanism can have high order harmonics and cause softness in the photo even at fast shutter speeds. The main issue however, is the finder blackout when the mirror is up. Shooting at 12 fps for e.g. the total black out time during each second of shooting is simply 12 x 40 msec = 480 msec ~ 0.5 seconds! this means the finder is on average blacked out half of the time.
In practice the problem is not as bad is it sounds because the ability of the human brain to “delete” the dark frames and stitch the bright frames together. The constant interruptions appear as a continuous smooth animation to our eye thanks to our brains, just like watching a flip book animation. However the dark gaps start to become limiting when the photographer is hand holding a larger super-telephoto lens and trying to pan with erratic motion at a high magnification. The interference from the finder blackout often results in less than perfect or off-center tracking of BIF, clipping the wings, missing sudden moves or interactions. Sometimes you can lose the bird not being able to see which way it is going.
Of course MILC cameras do not have a mirror blackout. However, if mechanical shutter is used there will be some EVF blackout when the shutter curtain is traveling in front of the sensor. It is thus necessary for the MILC to perform flawlessly with electronic shutter to eliminate the finder blackout.
Although the MILC can be made free of blackout if an electronic shutter is used, most MILC cameras on the market suffer from a finder lag phenomena. The image shown in the finder is not quite real time and has a slight lag to the scene. When you shoot a burst the camera feels like it is showing a slideshow of the captured frames in the EVF. As you can imagine it is only frustrating to pan with a big lens with a laggy EVF that can stutter. It seriously hinders the application of most MILC for intense action. At lower frame rates the DSLR blackout is actually much more manageable than the EVF lag because our brain cannot make up for the lag while panning.
The Sony A9 series cameras are the only cameras on the marker that can offer a totally lag and blackout-free EVF experience. You can hardly tell a photo is being recorded when looking through the EVF of an A9 II camera. This means the photographer can track erratic subjects such as BIF MUCH better and place the bird inside the frame even when shooting at 1200mm. The examples below, all taken at 1200mm and at closer range, would have been incredibly difficult to get with a DSLR due to the finder blackout.
Finally lack of any mirror shock or vibrations makes it even easier to track the BIF while shooting hand hold rock steady at 1200mm.
To summarize the points above we can see the Sony A9 II system advantage boils down to:
- Light-weight and well balanced 600mm f/4 super-telephoto lens, native to and optimized for use with the A9 series from the get go (no funny adapter etc. needed). Tack sharp 1.4X and 2X TC’s optimized for the system
- On-sensor PD and CD can use all the light available, AF performance largely independent of aperture between f/1.8 and f/8 (minus very dim light obviously)
- Almost 100% AF coverage across the frame
- high resolution AF (1100+ points) and powerful CPU allow for multi-factor real time subject tracking based on machine learning AI (pattern recognition). These algorithms are at work in both subject tracking and non-tracking AF modes.
- black-out and lag free EVF enables seamless tracking at close range, when using very long focal lengths. General tracking of challenging BIF becomes much easier.
- combination of PDAF and CDAF significantly reduces the ratio of in-focus but soft shots that plague many great frames with DSLR cameras. The focus is much more digital with the A9 II, either tack sharp or nothing in focus, most of the time.
Of course a new technology doesn’t always change the end result, while all of the technical advantages are there, if the pro DSLR AF is already adequate for the job the MILC will not really bring anything new to the table that wasn’t possible before. The optical viewfinder also has some inherent and fundamental advantages over the EVF which cannot be overlooked.
Whether the Sony A9 II is game changer or not really depends on the subject you intend to shoot. If you are shooting large wildlife in African safari for example there is really nothing the A9 II does that the D5 cannot do, minus a scene that really requires 20 fps with only the Sony can do. Same if you are shooting a weekend kids’ game or a wedding.
But if you are after certain dynamic BIF images, especially those made hand held with a long super-telephoto lens the advantages and the possibilities the Sony A9 II system brings to table cannot be overlooked. It seems for this application the Sony MILC system is the ultimate solution with native the super telephoto lens and a powerful AF system to drive it.
As of now no other MILC camera on the market is even close to the Sony A9 II. Rolling shutter phenomena, finder lag, stutter and slide-show effect, slow and underwhelming AF and lack of native fast super-telephoto lenses are issues that hold back MILC compared to a pro DSLR like the D5 when it comes to BIF. I find the Nikon’s Z series cameras for example, suffer from all of these issues simultaneously making them totally useless for this kind of action photography.
The Sony A9 series is a unicorn in the field which surely deserves a special place given the many technical innovations needed in its making. It will take time for other to match this camera and also come out with a native MILC super-telephoto lenses..
Few examples of images taken with the Sony A9 II and 600 f/4 GM + 2X TC (1200mm) hand held. As I shoot more with this rig I hope to share more photos of different species
Black skimmer. Sony A9 II, 600mm f/4 GM + TC 2X. ISO-2000 f/8 1/3200 sec hand held. Processed with C1P. It is very difficult to fit” the banking skimmer in the finder at 1200mm hand held if the viewfinder has a constant black out. Vertical frame cropped from a full-frame horizontal click on the image to enlarge
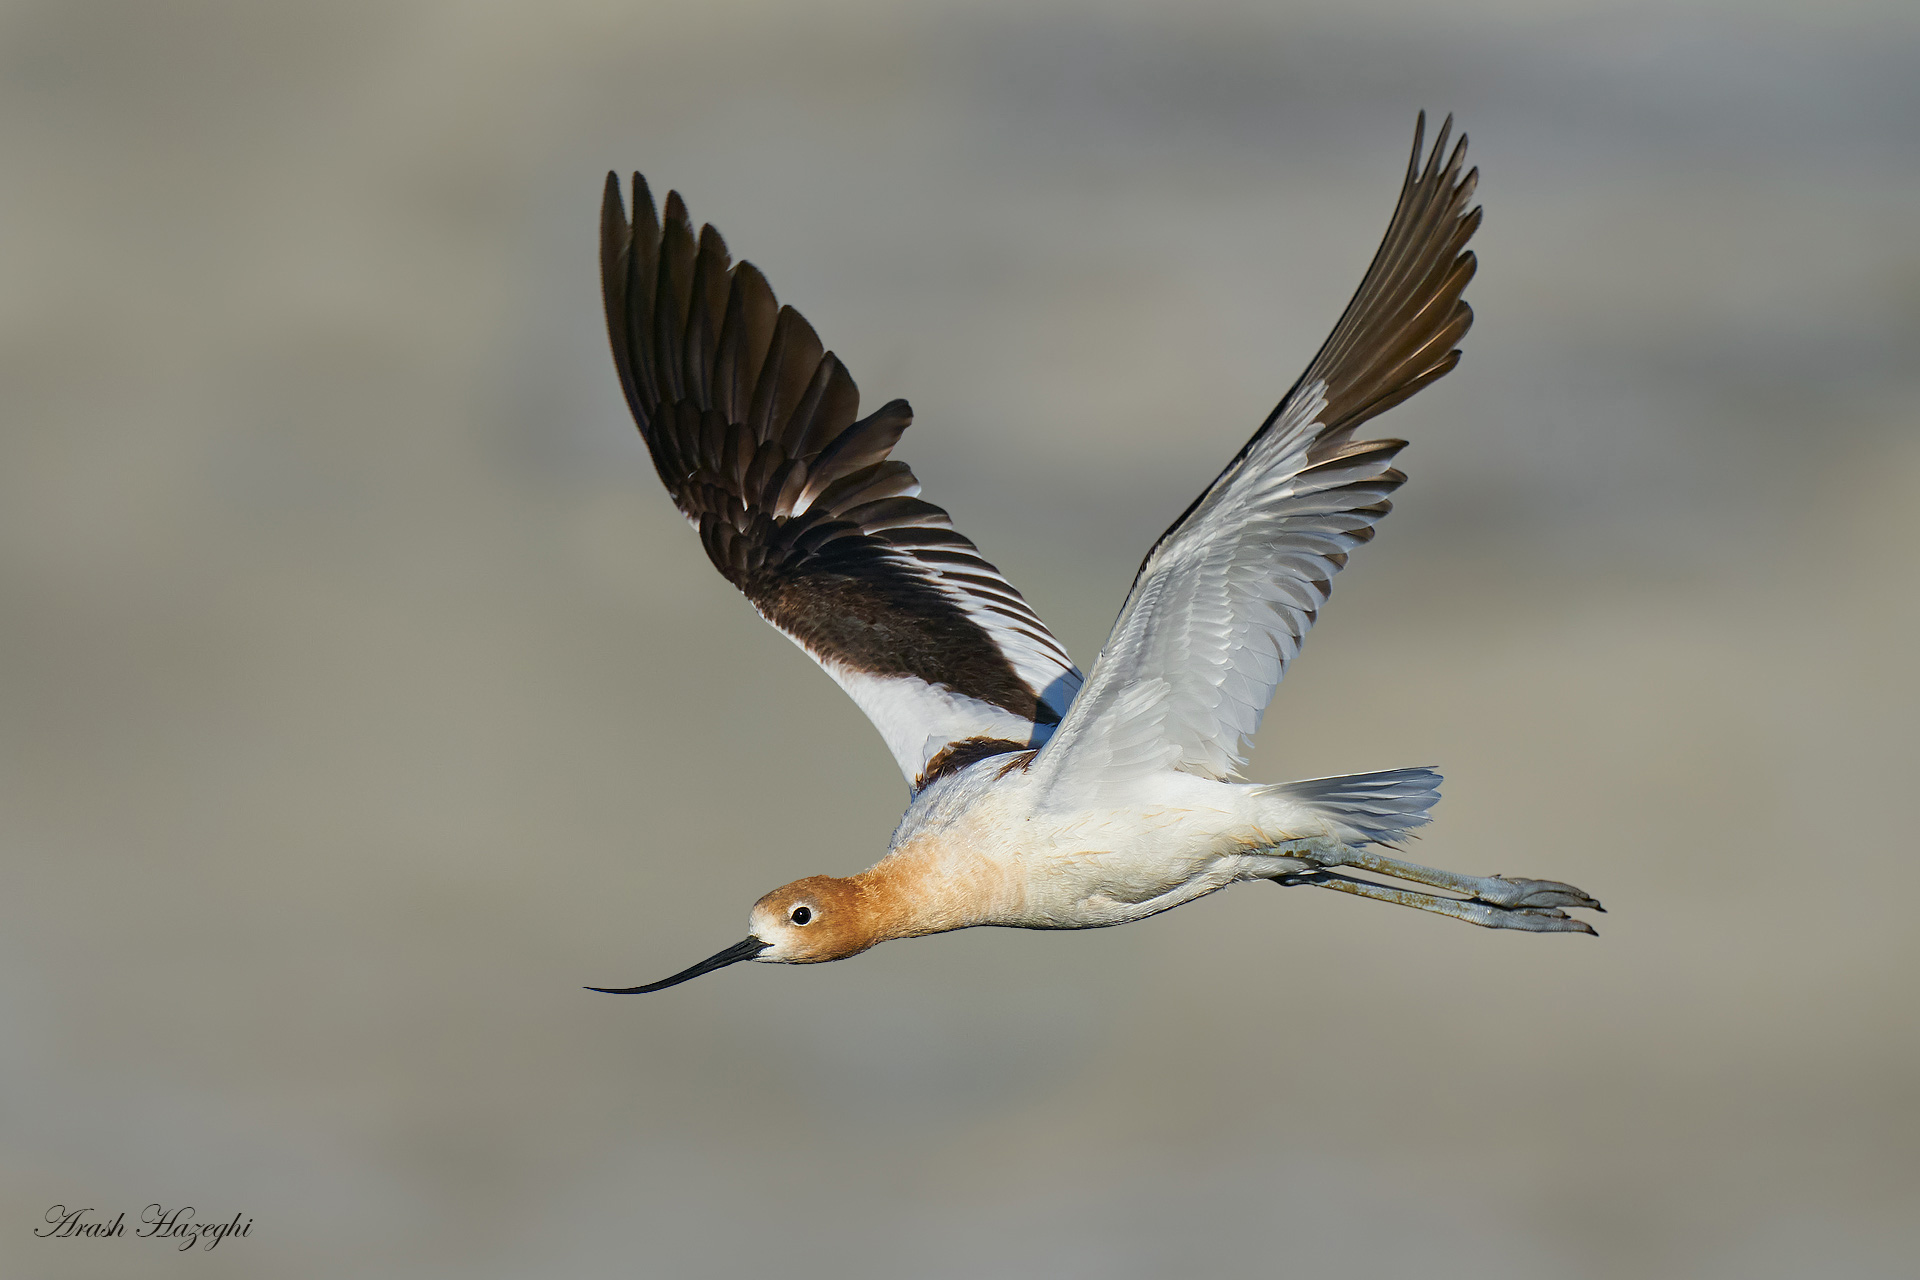
American Avocet. Full frame image captured with the Sony A9 II, 600mm f/4 GM + TC 2X. ISO-2000 f/8 1/3200 sec hand held. Processed with C1P. click on the image to enlarge

Black-necked stilt in low light. A9 II and 600 f/4 GM + TC 2X. ISO-1250 f/8 at 1/4000 sec hand held. processed with C1P. Click on the image to enlarge
Black skimmer, Sony A9 II 600 f/4 GM + 2X TC ISO 1600 f/8 1/3200 sec hand held processed with C1P. Click on the image to enlarge
Great review. However, I think “meaningless to talk about birds in flight and bird photography in general without looking at the 600mm” is extreme. Certainly some BIF and regular bird photography is best suited to a 600mm f/4, but not all. In fact, in some parts of the world and some types of flying birds 600mm might be too much reach. This is even more so with bird photography in general. No doubt the 600mm f/4 is great for many applications, but “meaningless” in your review is an exaggeration, especially considering that your type of bird photography (skittish raptors and BIF in North America) is a narrow (but very nice) slice of all bird photography.
Hi Jason, thanks for your comments. I do believe that without a 600mm f/4 a system is incomplete for bird photography. I have photographed in many locations for more than decade now. I find the birds in north America to be actually less skittish compared to many other places, like Europe for example. Florida is probably the best location in the world for general bird photography and you still need a 600mm lens there even though many birds are approachable. There are some locations where a 600mm lens could be too much, but there are more situations where even a 600 is not enough. That is why we have several lenses for different situations but if I had to pick one it would definitely be a 600mm f/4 without a doubt. Of course when I talk about bird photography it’s a bit more serious than shooting common birds like pigeons, seagulls etc. as a casual weekend activity, or photographing captive birds or making large crops of a far subject as a record shot, for those applications a 200mm lens can work just as well. But for me a system without a 600mm f/4 lens is pretty much dead in the water, not an exaggeration honestly.
I found the explanation of this picture weird http://arihazeghiphotography.com/blog/wp-content/uploads/2020/07/AF-blind-1024×907.jpg That is the “theoretical” resolution of the AF sensor and I don’t see what is the point of presenting that as the overall AF system pattern tracking capability. First, the AF sensors don’t see color, so the image should have been greyscale. Second, Canon iTR and Nikon 3D AF tracking are using the metering sensor to track color patterns then send that information to the AF system to make phase detection calculations in that specific area of the image where the color pattern was found by the metering sensor. Those metering sensors are much bigger in resolution then the numbers you presented there, so the AF pattern tracking of the camera see a color image much higher resolution then just a “70 pixels”. The only reason why face detection AF in viewfinder was first implemented in 1Dx mark II ( https://www.canon.co.uk/for_home/product_finder/cameras/digital_slr/eos_1dx_mark_ii/auto_focus/ ) is the fact they where not interested to implement it in the previous models, not because the subject detection capability was not possible by the 150.000 (sub)pixels metering sensor of the previous models.
Thanks ELiz but I think you missed part of the article. I did mention the metering RGB sensor is used for color based tracking in DSLR’s (Nikon had this from 2008) but it is not as effective because the pixels on the metering sensor do not have a micro lens to render a sharp image despite having many sites. It only produces a vague color map and does nothing when the subject has the same color as the BG.
Only Sony’s AF system sees color directly.
The Canon iTR detection does not work well even for human faces it was intended for despite Canon’s marketing claims. For birds it is totally useless and latches to the BG instantly. I say this because I used the 1DX II for over 4 years so I have plenty of experience with it.
Best
Thanks Ari for excellent article! Do you think it would be worth to buy the A9 II over the A9 when it comes to how the autofocus handles birds in flight? I guess the A9 should increase the number of keepers compared to Canon EOS 5D MKIV which I use now? The Canon is wonderful for other things. If the A9II is substantially faster for BIFthan A9 I might go directly for that one instead. I’d much appreciate your opinion! Thanks.
Hi per, I never used the original A9, if you want the best why risk it and buy the old camera? One thing I hear is that the battery life was very poor in the old model.
Great article, Ari. Will you be switching over completely to Sony?
Thanks Greg, I still have my D500 and 500PF, Sony currently doesn’t have anything as light as this combo
And…here comes the EOS R5!
Hi Ari
Battery life in my A9 is excellent.
Great article though.
Richard.
Great review & fair comparison. I have tried the Sony 200-600 with 1.4X & it does remarkably well. Any thoughts on this?
Thanks
Mike
Hi Mike, I have this combo too. It’s a bit on the slow side (f/9), certainly not comparable to my 600 GM + 1.4X but for the money it is hard to beat and it can also get the job done very will in good light. better than DSLR AF at f/8 for sure
Thank you for an incredibly useful and insightful piece of analysis and technical explanation. Much indebted. I’ll be very interested to see how the latest Canon R5 mirrorless compares to the A9 II, and those interesting f/11 super telephotos.
thanks Glenn, the Canon R5 looks good on paper but the f/11 entry level lenses is not something I would recommend for a series bird photographer.
Hey Arash,
As I am not techincally-minded, I am not quite able to follow everything above as to why SONY AF is better. When I swtiched from Canon to Nikon about four years ago, I switched because I knew in an instant that Nikon AF was much better than Canon AF. Two years later I switched again as it was obvious to me that SONY AF was far better than Nikon AF.
You are considering SONY as much better for handheld flight photography while feeling that Canon and Nikon are sort of just as good for general nature and bird photography. I disagree on that but only 100%.
My style has long been clean, tight and graphic and I love ultra-ling focal lengths like 1200mm. I think that I once saw a single good 1200mm flight image made with Canon. For the most part however, Canon at 1200mm for flight was basically useless. And as you imply above, the Nikon TC-E20 II actually is garbage. So far we agree on everything above. But, you doo not give SONY anywhere near the credit it deserves for mere mortal nature and bird photography.
Once you learn to use Zebras correctly, getting the right expousre with SONY is vastly easier than it is with other systems. SONY with either TC on any lens far out-performs either Canon or Nikon. For example, with your beloved Nikon 500 PF and the TC-E14 III, AF was OK as long as you used the center AF point. Once you got away from the middle AF was in the toilet. That made it very difficult to create the tight head portraits that I love. And the same is true with the 600 VR/TC-E14 III combo.
Not to mention that the a7r iv blows away any Nikon or camera body as far as fine detail and image quality is concerned. It is incredible for macro and scenics and for static birds. And it is not terrible for flight with the 600 GM and either TC (though the AF is clearly not as good as on the aa9 ii.
Respecfully submitted with love, artie
ps to all: There has been tons on SONY on my blog for the past 18 months. All are invited to visit. Be sure to stay safe!
I
Hi Artie, thanks for your comments. I agree with some but not all, especially the points below
1. I certainly have more than one sharp flight shot with Canon at 1200mm. haven’t counted them but definitely more than 100. No question Sony is better but I don’t want to sound like Canon/Nikon are garbage because they are not.
2. The PF with TC is great for stationary subject even with the peripheral AF sensors, I have many tack sharp images with this combo. usually soft images are result of operators error as you know, but in your case I think you may have had a lemon lens or TC.
3. I can get the exposure right without any zebras, I don’t need any of that. I find them distracting and redundant to be honest. If in doubt just look at my photos 🙂
4. A7R camera does not work for me, once they fix the finder lag and rolling shutter maybe. I’d say it is useless next to a Nikon D850 for me.
5. If I were shooting static subjects I wouldn’t have switched from Canon to Nikon and from Nikon to Sony. If we stand side by side, I can get the same image with all three systems.
6. Are you going to dump Sony and go back to Canon now that they have the R5? 🙂
Jeez, I forgot to mention Tracking Flexible Spot (S or M) which makes designing pleasing images as simple as child’s play when photogrpahing perched birds … And probably forogt lots more.
with love, aa
Nice write up Ari, well explained. I have been wanting to make the switch myself, but have been a little hesitant for a couple reason. How is the experience of the EVF coming from a nice OVF like the D5? Did it take any getting use to?
Hi Kyle, I had the same concern but I got used to it quickly. The blackout free view is nice and ability to see the exposure exactly as is, is also helpful. having a bright view in dim light and with 2X TC is another plus. there are some conditions where the image from the OVF just looks more natural to the eye and more pleasing but the advantages of a lag and blackout free EVF outweighs it IMO.
Great well argumented article, as always, Ari.
What do you think about the new 1Dx Mark III live view performances? At least on paper they look quite similar to the A9 II ones.
Hi Pino, unfortunately it is not a usable solution, I have seen some folks use it with a Hoodman loup but it is just awkward holding up a 600 rig to your face like that to use the LV. It also has significant rolling shutter effect which kills it. The new Canon R5 is Canon’s answer and we have to wait and see how it performs
Sony’s A9/ii is still the only mirrorless camera that’s has very low EVF lag with blackout free shooting at 20FPS. It’s really an amazing camera thanks to that sensors readout speed (1/160s vs 1DXMIII at 1/60s for reference). And No don’t expect the R5 or R6 to even match the A9s raw speed. It won’t… already numerous reports of bad EVF lag. Also reports that R5 FPS slow down once battery goes below 60%…combine that with poor battery life and I’m not impressed
Hi Nelson, I don’t think these are facts. Until it is tested by a reliable source we don’t know. Rest is just internet chatter and fake news. I have seen solid evidence of over-heating and shut down but that’s only when shooting 8K video.
Hi Ari, thanks for answering.I agree with you about the 1dx Mark III in live view not being a very usable solution for BIF, even with a loup. I have to object though that the 1Dx Mark III has no rolling shutter effect at 20fps using the mechanical shutter. About the R5, I had the chance to try it for a few minutes three days ago. I did not have the time to check how it was set up but at 20 fps electronic shutter it showed a visible EVF lag. Thanks again
Pino, you are correct, the rolling shutter effect is only in electronic shutter mode. Obviously mechanical shutter has no rolling shutter effect by definition. However mechanical shutter suffer from the blackout as the shutter curtain travels in front of the sensor and has to physically block it. It is not as bad as mirror blackout but still visible and distracting when panning. In order to get a lag and blackout free finder like the Sony A9 a camera needs to have no rolling shutter with electronic shutter and also be able to display the image real time (as opposed to a slide show)
I am skeptical of the EOS-R5 really being uo to the spec of a true BIF camera, after all they call it a 5-series camera not a 1-series. The bigger issue with this camera is lack pf native 600mm f/4 lens, have to use the old lens with an adaptor. until an RF-600mm f/4 is made by Canon I cannot take this camera seriously.
best
Just a typo you may wish to correct “As explained above the DSLR AF system has to make due with a much dimmer image”. “Due” should probably be “do”.
Still reading the rest – but am interested in how the Sony 200-600 compares with other ‘2nd tier lens’ options. No real way to take these big primes with on the trips I do in Africa so some compromise required. Currently have the Nikon D850 and 500PF and 200-500 but considering switching to Sony as Nikon future is far from certain. By all accounts the A9II with the 200-600 will be as good as the D850+500PF ot 200-500. In addition the 200-600 does not extend to no chance of sucking in the fine dust prevalent on these bush trips. But would the A9II+200-600 be comparable to the D850/500PF in terms of sharpness and autofocus tracking ? And would the sharpness of the Sony TC’s make up for the crop-ability of the D850 45megapixel images ?
Any thanks again for taking the time to share you experiences.
Hi Duncan, thanks again for finding the typo. as for the sony 2-6 it’s a great lens, it is however f/6.3 and with the 1.4X TC it would become f/9 which is limiting in low light situations. In bright light this combo works well including AF. Asking the zoom with the TC to be as sharp as a more expensive Nikon prime it’s asking for too much 🙂 it’s not going to be quite as sharp with the TC as the bare Nikon PF. The sony 600 f/4 GM is quite a bit lighter than the nikon 600, so if you can I’d take that lens. it’s the ultimate long lens ever made and worth every penny of the asking price….
Great review thanks – almost exactly a year to date since I asked you what you thought of the emerging Sony kit – seems it has jumped ahead by quite a considerable amount in that time.
How does the A9II/200-600 stack up against the D500/500PF in terms of sharpness, AF speed and VR? From reports I have seen the 200-600 is quite a bit sharper than the 200-500 across the frame and with the A9II you can still get good AF at f6.3. But is the AF quick enough to track fast objects coming towards you ? For my trips in extreme heat and dust I also like that the 200-600 does not extend and won’t suck in any dust. Nearly impossible to change lenses out there because of the dust and tracking fast objects out a vehicle window with a big prime is an exercise in frustration – never mind quickly switching sides without knocking anyone out while doing so. The 500PF is hard to beat for this situation.
Hi Duncan, thanks for the comments
yes the 2-6 is quite a bit sharper than the nikon 2-5 which I didn’t find very sharp at all. It is close to the PF in terms of sharpness and yes it can track a bird coming right at you if the camera can initially identify and lock on the subject. It’s the perfect safari lens and should work well in dusty locations, build quality is very tight.
Ha, if I buy the 600 f4 then I can’t afford the camera or the ticket to Africa ! Tell you what though, next time we do a trip we’ll invite you and you can bring the 600 f/4 along. BTW, if you are ever interested in doing a trip through some of the game parks in South Africa, Botswana or Namibia you should contact my brother who lives there. He is often looking for someone to go with him on trips – and preferably another patient photographer! Although who knows when we will be able to travel again.
Hi Duncan, thanks for the warm invitation and I’d love that. Was actually planning on an Africa trip for my sabbatical then COVID hit….I just hope by next year this time things would be normal again.
Good to know the 200-600 is close to the 500PF because that is more than good enough for me. I found I ended up using the 200-500 almost exclusively with the TC1.4 and the D850 and it’s a bit slow and a little soft – but still I was able to come away with a bunch of shots that look pretty good on a 5K display. And I am a rank amateur. See some of the pics here with links to the full res images from a 4 day trip https://ossh.com.au/sport-and-outdoors/photography/kgalagadi-frontier-park-african-wildlife/
No doubt you would have a lot of fun with all the raptors there – all shapes and sizes, from massive lappet-faced vultures, martial eagles and secretary birds to the tiny pygmy falcons.
nice shots, for wildlife it think it will work even better than birds.
Ari you really need a nested comment system here. It’s hard to discus to other peoples in the comments section with current system.
WordPress have this setting. Go to Settings->Discussion->” Enable threaded (nested) comments 10 levels deep”
HI Arash. Thank you for another excellent review.
One thing I have not been able to find out in clear detail is the nature of the ‘non-blackout, VF on the A9ii.
Some (like Panasonic or Olympus) claim non-blackout but even in electronic shutter what is really happening is that you are seeing a split-second preview of the shot you have just taken, not what the subject is actually doing in that split second. Obviously if this ‘preview’ is quick enough then it becomes less of a problem.
So what exactly is the Sony doing in electronic shutter – is it continue to show you what the subject is still doing while it processes the shot just taken, or is it showing that ‘preview’?
Thank you again for your great work
Hi Dave, what you describe is called the “slide show phenomena” that plagues almost every single MLIC camera including Sony’s own A7RIV. The Sony A9 series is the only camera on the market that does not have this effect, i.e. the finder image is 100% live and not a slide shows of the past frames
Any plans for a BIF guide for the Sony A9ii?
it is in the works 🙂
Ari,
I hear you completely switched to Sony! I resented ly switched to Nikon from Canon, so I won’t be changing brands anytime soon. I have two questions, maybe three. Do you feel that cropped cameras are becoming obsolete? I own the D500 and D850, but I find myself almost always using the D850 and cropping if I need to. I would like a back-up full frame camera. Any suggestions? Finally, it doesn’t appear Nikon makes a zoom lens in the 100-400mm range with nearly the sharpness and durability of Canon. I though about Nikon’s 80mm-400mm but there appear to be numerous quality control issues with thistles. Any suggestions?
Best
April P.S. You are one helluva teacher!
Thanks April, you are quite right that the crop cameras are indeed obsolete, there will not be a replacement for the D500. The D850 as good as a DSLR gets I find it a bit slow but other than that it’s great. However, the DSLR cameras are generally becoming obsolete as the mirror-less dominates the market. they will be phased out in a couple of years.
I recommend the Nikon 500 PF, it is much better than any zoon Canon or Nikon make.
best
Hi Ari. Based on your review I have just ordered the a9ii and the 600FE OSS GM, plus the grip and TC 1.4. Finding the lens was like looking for a Unicorn, but finally will have it delivered. I also have Nikon D850 with the 500F4E ED FL and will keep for wildlife and stationary subjects because the 45MP is spectacular. When do you think you may release the A9ii + 600 GM BIF guide. Also, can you recommend a a9ii setup guide for BIF? Thanks for the review, best I’ve read on this combo!
Hi Daryl I am working on the guide. targeting early next year. Foe now just use Zone AF and it should cover most cases, the camera is very complex and unfortunately the manual is written poorly.
Ari- Great review & clear explanation. Really well done- professional quality. How do the new Canon (R5, R6) MILCs compare re. AF, shutter lag, black out, etc. Reading that they are very close (or even better) to Sony a9ii.
Thanks
Mike
Hi Michael, I haven’t tried the R5 extensively but from a quick it had trouble staying locked on challenging BIF like every single Canon camera before it. certainly not as bad as the 1DX series that struggled really hard but not quite there with the Sony’s.
Hi Ari, as a fellow engineer I must compliment you on this excellent and very informative review. I am currently using a D850 with a 500 PF and have been very satisfied with it; particularly the 46MP sensor. If I had my wish, it would be for an A9 lll with a 2X larger sensor and half the frame rate. Would this be possible, or would the smaller pixels compromise the speed and/or accuracy of the focusing system?
I am also using back button autofocus on the D850 with buttons assigned for single point, Group and 153 point. Sony cannot provide this feature, but has the need for it been eliminated by the sophistication of the focusing system?
Hi Ed,
Sonly already have a 60 Mpixel 12 fps camera but it suffers from finder lag and rolling shutter effect which makes it not ideal for action shots plus the high ISO performance is very limiting. If it were me I would opt for 30 mega pixel 20-25 fps camera as a replacement foe the current A9 II.
You can configure the A9 II AF-ON button to toggle between the AF patterns just like the Nikon cameras. It’s in the “custom key ” settings.
Oh well I guess 50mp 30fps no rolling shutter continuous af/ae at f22 -4ev will have to do.
Holy moly – they’re not messing around are they!
Hi Ari,
I’m the redactor of the website http://www.ornithomedia.com. Your website is very interesting, and we would like to publish a French version of your article”Sony A9 II for BIF, initial impressions and comparison vs. Nikon/Canon”. Of course, we would clearly present your article as the source, and we would add your name on all your photos. Would it be possible ?
regards,
David Bismuth
ornithomedia
Hi David, translation with credit is fine
best
Hey Ari,
Hope all is well. I’m giving consideration to a Nikon>Sony switch now that they’ve announced the a1. I’m wondering about the best option for hand held flight shooting. I know you use the 600 that way but I don’t feel confident I could so I’m considering other options for this purpose. I’d get the 600 for tripod use only I suspect. Here’s what I’m thinking about:
1. 400 f/2.8 GM
2. 100-400 GM + 1.4 tc
3. 200-600 G
First thing I’m wondering if you know, is what sort of quality and AF speed difference is there between the G and GM series lenses? The 1-4 with tc rig would be the lightest option and about the same speed and a bit less reach as the bare 2-6……….but it would be a GM lens.
The 400 2.8 is considerably heavier than the other two but obviously much faster. It’s about the same weight as the Nikon 300 f/2.8 I used to shoot hand held so I think I could manage it at 6+ lbs. And again it’s a GM lens.
Any thoughts on these options would be much appreciated.
If you want my honest opinion you must try the 600 f/4 GM and get confident 🙂 the lens is only 6.7lbs about the same as the 400 f/2.8.
If you have the resources for a 600 f/4, anything else will be a mistake and will result in deep regret long term. The 400 f/2.8 is too short for general bird photography. It’s not a wise investment for a bird photographer IMHO. You won’t find that many bird photographers shooting with a 400 f/2.8. The 2-6 is not bad at all but doesn’t really hold a candle next to the 600 f/4 in every measurable way. To be honest without a 600mm f/4 lens, I would personally give up bird photography and do something else. 95% of my portfolio is made with the 600 f/4 and wouldn’t have been possible with anything else, but this is just my opinion 🙂
For the past 20 years I have had to evaluate the best system in terms of available cameras and lenses and flash. At times it has been Canon and at the present it is Nikon. The Sony cameras are great but the available lenses for willdlife and macro and landscape photography that I use with my D850 and D5 are missing from Sony at this time.
I use Sony 600mm f/4 GM lens and 200-600 zoom which are both the best lenses in their class. I wish Sony also had a short light f/4 super telephoto lens like the Canon 400 f/4 DO II. that is the only lens missing for me.
Any plan to test the A1 ?
As soon as I get one 🙂
Hi Ari,
Are planning to release an AF Guide for BIF (Sony E System)?
Thanks
Nuno
Hi Nuno, I am currently working on it. It will include the A1 also. I take my time writing these guides so I can gain enough filed time with the camera to pass my experience to the users
cheers
Thanks Ari!
I’ve switched from Canon 1Dx + 5D IV to Sony A9 + A7R3 and I’m still adapting to the Alpha system that is quite different for Canon.
Looking for your Sony AF guide. 😉
Cheers
Ari,
I am considering upgrading my Canon 7D mark II to the Sony A9ii before my African Safari next month. However I am concerned about battery life with the EVF since I pretty much use my camera as my binoculars. I have been trying to decide between a Nikon D500 and the Sony. Do you think the A9ii could last with frequent use of the EVF or should I stick with a DSLR platform?
Thanks for your insight!
the battery usage is not an issue with the A9 II. I have the grip with two batteries. they last for 7000 to 9000 shots easily.
best
What about Canon 600mm IS III or II with Good Quality Adapter like Metabone on Sony A9 II ?
it will be useless in terms of AF.
Hi, well I got my a1 – here is a short video of my first attempt to capture rainbow lorikeets coming at me. Never could get them with the a9 and I have tried – they are just too fast. Well no problem with the a1 and 200-600. Absolutely wicked.
https://youtu.be/EhcFb_q9EHk
No brilliant keepers as it was overcast and auto iso was maxed out at 6400 but shocking to see that 1 out of 44 images where the head was out of focus and 1 missed frame. AF-C Priority set to AF and using Wide focus area.
Cheers
nice video Duncan
[…] Date:July 1, 2021 Author:Ari Category:Reviews Tags: Sony A-1, Sony A-1 BIF, Sony A-1 review, Sony alpha for birding, Sony alpha-1, Sony Alpha-1 BIF, Sony Alpha-1 review, sony BIF, Sony birds ← Sony A9 II for BIF, initial impressions and comparison vs. Nikon/Canon […]
A bit different question- I am new to Sony system, switching from Canon to Sony.
I have purchased Sony A9 II body and Sony 200-600mm (E Mount) lens.
Is there any good Sony body with Crop factor which takes E Mount lenses so that I can use the E Mount lenses both on A9 II and Crop Factor bodies depending on how far is the subject ( Bird/Animal ) ?
Thanking you for your reply.
https://www.facebook.com/NaturePhotographyByDhrubaKSapkota
Hi Dhruba, Sony do not make a professional small sensor body. crop factor does not help with far subjects, it’s the sensor resolution that matters. Please read this article to understand this topic better
https://arihazeghiphotography.com/blog/undrestanding-crop-factor/
for far subjects you can use your 200-600 with a TC.
Yes, the A9 is a good camera but for AF on a small bird in midground, my D500 beats it. The Sony AF sensing gets confused, to use the description of my Sony/Nikon/Canon agent. It racks out and if a shot is taken, EXIF data records no focus point.
This is widely reported by users, including of the A7R IV and A7R III.
Perhaps it’s due to the PD sensors being line-type only, or to insufficient contrast in the scene.
That’s not true, it is likely operator error. I never had any issue with my A9 II, it was orders of magnitude better than my Nikons. There is no such thing as line sensor in the Sony AF system.
[…] of the MLIC camera is less sensitive to the maximum aperture of the lens given the nature of the AF technology in these cameras. This means the AF tracking remains accurate and consistent even at f/8. The […]
[…] and the only MLIC camera suitable for serious action including bird and wildlife photography. Here is what I wrote about that camera back […]