
Canon 5D Mark IV field review
Debuted as a new DSLR category back in 2005, the original Canon EOS-5D was the first compact and relatively affordable DSLR body with a 12 Mega-pixel Full-Frame low-noise CMOS sensor at the time when other major camera makers were stuck with smaller CCD sensors. It quickly became adopted and loved by many photographers shooting weddings, portraits, events and landscape as well as press and studio photographers thanks to its high image quality at the time. Similarly, the EOS-5D Mark II broke new grounds with its first-to-the market full-HD video in a DSLR and a 21-Mega pixel full-frame sensor. Fast forward 11 years, the 4th iteration in the 5D series was released in late fall 2016. The 5D Mark IV, is the long awaited upgrade to the EOS-5D Mark III.
Unlike the original EOS-5D, or the EOS-5D Mark II, the EOS-5D Mark IV is not a revolutionary camera. There are other full-frame cameras within the Canon brand that offer either a significantly higher resolution or a significantly higher performance. The EOS-5D Mark IV on the other hand, tries to strike the best balance between resolution, image quality, performance, feature set, size, weight and cost rather than focusing on just one of them.
In this review, I will take a close look at the strengths and the weaknesses of the EOS-5D Mark IV from the perspective of an avian photographer.
Note: Most images in this article have been processed for viewing on a 4K monitor. Click on each image to expand. All images (c) Arash Hazeghi Ph.D. and cannot be printed or posted without permission.
EOS-5D, 4th vs. 3rd
The EOS-5D Mark IV is similar in its form factor and controls to the EOS-5D Mark III, but that’s where the similarities end. Everything in the EOS-5D Mark IV is entirely new, from its 30 Mega-pixel CMOS sensor and the 61-point Reticular II AF system, to the magnesium shell.
The table below compares the EOS-5D Mark IV with the EOS-5D Mark III. Everything has been upgraded while many new features have been added.
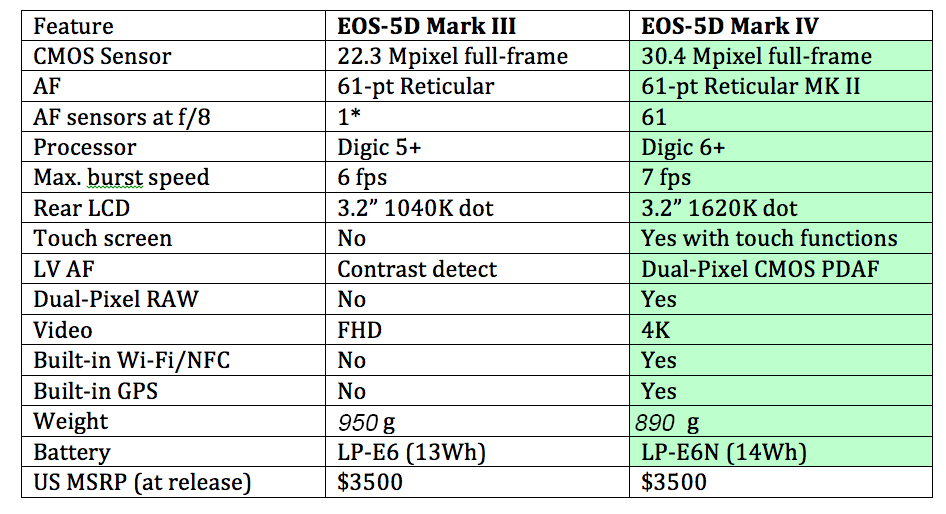
Major features of the EOS-5D Mark IV compared to the EOS-5D Mark III.
The two cameras are shown side-by-side below. The general layout and controls are similar. This means any current EOS-5D Mark III owner can pick up the new camera and start shooting right away. Although the EOS-5D series cameras (without the vertical grip) are noticeably smaller than the full-size EOS-1D X Mark II, they are still easy to handle and operate even when wearing thick gloves thanks to large buttons. The build quality is superb as with any pro-level Canon camera.
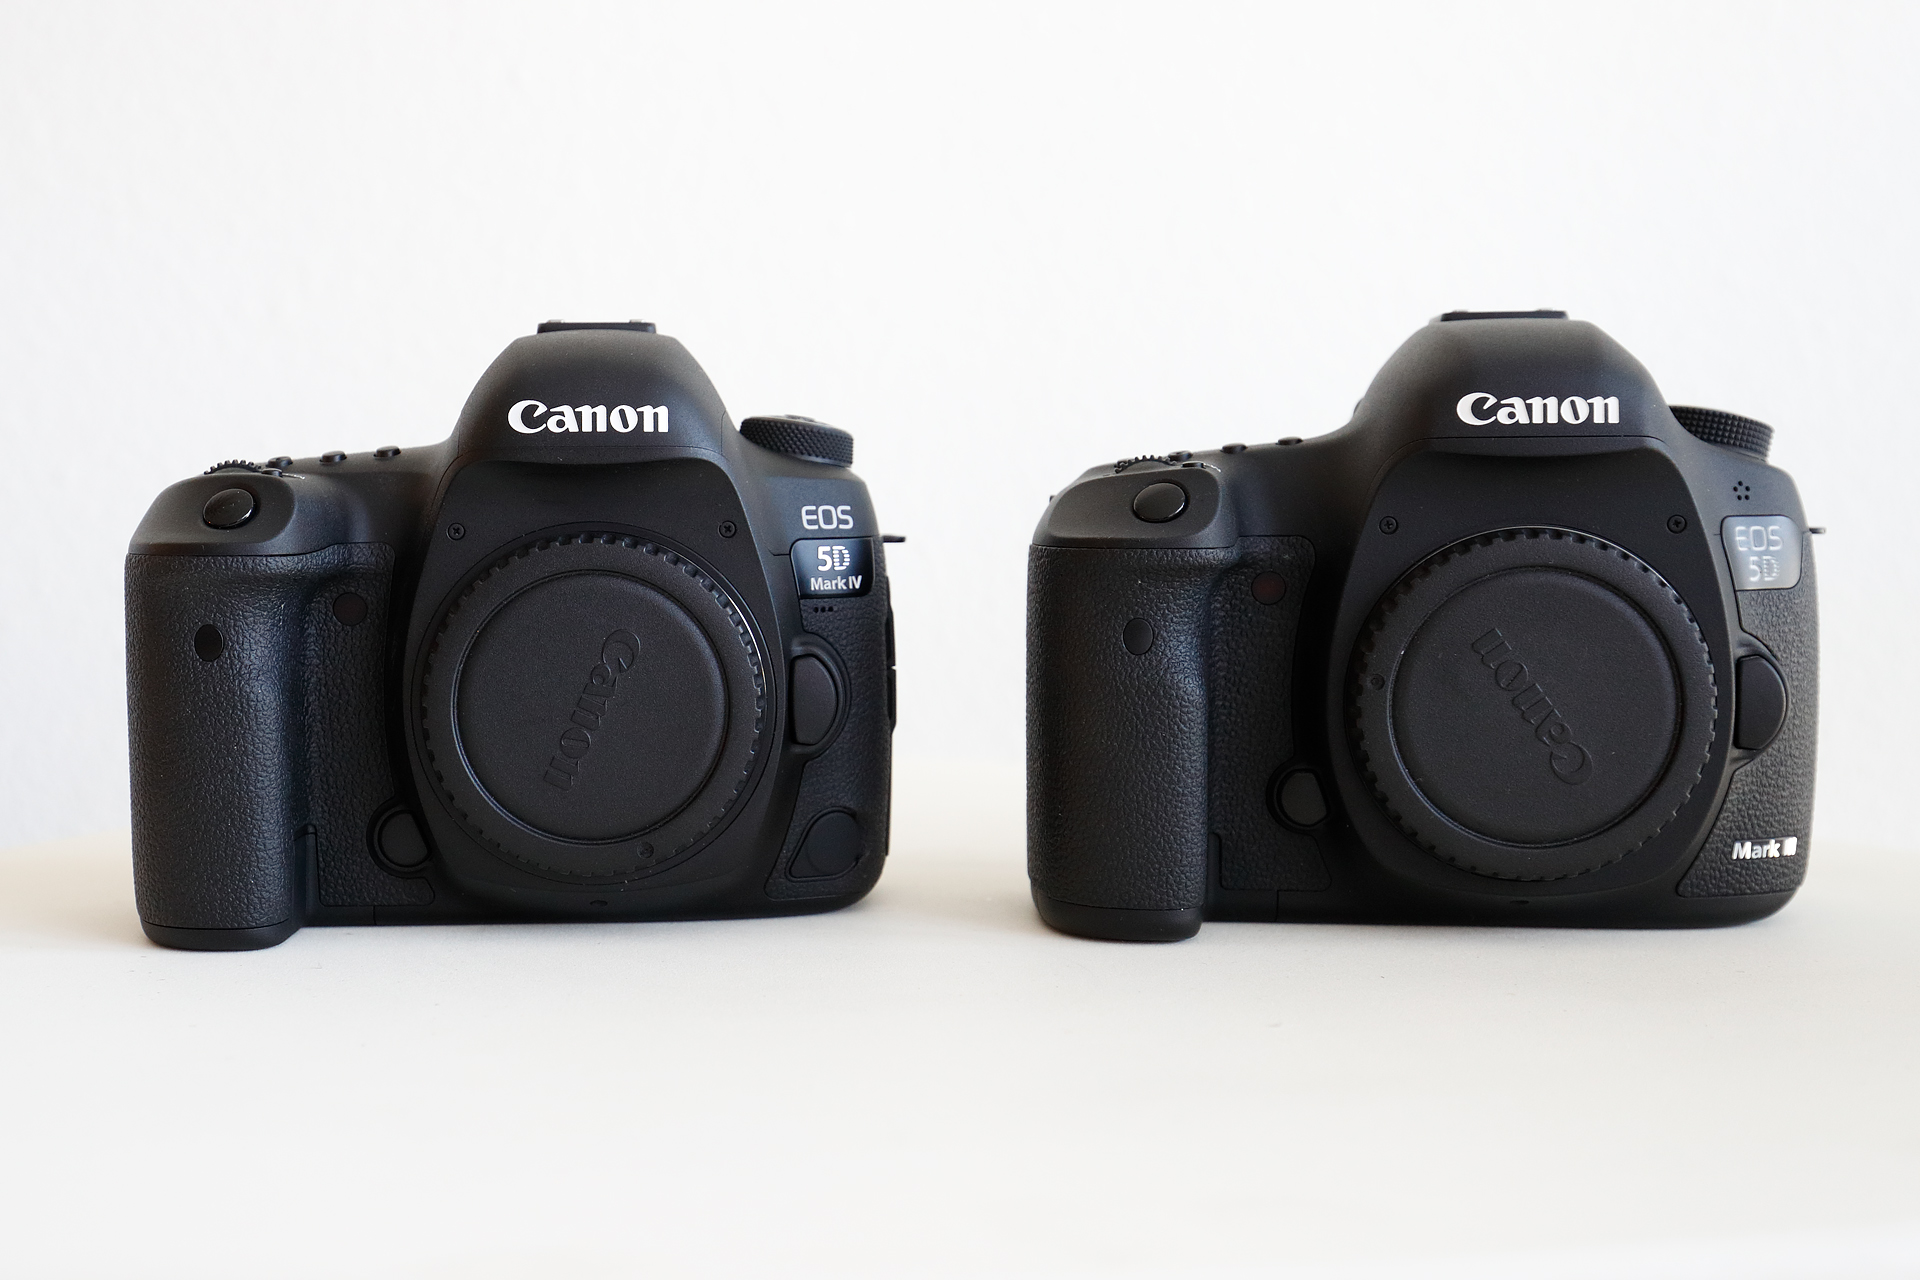
EOS-5D Mark IV (left) vs. EOS-5D Mark III (right). Note the prism dome in the EOS-5D Mark IV is a separate composite piece the allow for GPS/Wi-Fi reception.
The prism dome in the EOS-5D Mark IV is a separate piece made of composite material to allow reception of GPS/Wi-Fi signals. The camera is water resistant and dust proof to a higher degree than the EOS-5D Mark III, says Canon.
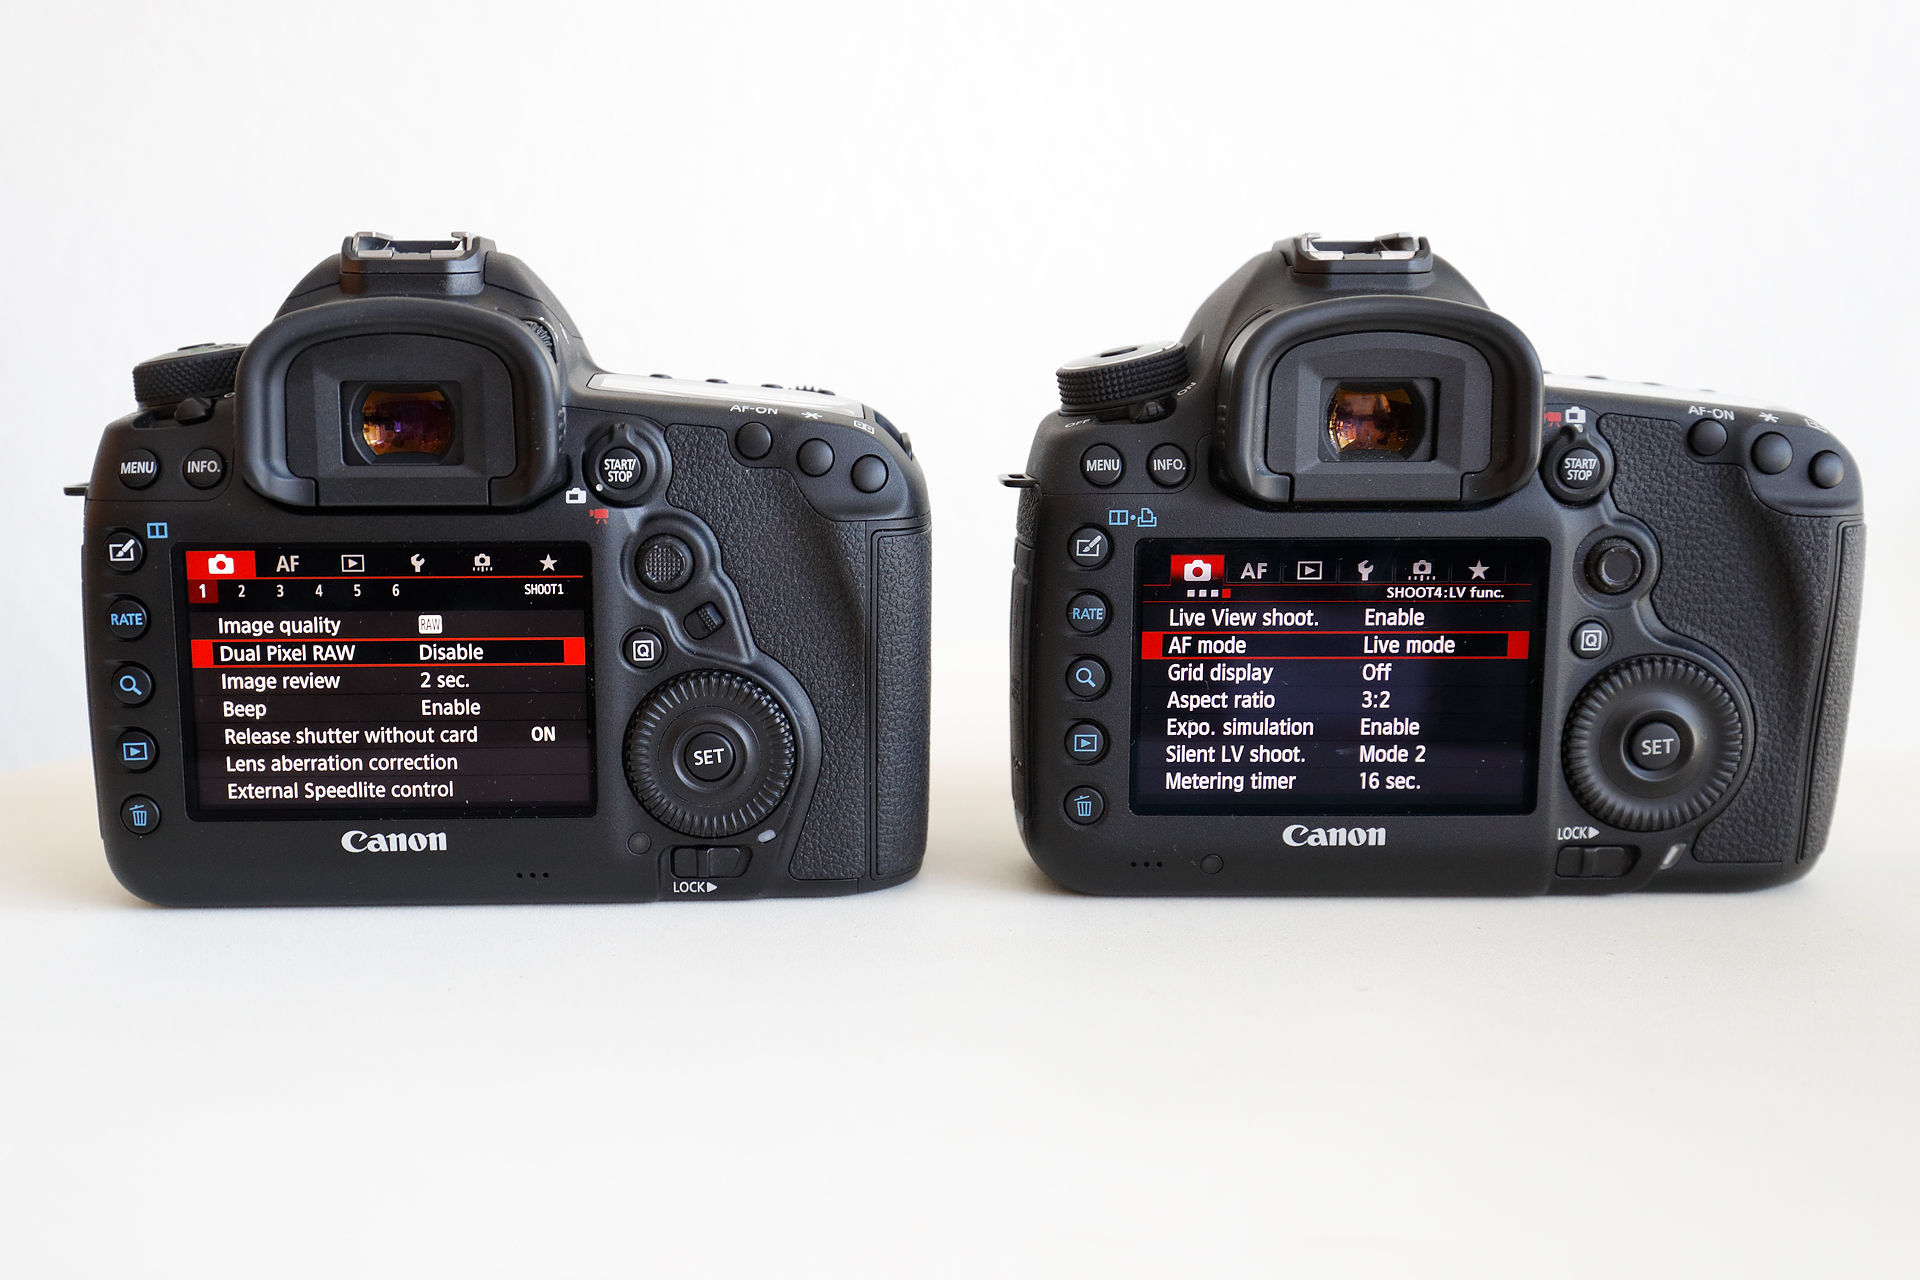
EOS-5 D Mark IV (left) vs. EOS-5D Mark III (right). The rear of the cameras are similar save for the new AF area selection button on the EOS-5D Mark IV. This button controls the AF pattern by default but it can be programmed to perform other functions as well.
Canon have added a new AF area selection button to the back of the camera, close to the main dial. This button can be configured to perform a variety of functions using the customs control menu.
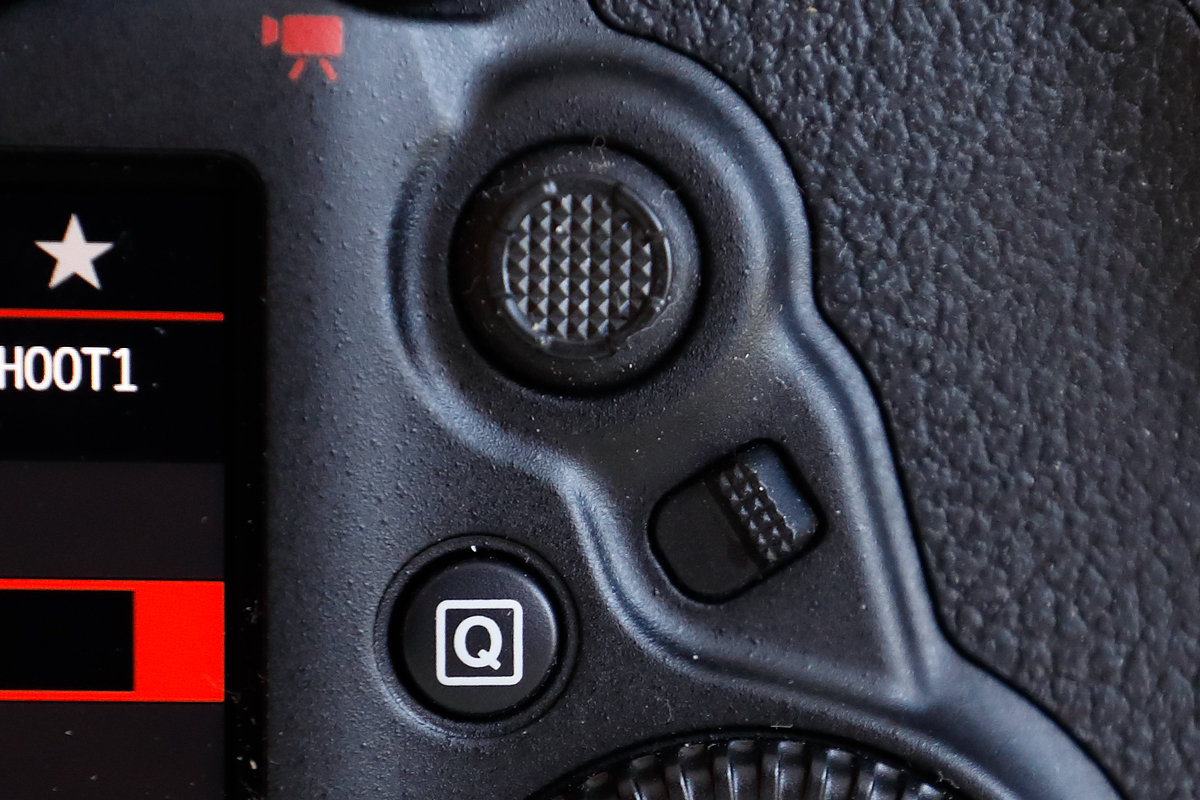
New in EOS-5D Mark IV: AF area selection button. This button as well as the Q button and the multi-controller can be programed to performs other functions.
The EOS-5D Mark IV also includes a new cable management accessory which uses a thumbscrew to attach to the I/O port. It holds the USB/HDMI cables firmly in place to prevent damage to the camera’s I/O ports when using long heavy cables or if the cables are accidentally pulled.
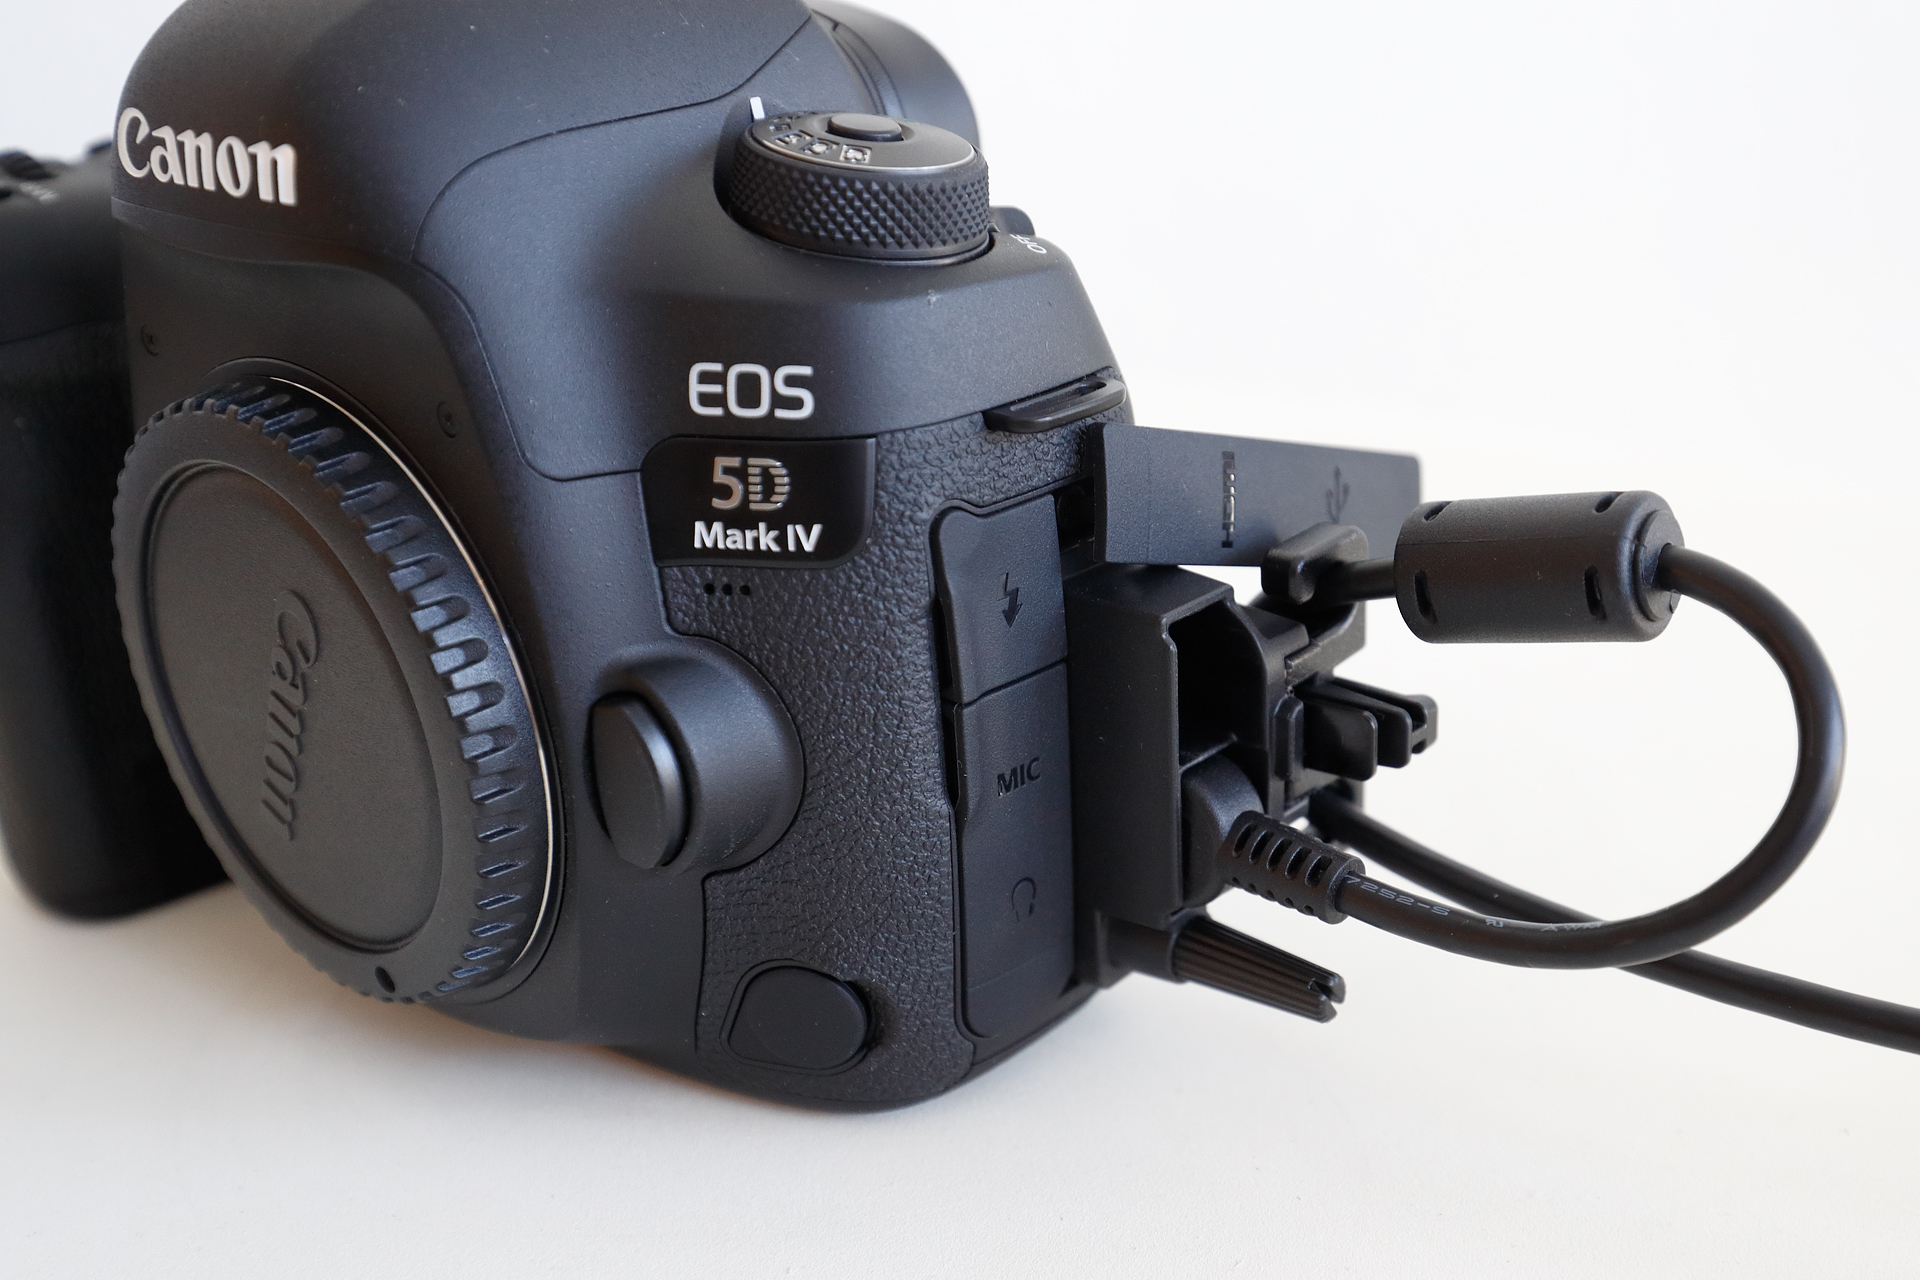
The new cable holder accessory makes it easy to securely attach a USB3 or HDMI cable to the I/O port. The accessory is attached to the body using the included thumbscrew.
The only thing Canon did not update in the EOS-5D Mark IV is the camera’s storage interface. It still uses CF + SD card slots. CF is getting long in the tooth and is limited to UDMA7, the newer CFAST interface allows for much faster read and write speeds (500+ MB/sec). Many of the EOS-5D Mark IV users also use the EOS-1D X Mark II and dealing with two types of storage media, card reader etc. is very cumbersome.
Touch screen
The capacitive touch screen in the EOS-5D Mark IV is very useful. It can be used to quickly change the menu settings, zoom in or scroll an image, move between images and more. It supports common touch gestures such as pinch to zoom, drag to pan etc. and is calibrated as good as the best smartphones on the market. The touch sensitivity can be adjusted if needed. It surprises me that Canon did not include touch functions in the EOS-1D X Mark II which has an identical touch screen hardware. Perhaps a firmware upgrade will enable these functions for that camera as well. The touch screen can be disabled it needed.
Wi-Fi
This is the first time Canon have included a Wi-Fi/NFC module in one of their high-end cameras. Wi-Fi can be used not only to connect the camera to a smart phone like most other cameras, but also to connect the camera to any access point as an FTP server. This can be used to upload images directly to your computer, NAS server, or even the internet photo-sharing and social sites (Flicker, Tweeter, Facebook, Google+ etc.). I find the transfer rate over Wi-Fi too slow when shooting volume in RAW but it can be useful for quick JPEG uploads to the web. All recent Canon bodies allow for in-camera RAW conversion so even if you exclusively shoot RAW like myself, you can quickly extract a JPEG and upload it to your destination.
The image below was converted from RAW and cropped in the camera itself and then uploaded to my iPhone via the Canon app. Click on the image to see it large, although the image quality is not as good as a RAW conversion in DPP using my desktop, it is acceptable for internet sharing or record keeping and even making prints.
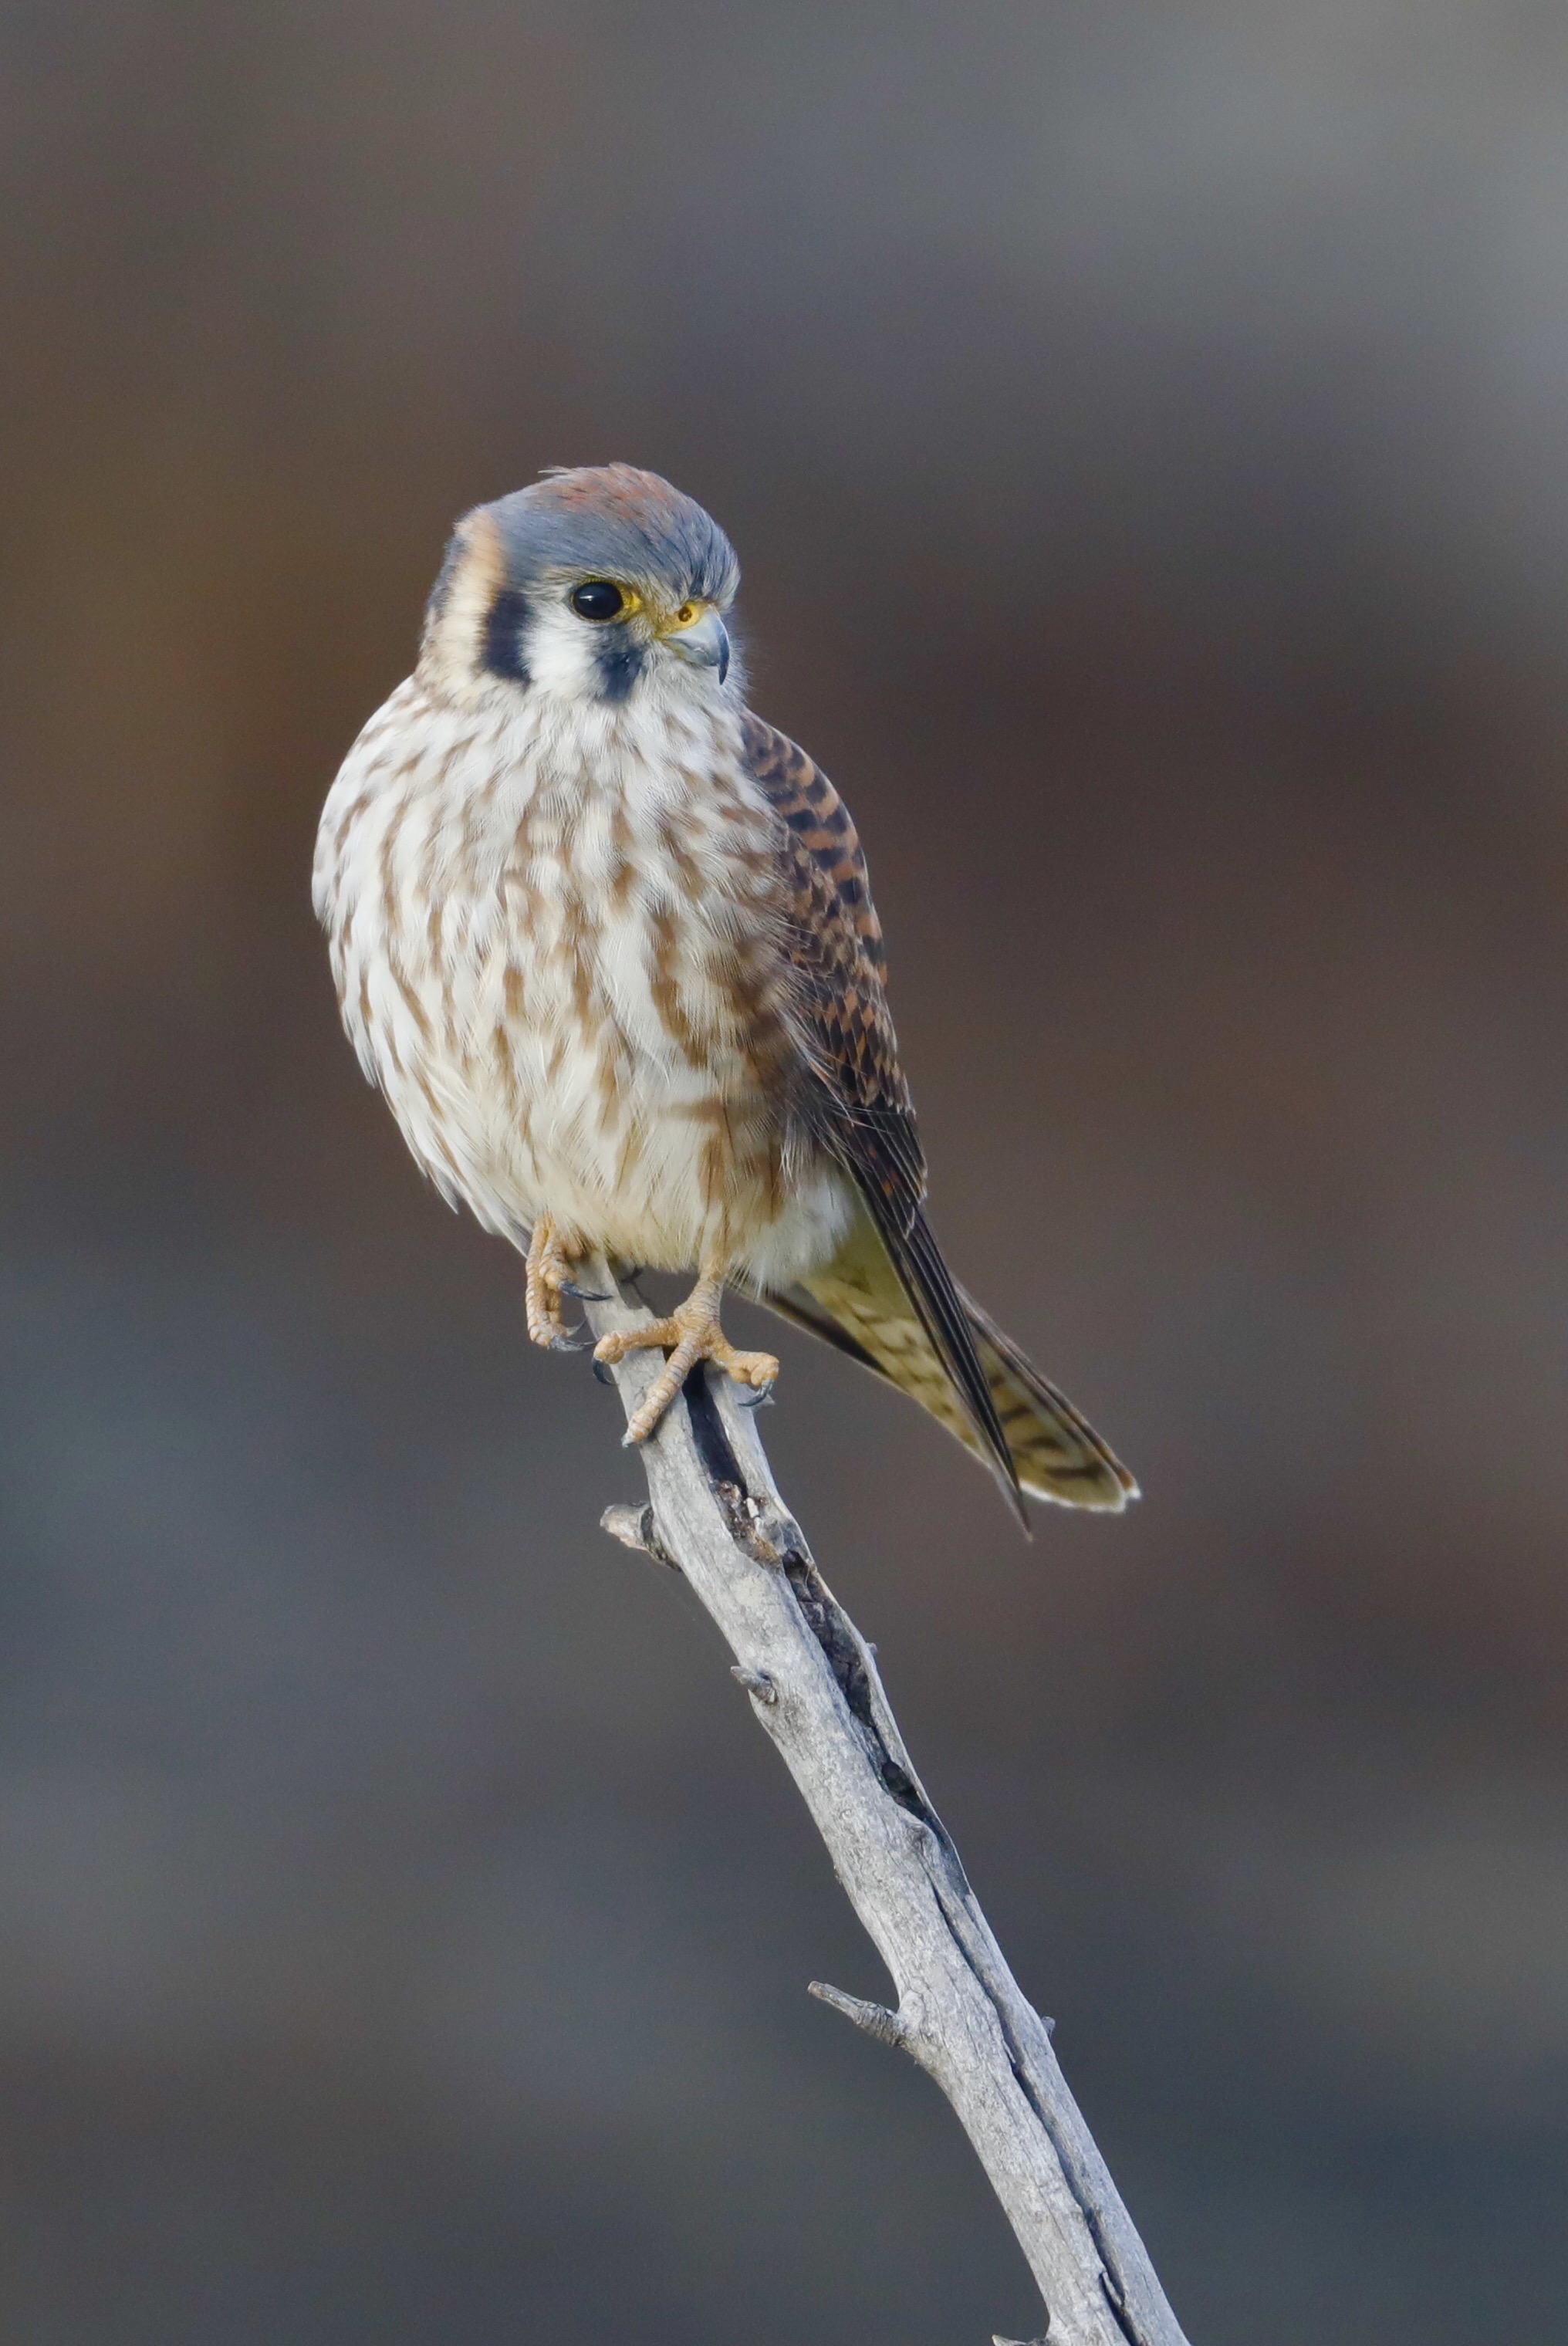
Female American Kestrel. In-camera converted JPEG. ESO-5D Mark IV. EF 600mm f/4 IS II + EF Extender 1.4X III. ISO 2500. F/5.6 at 1/800sec. Hand held from vehicle. Click on the image to see a large file. (c) 2016, Arash Hazeghi, all right reserved.
Another useful feature enabled by Wi-Fi is the smartphone remote app. I have used remote apps for several other cameras including Fuji and Sony but to date none has been as robust and as refined as the Canon app on my iPhone. The live view feed is very stable and doesn’t crash my iPhone, the app can run indefinitely as long as the camera has battery without freezing or dropping the connection. Switching to other apps on the phone will not kill the connection. Most camera functions can be set remotely. Below is a screen capture from the remote app.
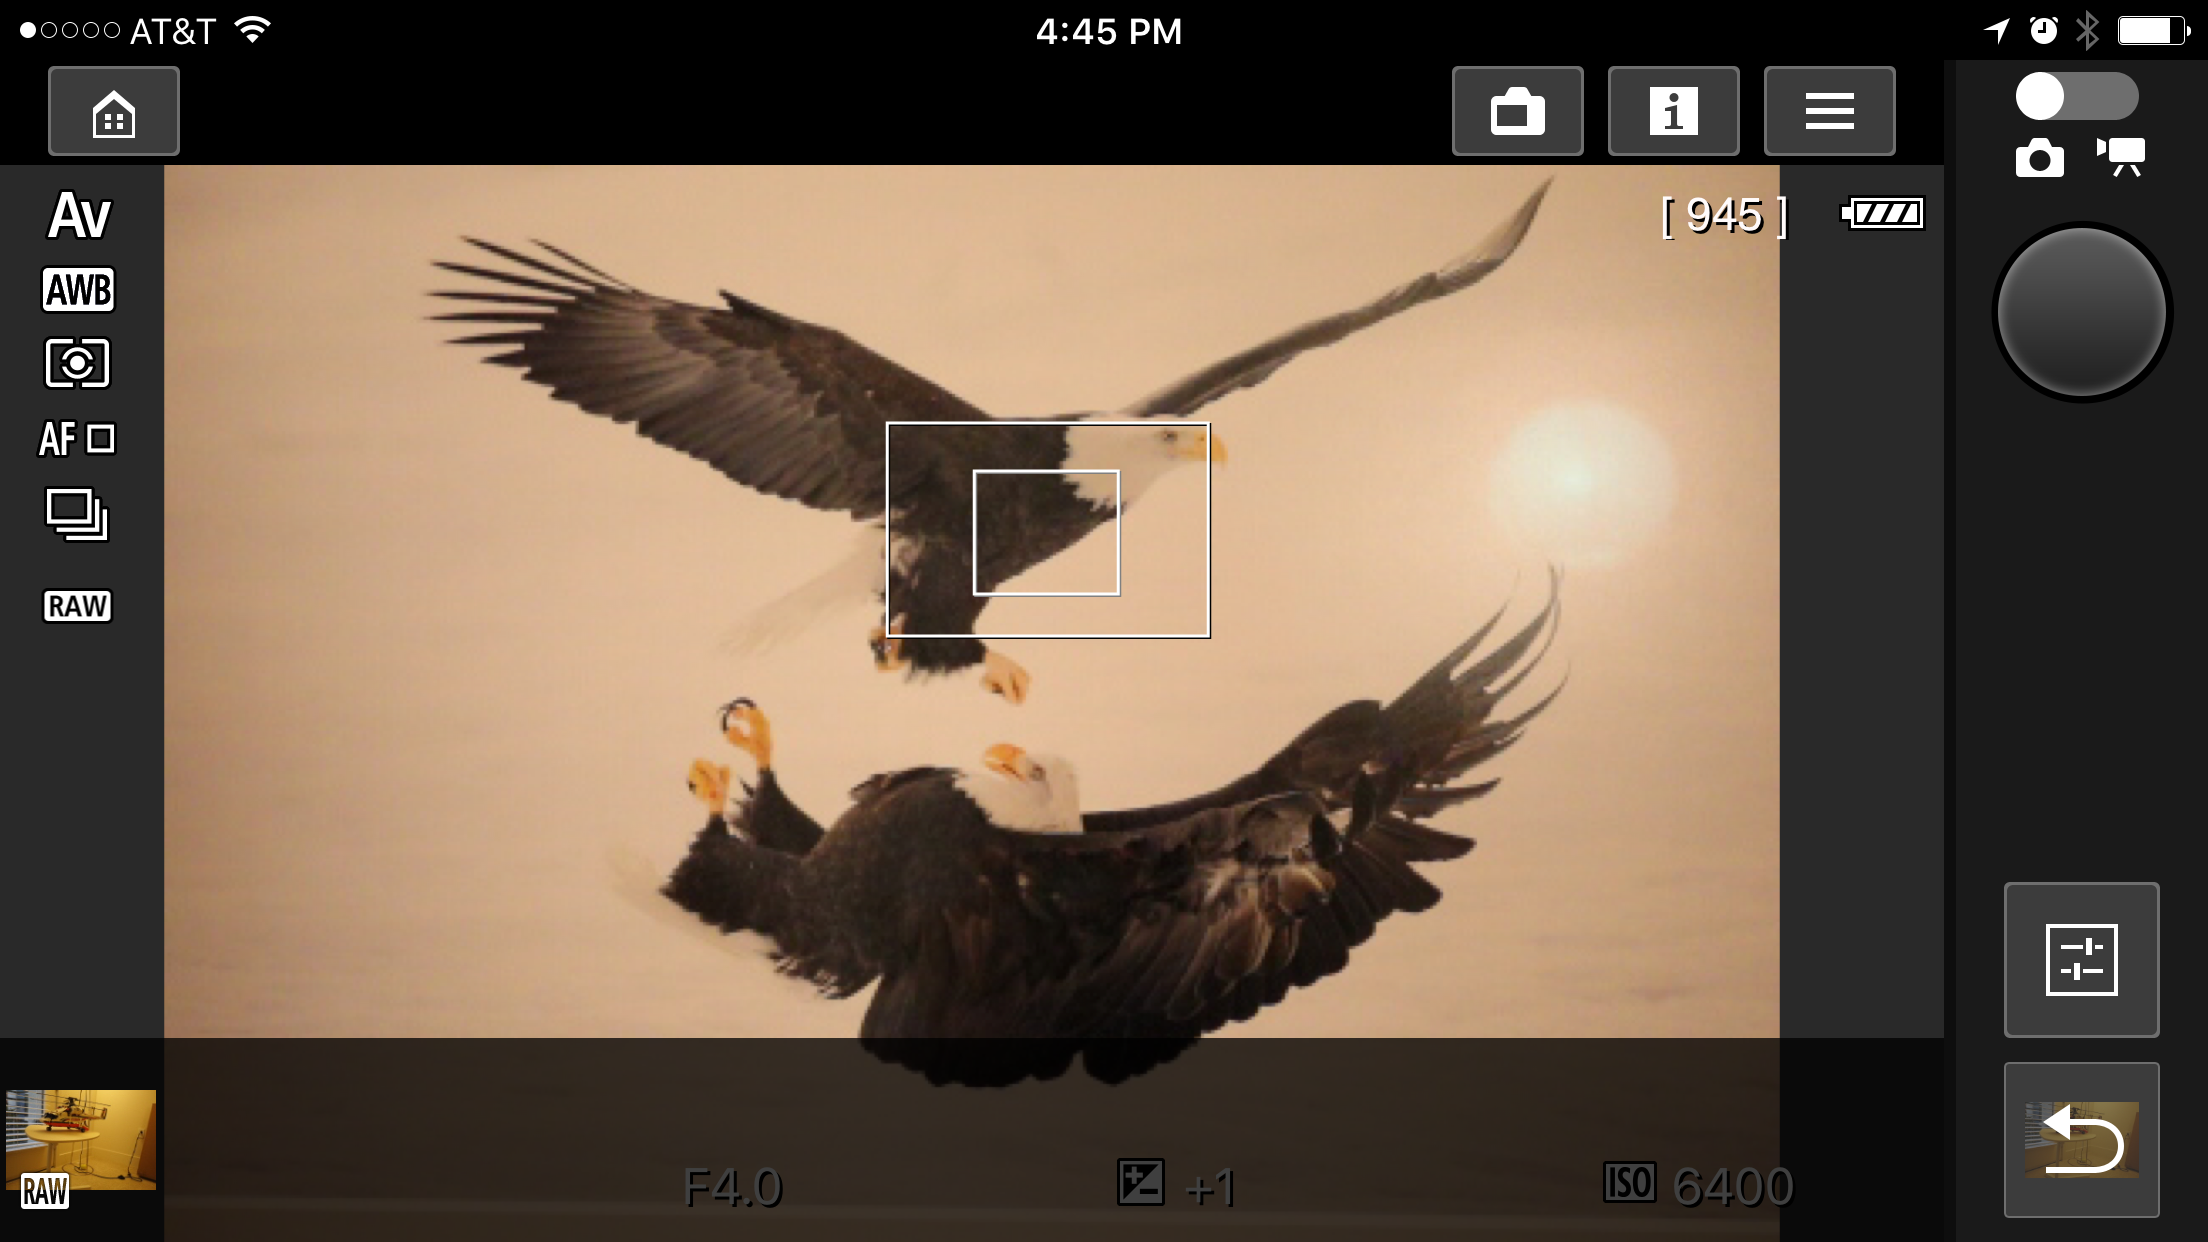
EOS Camera Remote for iOS. The app is stable and fast, camera settings are displayed and can be changed. Servo AF (LV DPAF) is possible with the app as well.
One killer application enabled via WiFi is reviewing images quickly on your laptop, iPad or large screen phone without needing to download them. You can browse, tag and delete unwanted images directly via the app. After each shoot you can simply walk through and weed out your files when sitting in a cafe without needing to take the camera out if your bag. you have to watch for battery usage though, using WiFi for a couple of hours can drain the battery. I found 2 fully charged batteries to be sufficient for a full day of shooting plus moderate WiFi usage (with the GPS active).
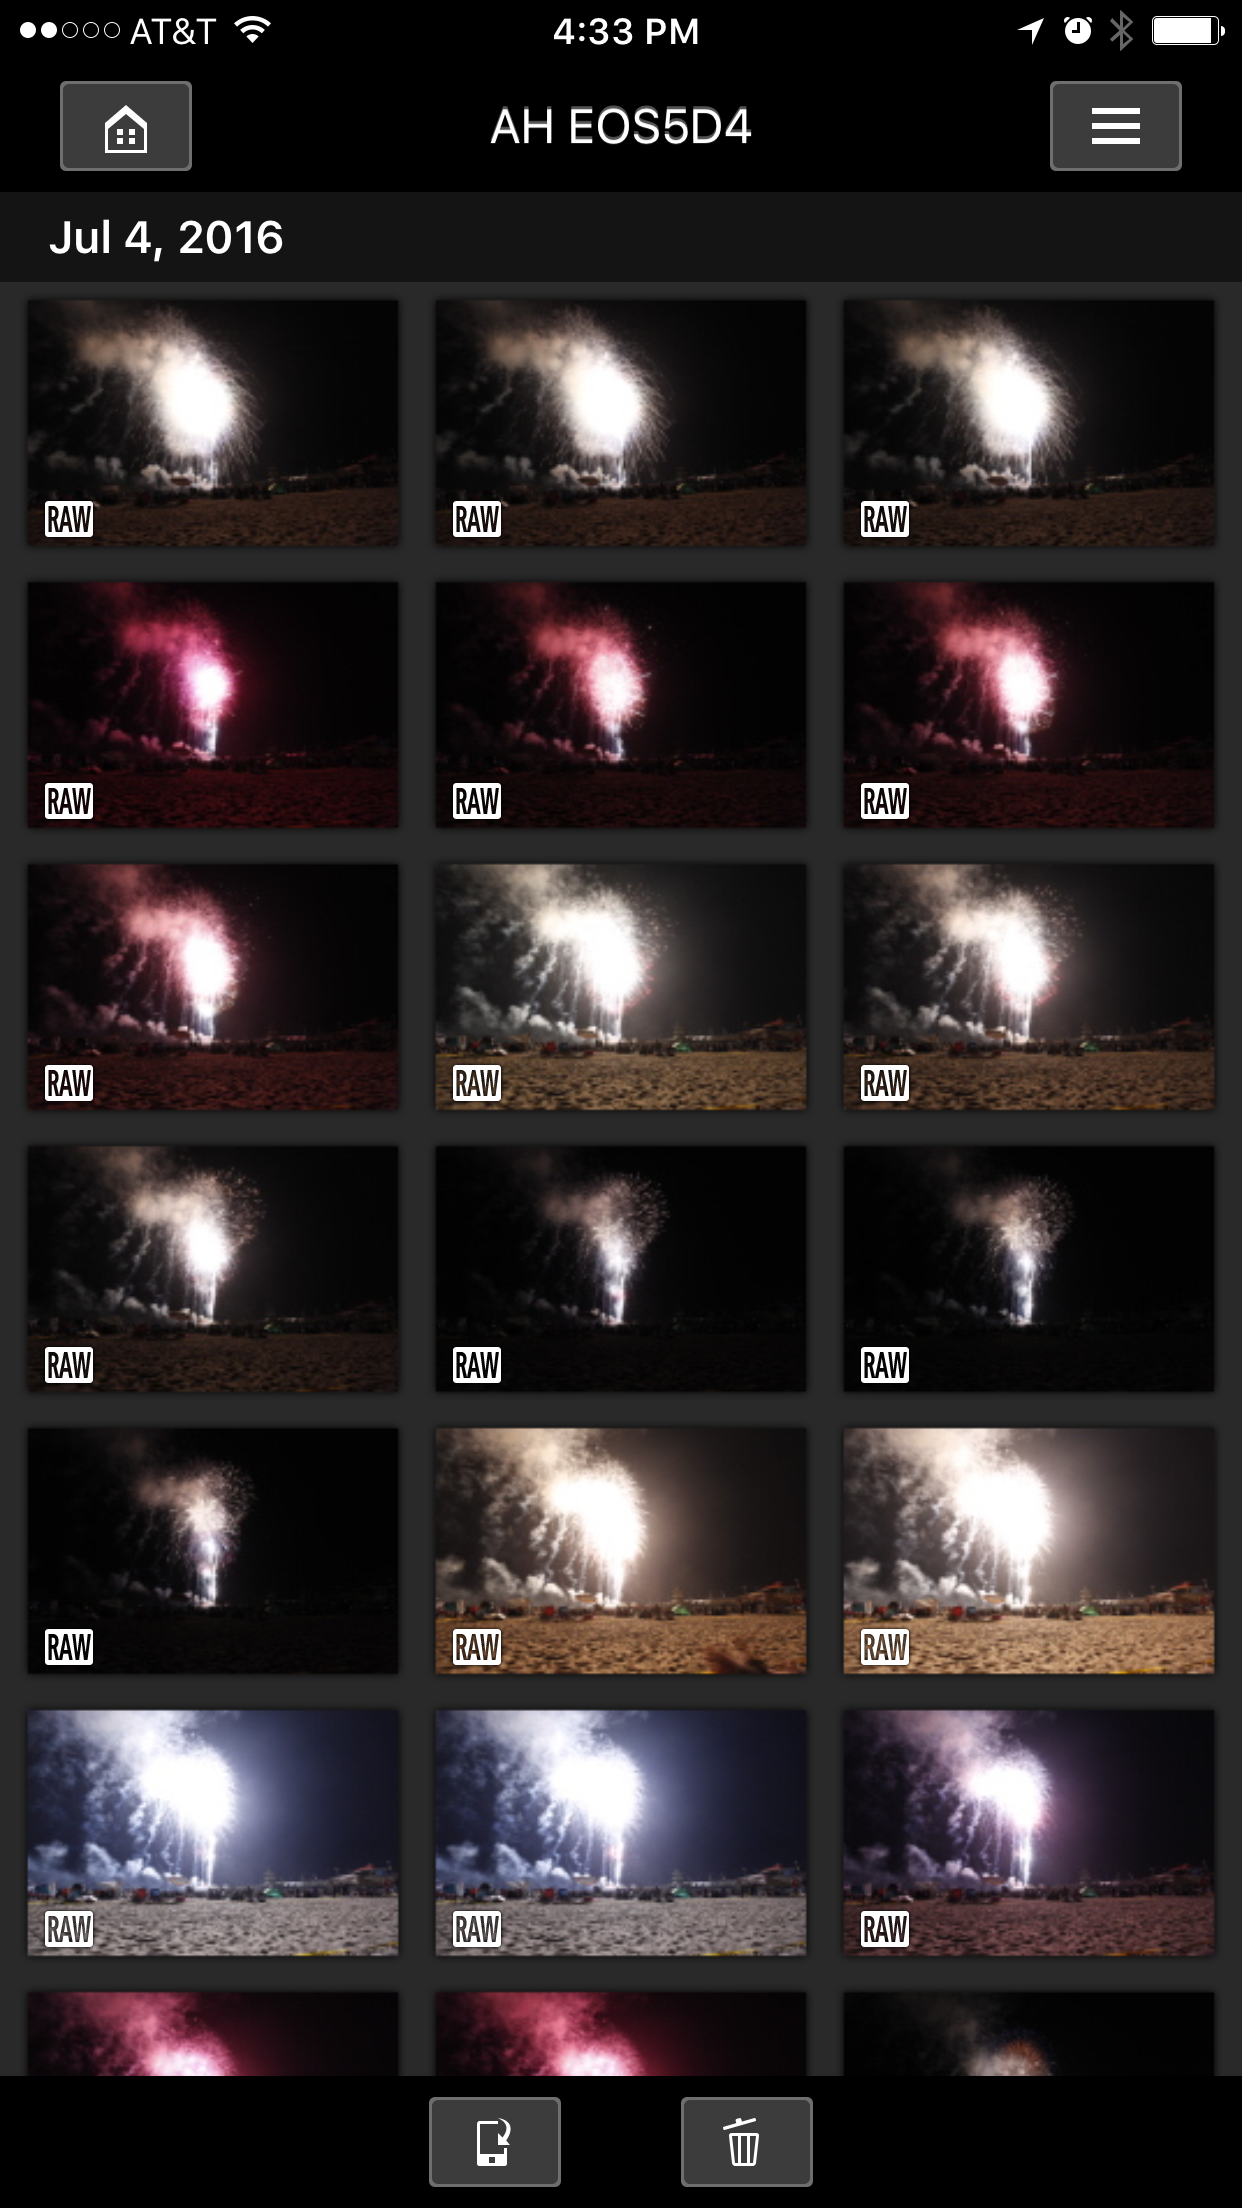
Thumbnail display of the RAW files on the CF card. Multiple Images can be selected, sorted or deleted.

Each image can be displayed individually. You can zoom to inspect sharpness or download a JPEG copy to the phone.
The desktop-based EOS viewer utility can be used for remote shooting over Wi-Fi from your computer. This is also very useful when the camera is attached to a super-telephoto lens on a tripod sitting outside or in a different room, or when performing calibration. You can also set the custom functions via the EOS viewer utility as well. The EOS-5D Mark IV also includes built-in GPS, like the EOS-1D X Mark II and unlike the EOS-7D Mark II, the GPS module uses little power and doesn’t drain the battery. I keep it ON at all times. Make sure you set it to mode 2 (low power).
Image quality comparison
Every EOS-5D series is ultimately going to be judged by its image quality. The EOS-5D Mark III brought only a minor resolution increase over the EOS-5D Mark II while it improved the high-ISO performance. After the introduction of the original EOS-1D X, the 5D Mark III became a strictly backup body for me. The 18 Mega-pixel sensor in the EOS-1D X provided similar resolution and at least full stop of better high-ISO performance. There was really no situation where I’d reach out for my EOS-5D Mark III, unless the my 1D X was not available. With the EOS-5D Mark IV’s 30 mega-pixel sensor I can see situations where I’d reach out for this camera instead of my EOS-1D X Mark II to take advantage of the extra resolution. That is *IF* the image quality is great, which we are going to find out.
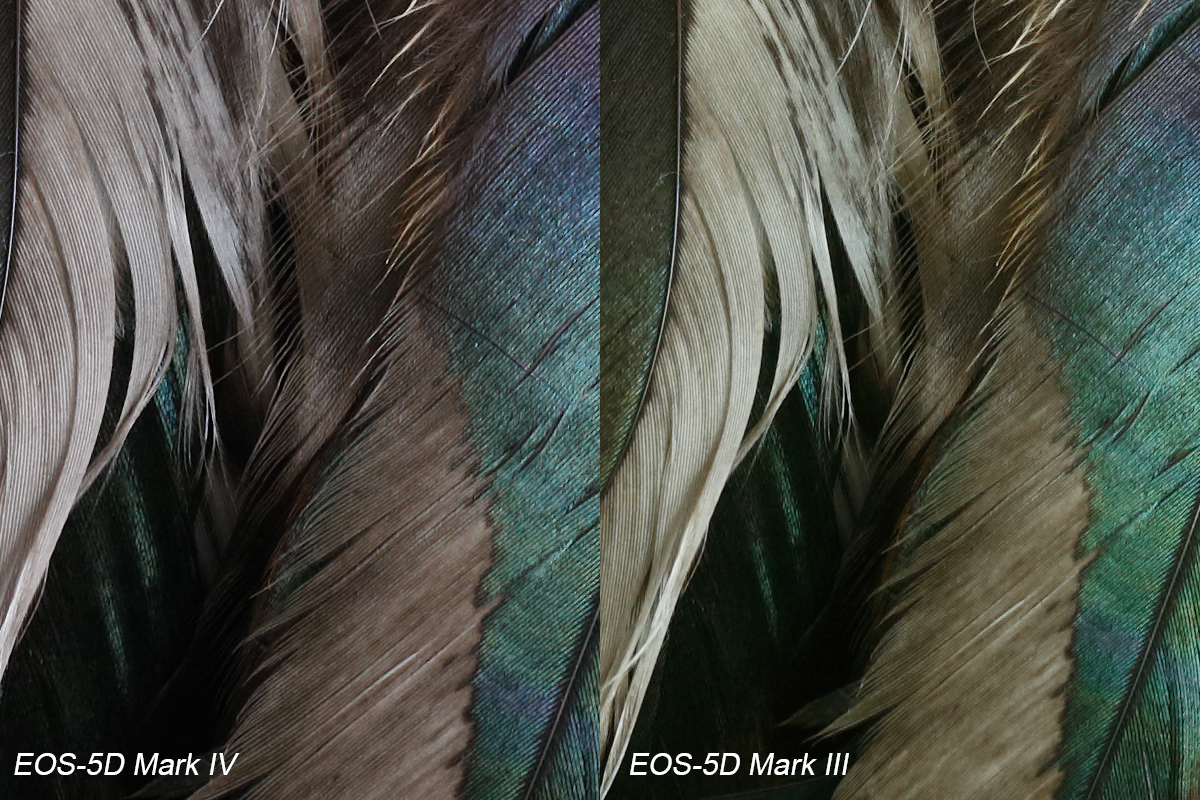
The scene below should be familiar to those who follow my blog, it is my decoy owl decorated by game feathers to simulate a bird. I compared the EOS-5D Mark III with the EOS 5D Mark IV shooting this owl with my EF 70-200 f/2.8 IS II, set to 200mm and f/8, attached to a sturdy tripod.
The RAW files were converted to TIFF using the latest DPP 4.5. Luminance NR was set to zero to level the playing field. I used minimal amount of chrominance NR to remove color noise. Chrominance NR in DPP does not affect spatial detail. For more information please see the DPP4 RAW conversion guide.
Note: you must click on image to see the full-size crops

100% crop from RAW converted with DPP 4.5. ISO 100. Click on the image to expand.
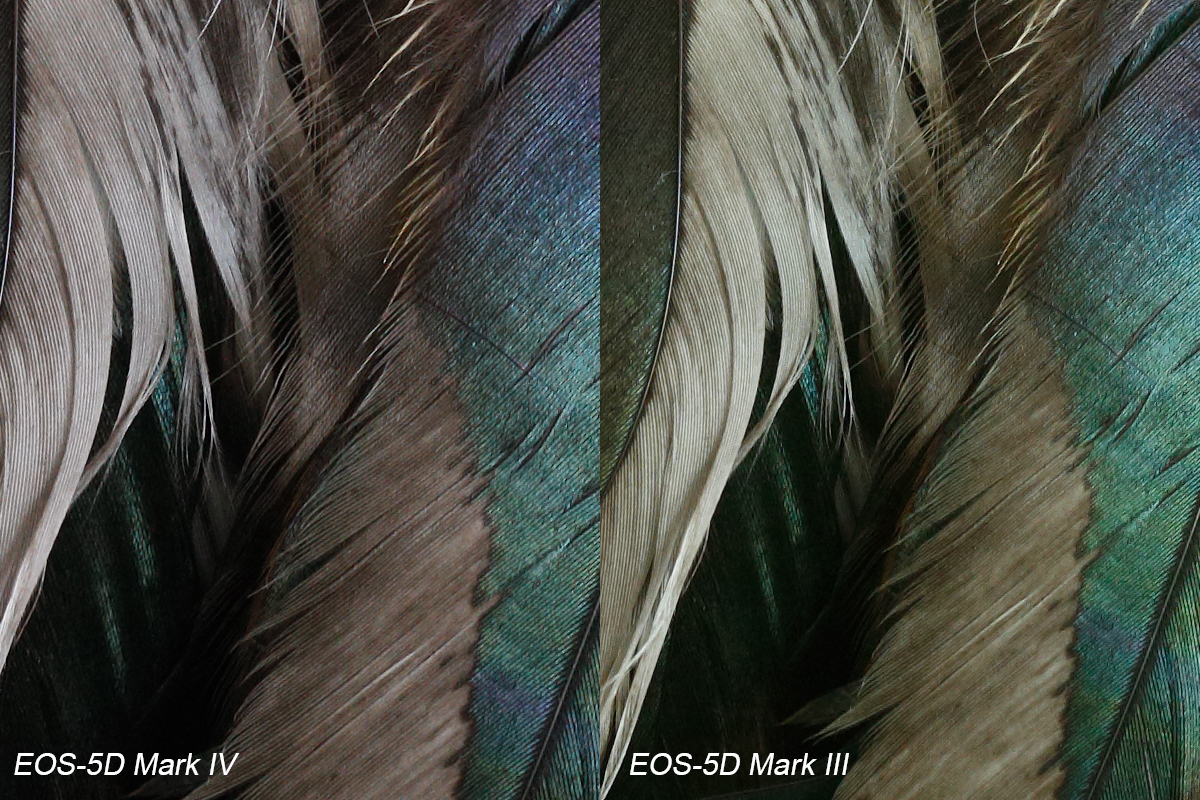
100% Crop from RAW converted with DPP 4.5. ISO 400. Click on the image to expand
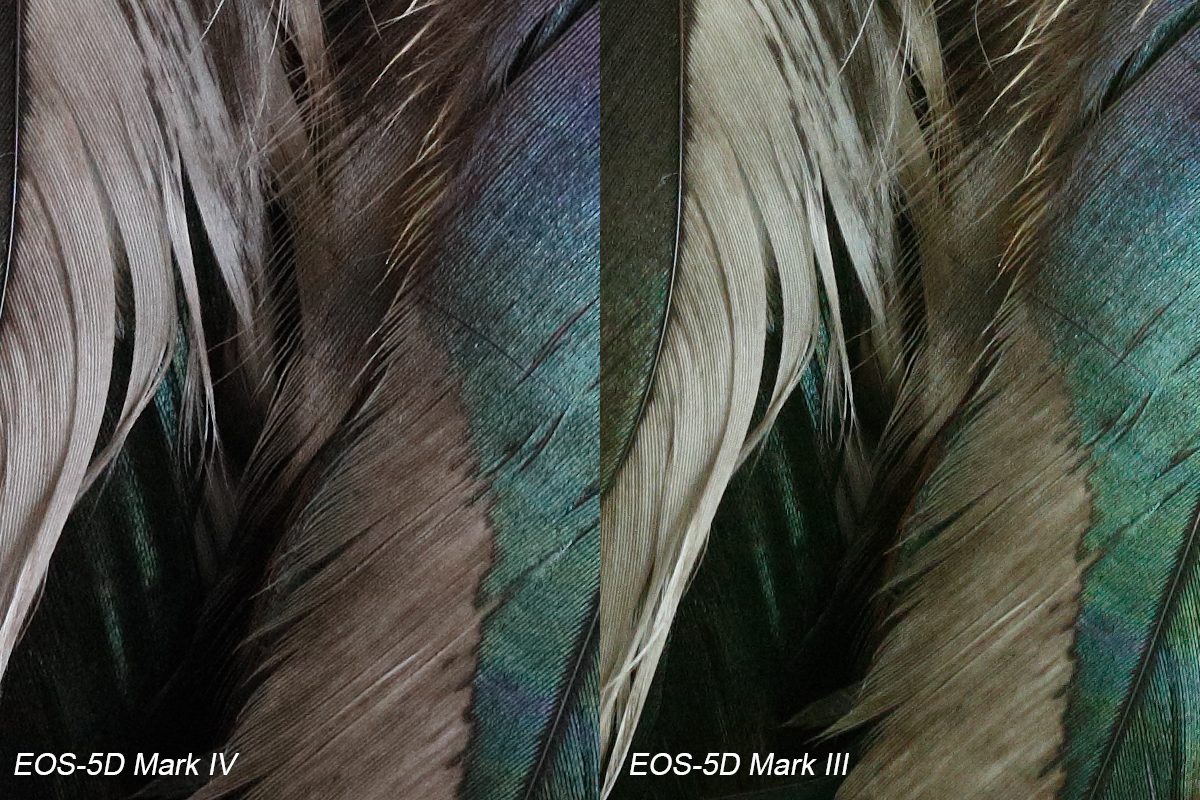
100% Crop from RAW converted with DPP 4.5. ISO 800. Click on the image to expand.
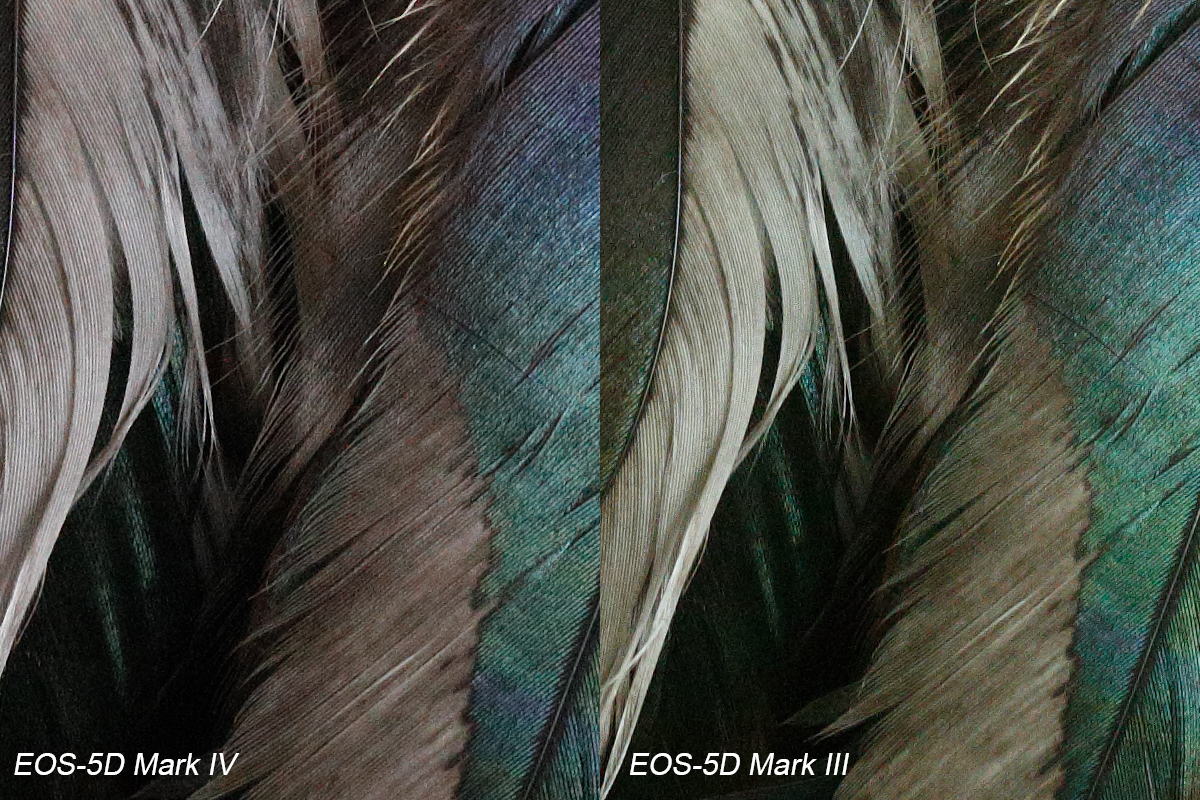
100% Crop from RAW converted with DPP 4.5. ISO 1600. Click on the image to expand.
100% Crop from RAW converted with DPP 4.5. ISO 3200. Click on the image to expand.

100% Crop from RAW converted with DPP 4.5. ISO 6400. Click on the image to expand.
From the crops the resolution advantage of the EOS-5D Mark IV is readily visible. It can resolve more details across the ISO range from ISO-100 all the way to ISO-6400. At the same time, at higher ISO’s the EOS-5D Mark IV looks sharper and shows less noise. Canon have increased the pixel count by 50% and improved the high ISO at the same time which is quite remarkable. The EOS-5D Mark III was no slouch in high-ISO performance but the EOS-5D Mark IV takes it a nudge higher.
Overall I would not hesitate to use EOS-5D Mark IV all the way up to ISO 3200. ISO 6400 can be used in most situations as well, it works best when lightning is uniform.
The EOS-5D Mark III had some pattern noise (FPN) which could limit the lower ISO shadow detail. I never found this to be an issue as I have learned not to underexpose my photographs and not to shoot in harsh light when shadows are strong and equally unattractive. The only situation where I found the pattern noise objectionable with the EOS-5D Mark III was for nigh time long exposures. The darker tones could show FPN if pushed too much.
To exaggerate any pattern noise in the sensor I photographed the night scene below at 6 sec, f/5.6 at ISO 100.
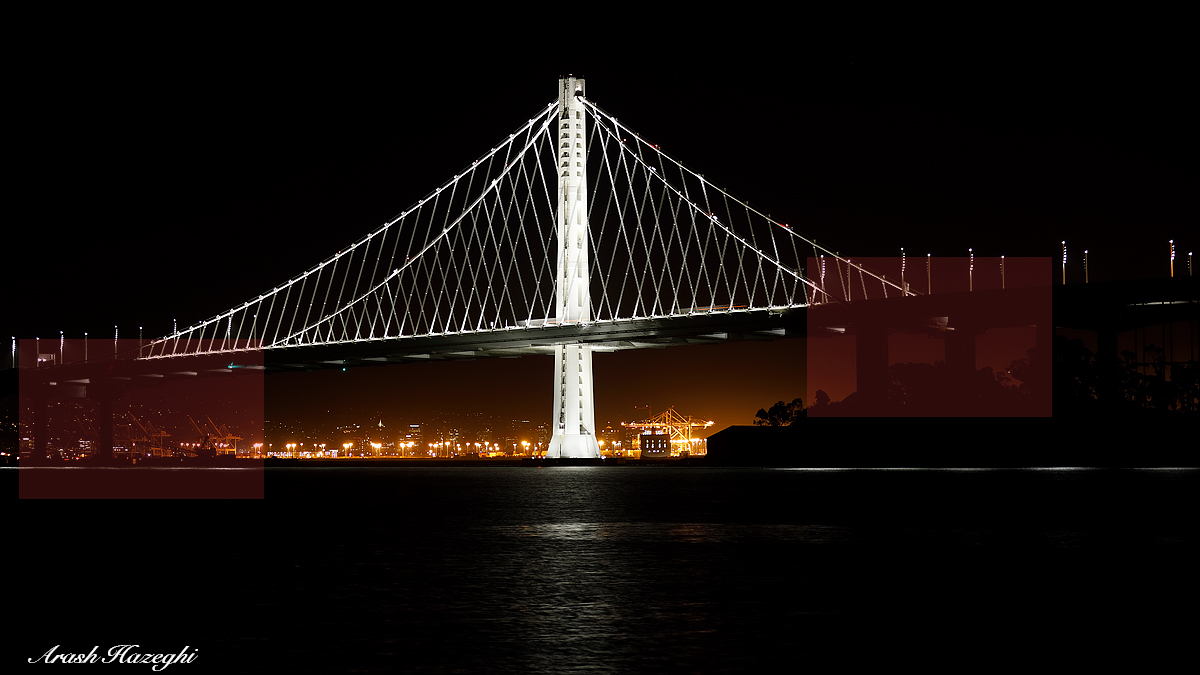
Night scene: San Francisco Bay Bridge extension. EOS-5D Mark IV, EF 70-200mm f/2.8 IS II. 6 seconds exposure at ISO 100. 100% crops of the red frames are shown below after +3EV exposure adjustment and maximum shadow adjustment of +4 in DPP4.5

100% crop from RAW. Exposure was raised by +3EV and a shadow adjustment of +4 was applied in DPP4.5. No noise reduction applied.

100% crop from RAW. Exposure was raised by +3EV and a shadow adjustment of +4 was applied in DPP4.5. No noise reduction applied.
I don’t shoot landscapes but below is another example which might be relevant to photographers who like to shoot landscapes, the original RAW was exposed to maintain the highlights in the sky and ocean, then I raised the exposure by an equivalent 7 stops in DPP4.5 and Photoshop for the shaded regions.
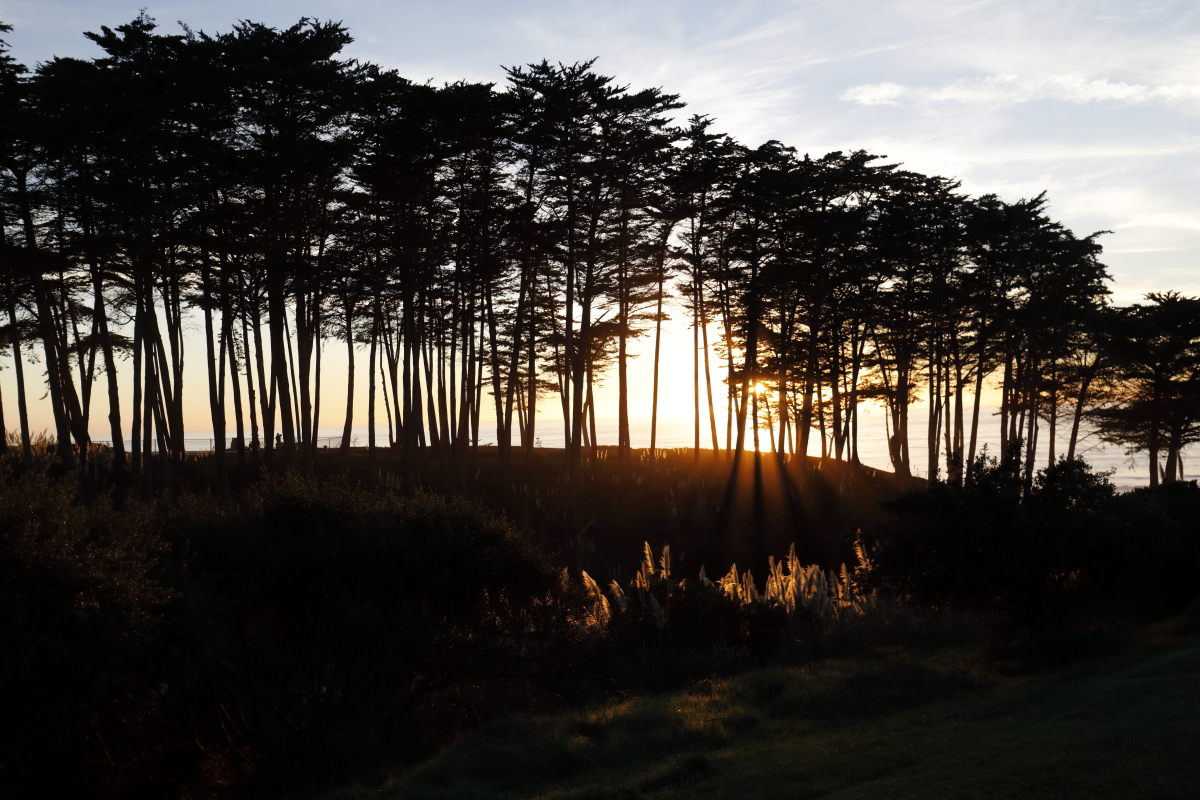
EOS-5D Mark IV, EF 16-35mm f/4 L IS. ISO 250, F/4 at 1/250sec, B+W circular polarizer.
Same file after processing is shown below. Click on the image to see a very large 3000-pixel wide image (best viewed on a 4K screen)

Same file as above after optimal processing.
You can push the RAW file even more, but personally, I am not a fan of the unnatural looking HDR processing that is trending these days.
As we can see the FPN has been greatly improved as was the case in the EOS-1D X Mark II. Again wildlife and avian photographers don’t usually care much for low ISO or pushing deep shadows. My starting ISO when shooting birds is usually between 640 and 800. I only make photographs in early hours of the morning or late hours of the evening when soft light makes attractive images. The improvement is welcome, nevertheless.
Field Image Quality
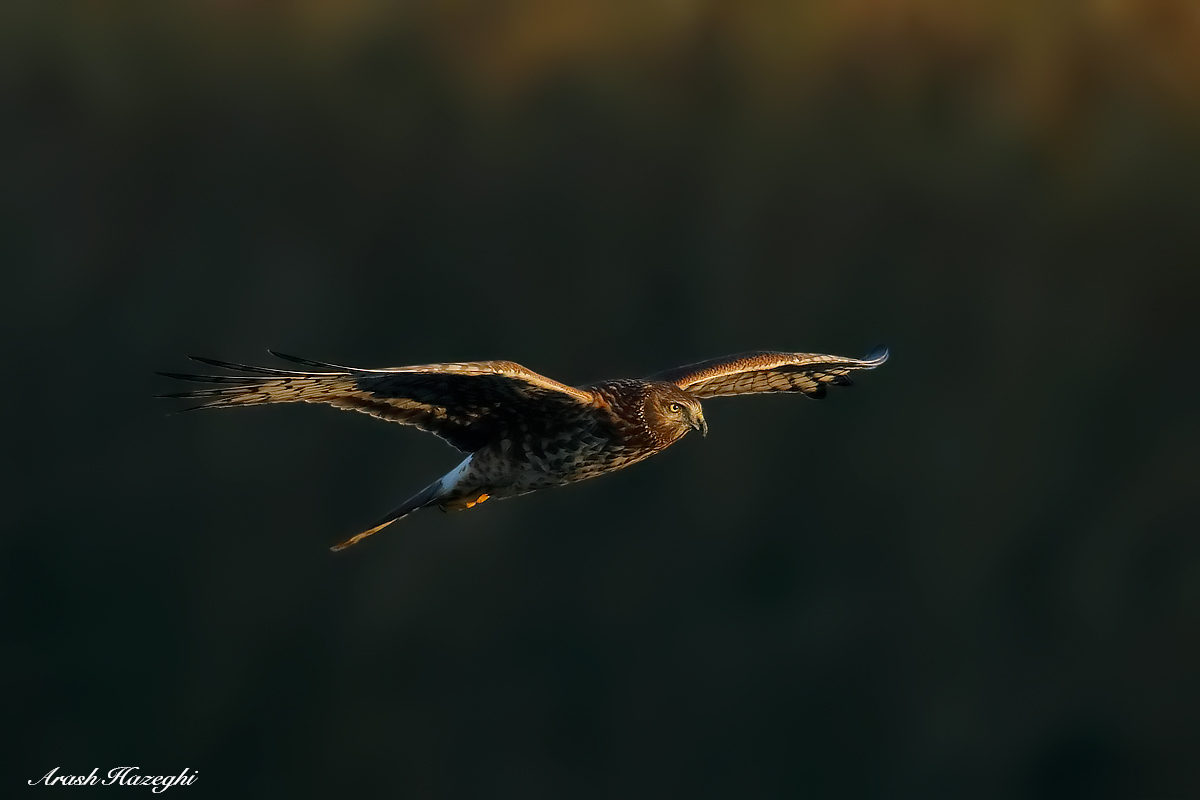
I spent a few months photographing with the EOS-5D Mark IV, during this time I had the opportunity to shoot a variety of avian subjects with this camera. The image quality of EOS-5D Mark IV is excellent across the ISO range. It delivers sharp and detailed files that retain their quality even after cropping. If you have an HD or a 4K monitor, click on the image below to see an example. This photograph is about 60% of the original file.

Female Northern Harrier. EOS-5D Mark IV, EF 600mm f/4 IS II + EF Extender 1.4X III. ISO 800. F/5.6 at 1/3200 sec. Hand held from vehicle. Processed with DPP 4.5. Click on the image to see a high-definition file (requires a large screen).
Interestingly the EOS-5D Mark IV has a smaller pixel size and thus more “reach” than the old EOS-1D Mark IV which was the professional Canon body for wildlife shooter for a number of years, obviously, the EOS-5D Mark IV has much better high ISO performance. The EOS-5D Mark IV is ideal for photographing some species that are difficult to approach such as the American Kestrel shown below.
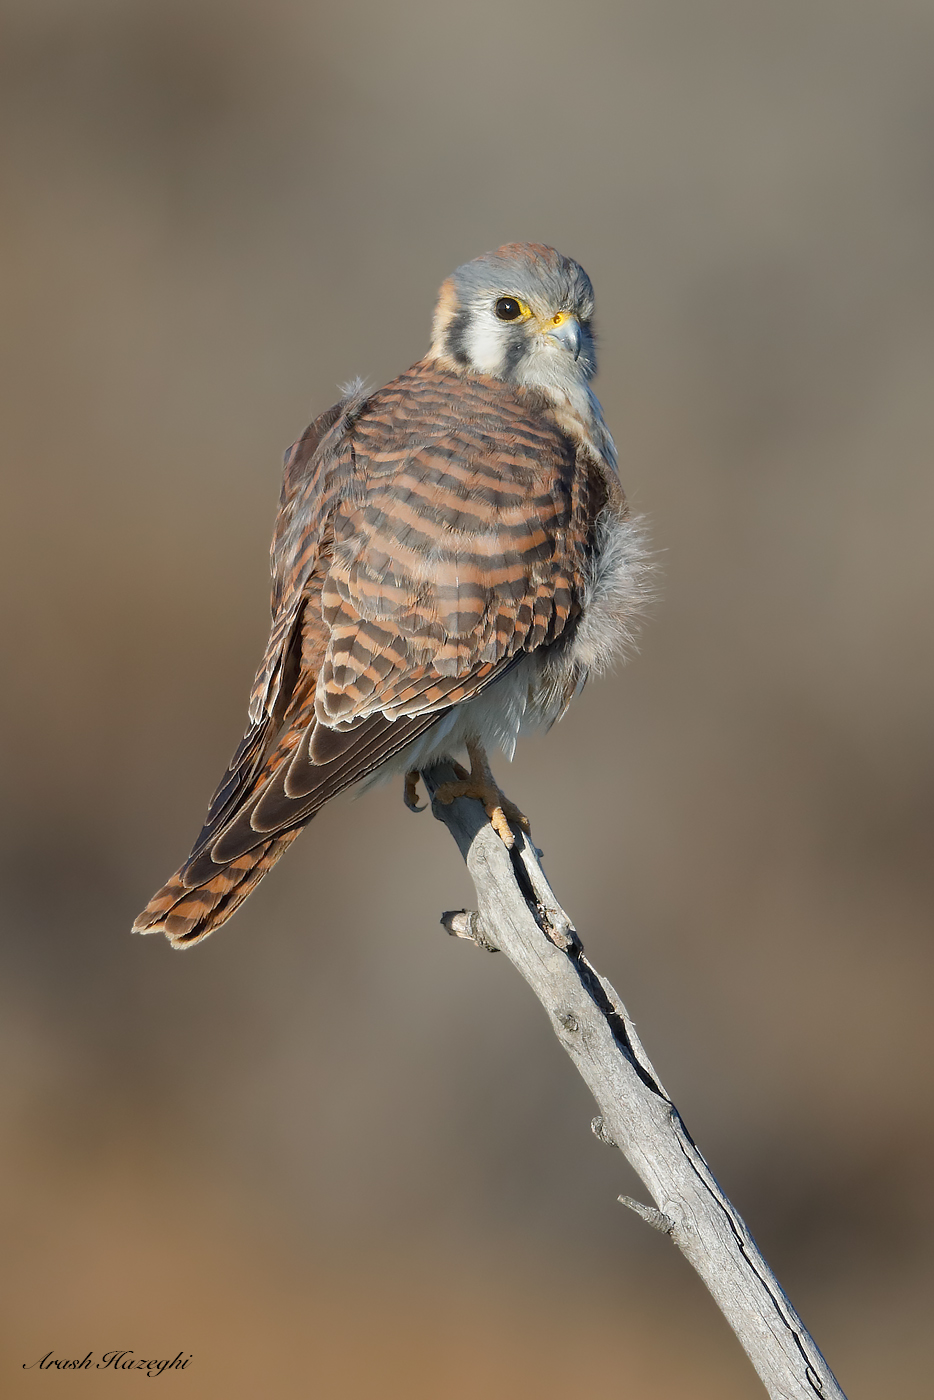
Female American Kestrel. EOS-5D Mark IV. EF 600mm f/4 IS II + EF Extender 1.4X III. ISO 800. 1/3200sec at f/5.6. Hand held from vehicle. Click on the image to expand.
The field low-light performance of the EOS-5D Mark IV is excellent. The image below (Merlin) was taken after sunset when it was very dark. The exposure has been boosted by +1EV in DPP 4.5, results look good, especially for a relatively tight crop.
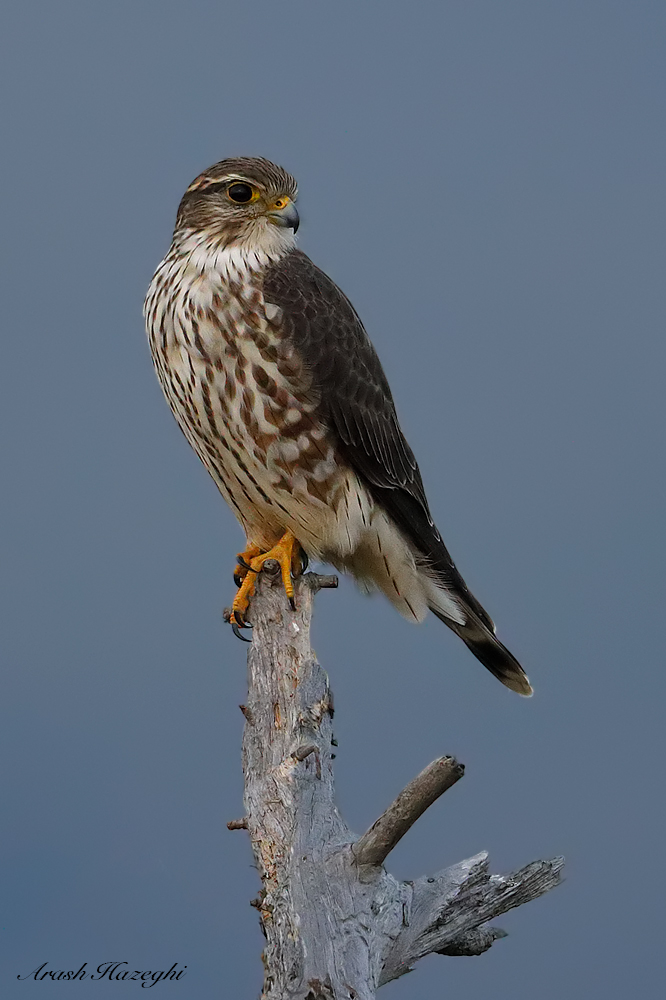
Female Merlin. EOS-5D Mark IV, EF 600mm f/4 IS II+ EF Extender 1.4X III. ISO 3200. F/5.6 at 1/1250sec. Hand held. Processed with DPP 4.5. Click on the image to expand.
It’s also important to note that you don’t need to spend too much time applying noise reduction and sharpening to get a high-quality output, just a straightforward conversion in Canon DPP 4.5 with optimal settings is often all you need to arrive at a clean, detailed TIFF file. This is in contrast to the higher resolution EOS-5DS R, which I have tried on many occasions, but I cannot say I find it a good fit for my type of avian photography. At low ISO’s and bright scenes the detail in the 50 mega-pixel RAW’s is stellar but as soon as the light drops and the ISO is raised, the files lose critical sharpness and become too grainy. Careful processing is needed with advanced noise reduction to get the best out of that camera. This is time consuming given the files size, and even then the files just lack the punch in lower light. I’d definitely pick the EOS-5D Mark IV over the EOS-5DS R for bird photography based on image quality alone.
I also spent a couple of days photographing in Southern California with iffy light, the high ISO performance of the ESO-5D Mark IV proved to be great.

Shrike, EOS-5D Mark IV, EF 600mm f/4 IS II + EF Extender 1.4X III. ISO 2000. f/5.,6 at 1/2000 sec. Hand held from vehicle. Processed with DPP 4.5. Click on the image to see it in high-definition format (requires large screen).
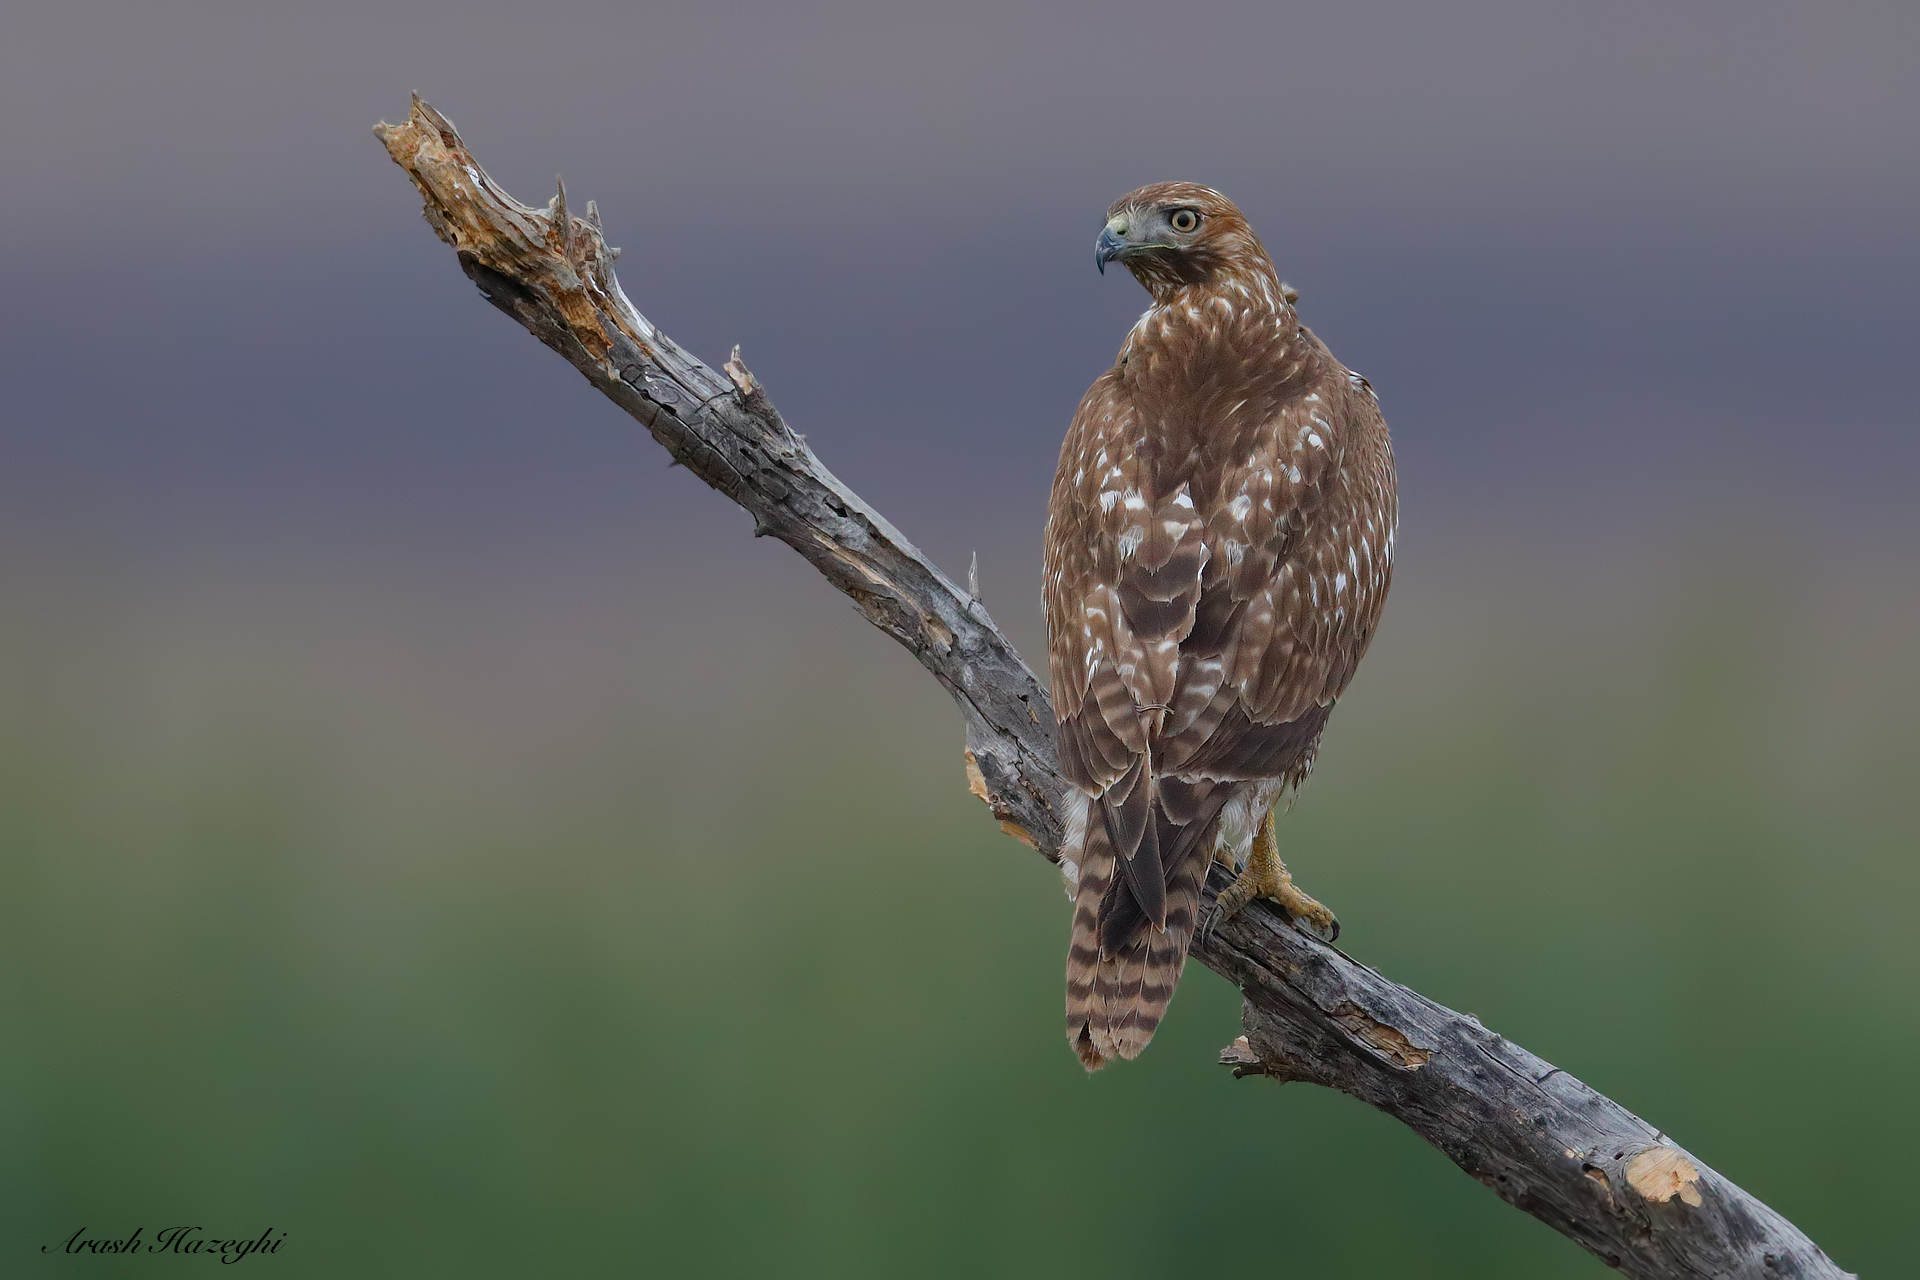
Juvenile Red-tailed Hawk. EOS-5D Mark IV, EF 600mm f/4 IS II + EF Extender 1.4X III. ISO 2500. F/5.6 at 1/2000sec, Hand held from vehicle. processed with DPP 4.5. Click on the image to see in high-definition forma (requires a large screen).
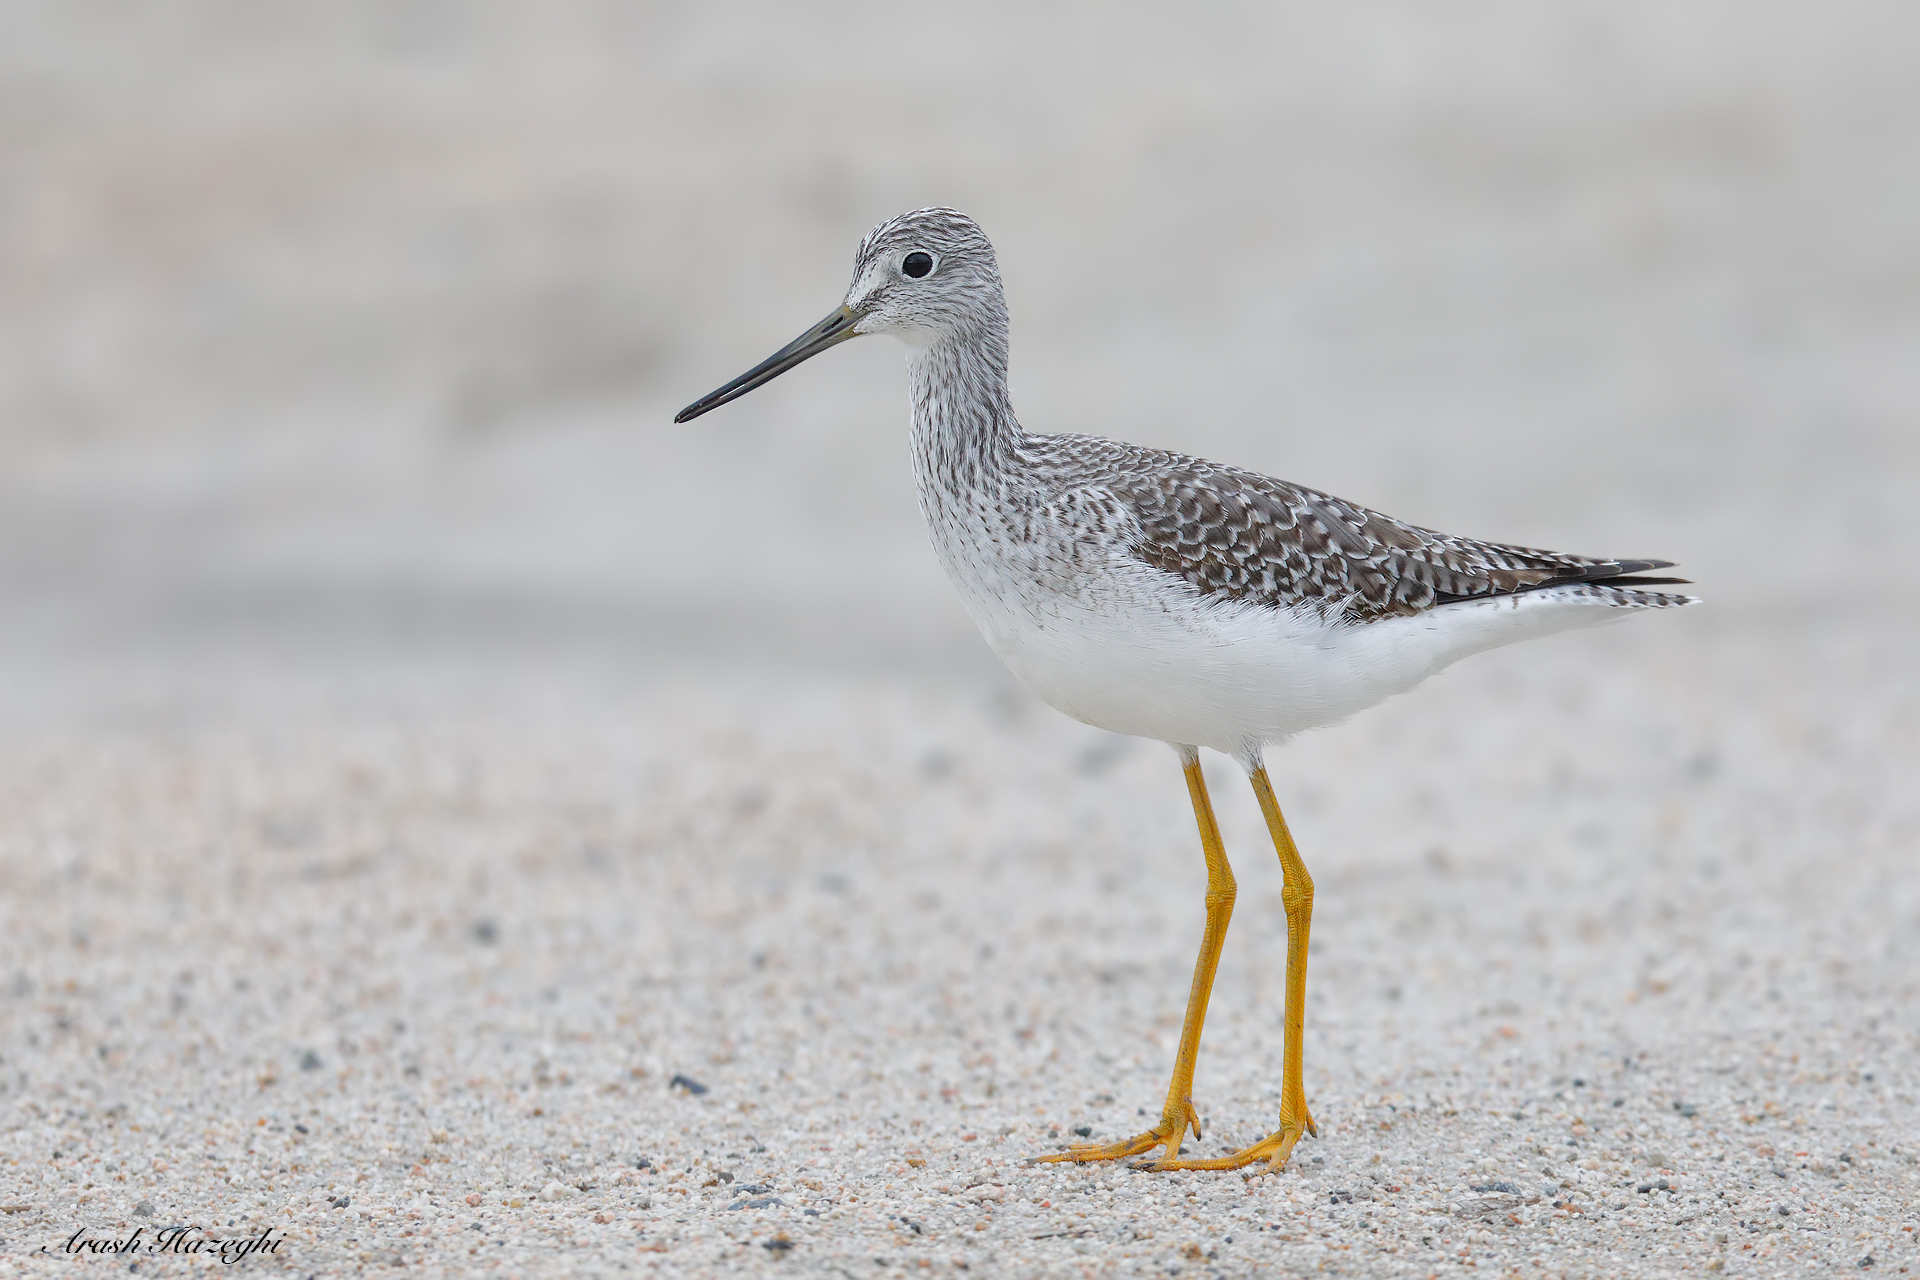
Yellowlegs, EOS-5D Mark IV. EF 600mm f/4 IS II + EF Extender 1.4X III. ISO 2500. f/5.6 at 1/2000 sec. Hand held from vehicle. Processed with DPP 4.5. Click on the image to see a high-definition file (requires a large screen).
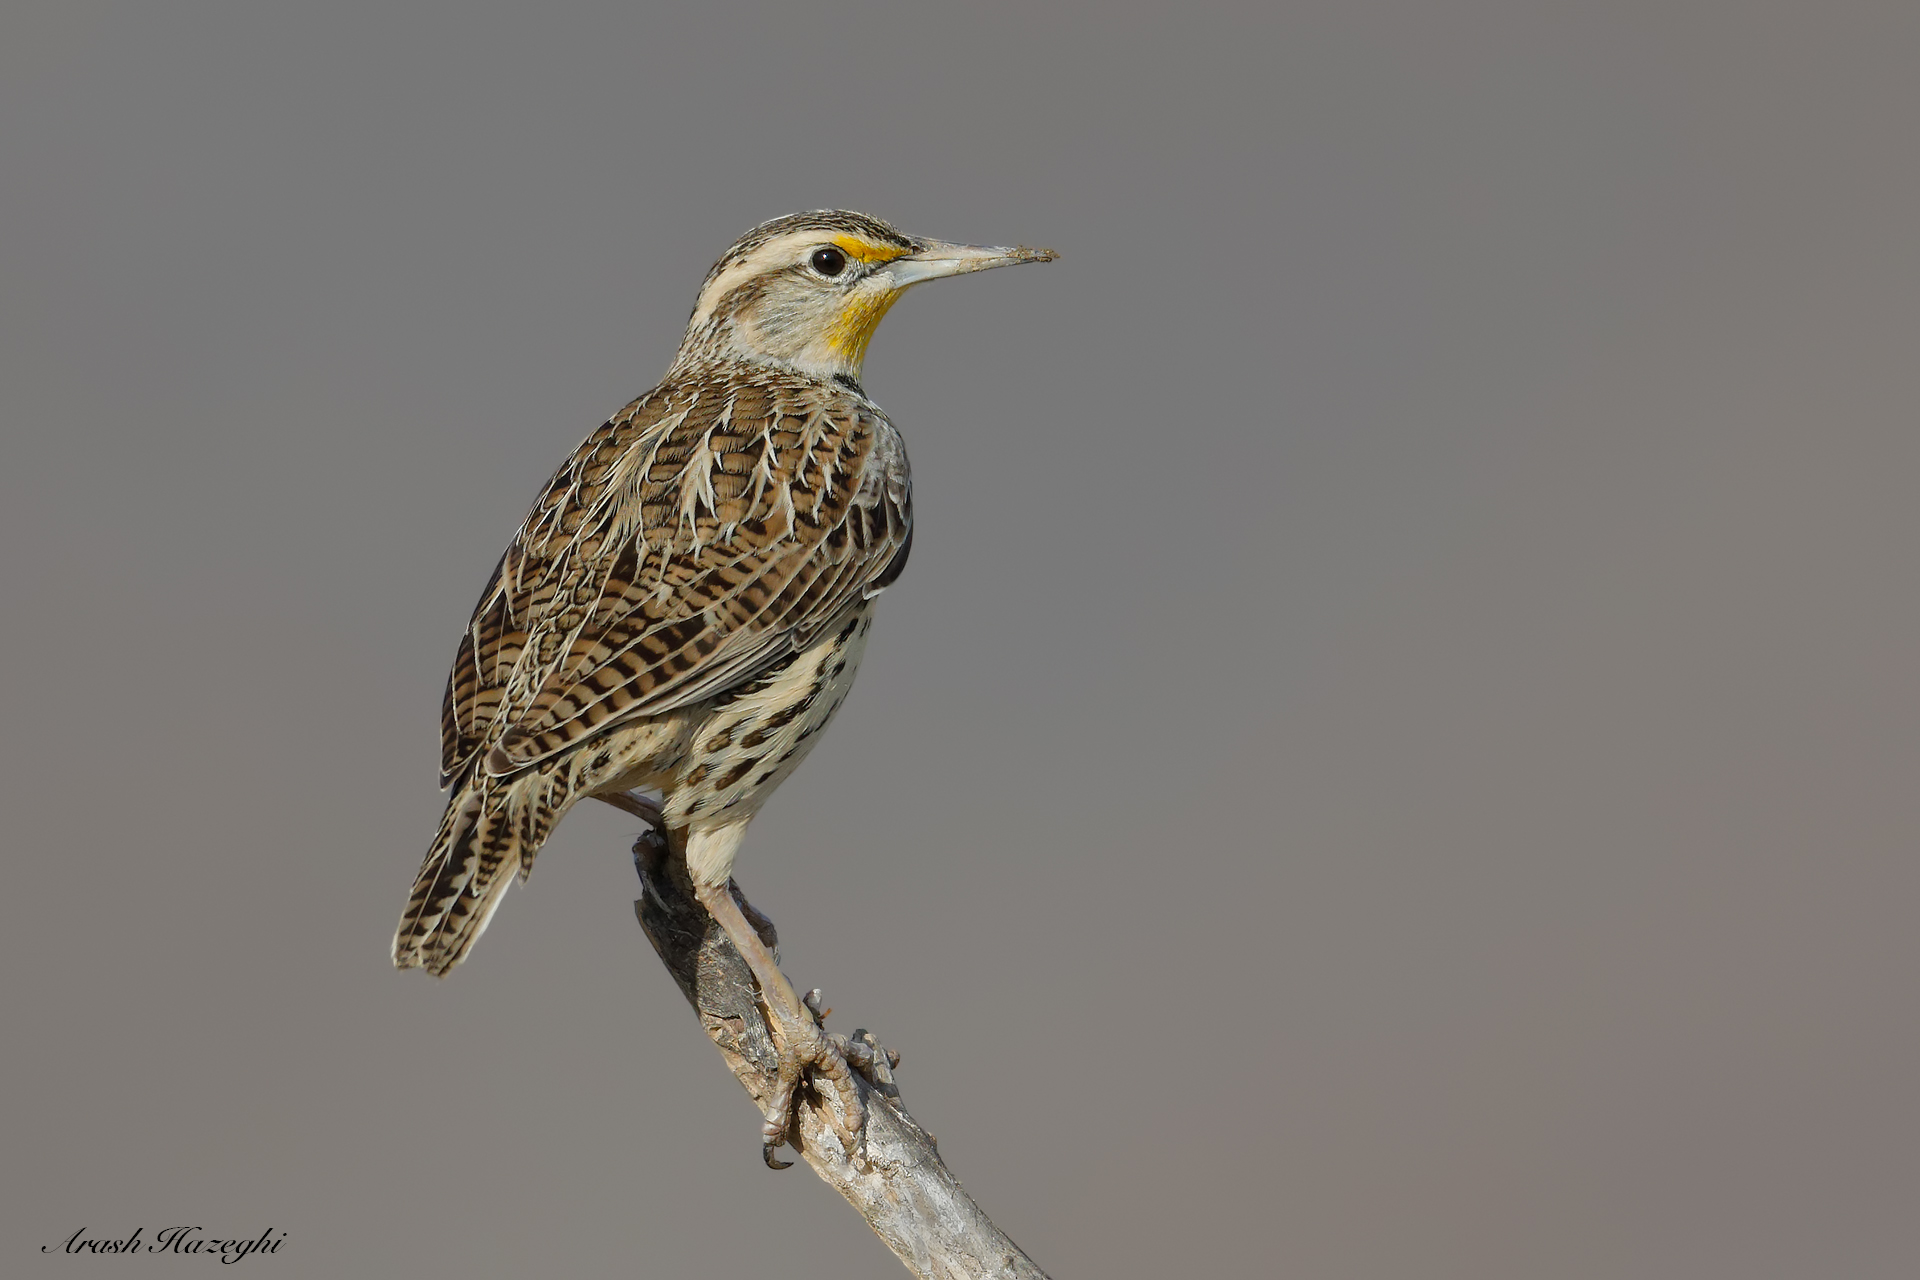
Meadowlark, EOS-5D Mark IV, EF 600mm f/4 IS II + EF Extender 1.4X III. ISO 500. F/5.6 at 1/3200sec. Hand held from vehicle. Processed with DPP 4.5. Click on the image to see in high-definition format (requires large screen).
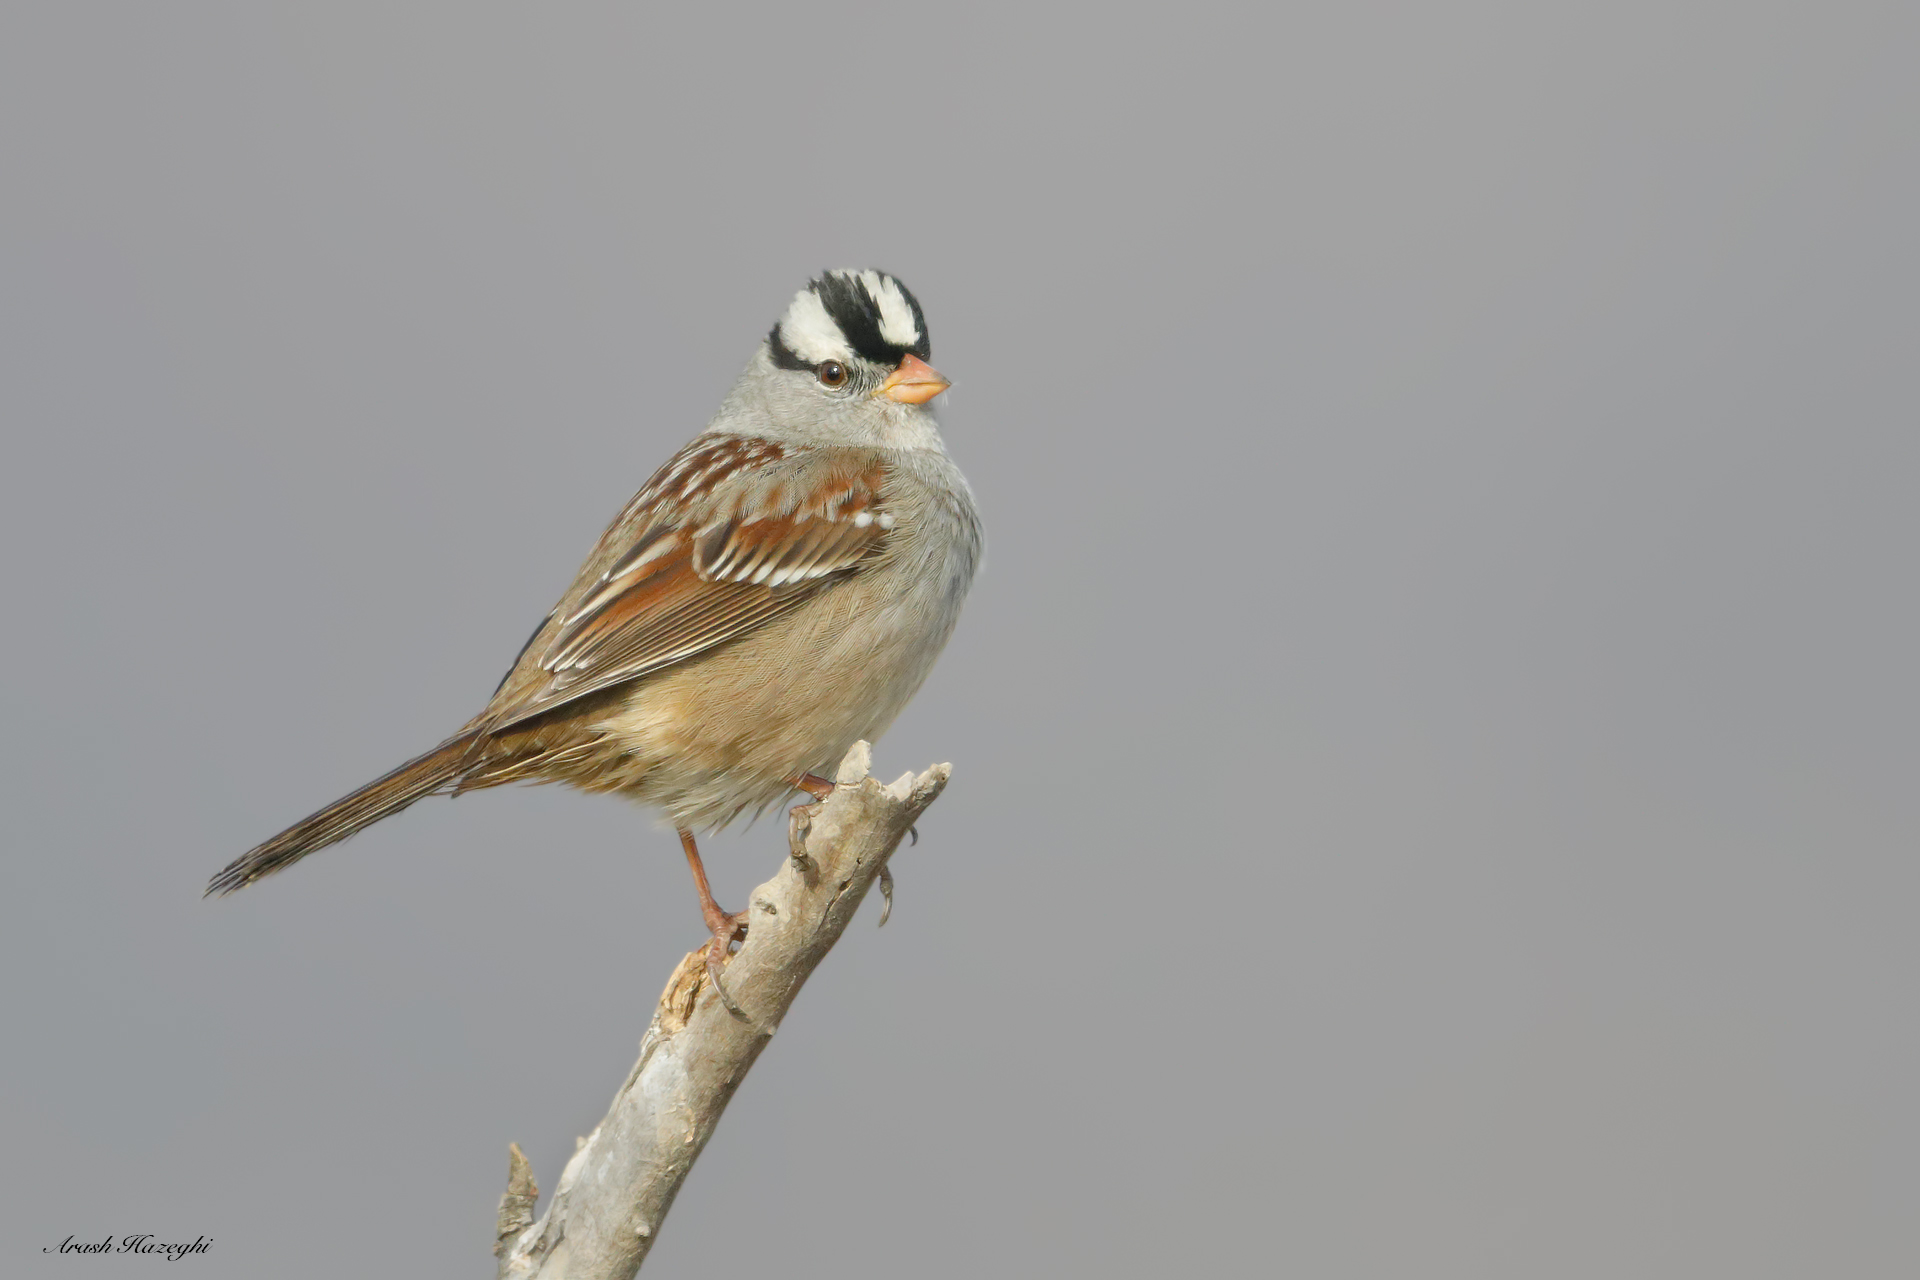
White crowned sparrow. EOS-5D Mark IV, EF 600mm f/4 IS II + EF Extender 1.4X IIII. ISO 1600. f/5.6 at 1/3200 sec. Hand held. Processed with DPP 4.5. Click on the image to see a high-definition file (requires large screen).
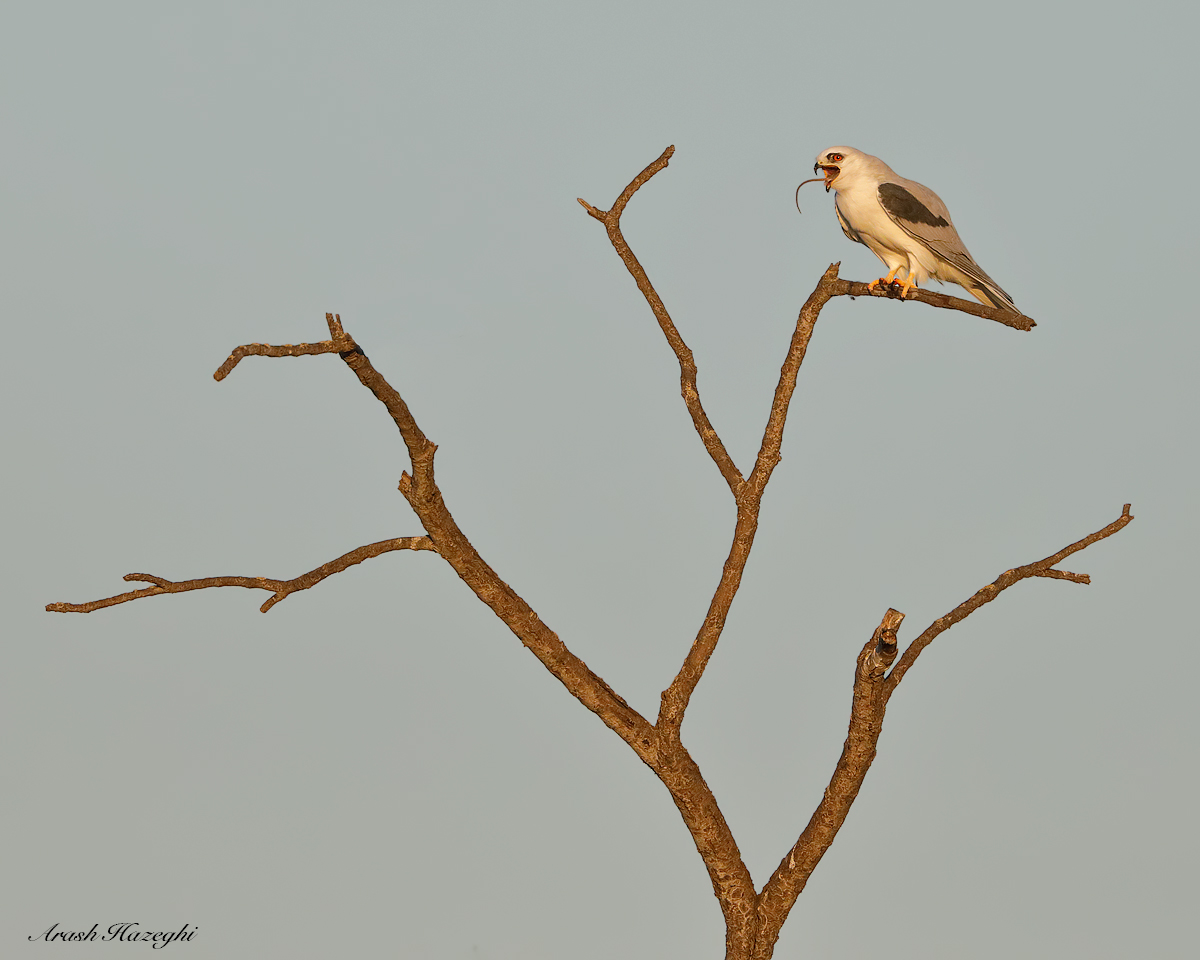
Adult White-tailed Kite. EOS-5D Mark IV. EF 400mm f/4 DO IS II + EF Extender 2X III. ISO 1600. F/8 at 1/3200 sec. Hand held. Processed with DPP 4.5. Click on the image to expand.
Against the EOS 1D X Mark II
Although these cameras are targeted at different audiences and most photographers will not cross shop them, it is still interesting to see how much more detail can the EOS-5D Mark IV render from a scene.
The image below shows the resolution advantage of the EOS-5D Mark IV compared to the EOS-1D X Mark II when the light is good. I photographed the female Northern Harrier in Southern California from a vehicle. I placed my EF 600mm f/4 IS II, attached to my EF Extender 1.4X III on a bean bag and then quickly swapped bodies to take the shot before the harrier moved. It is not an ideal frame with the busy perch but demonstrates the difference.
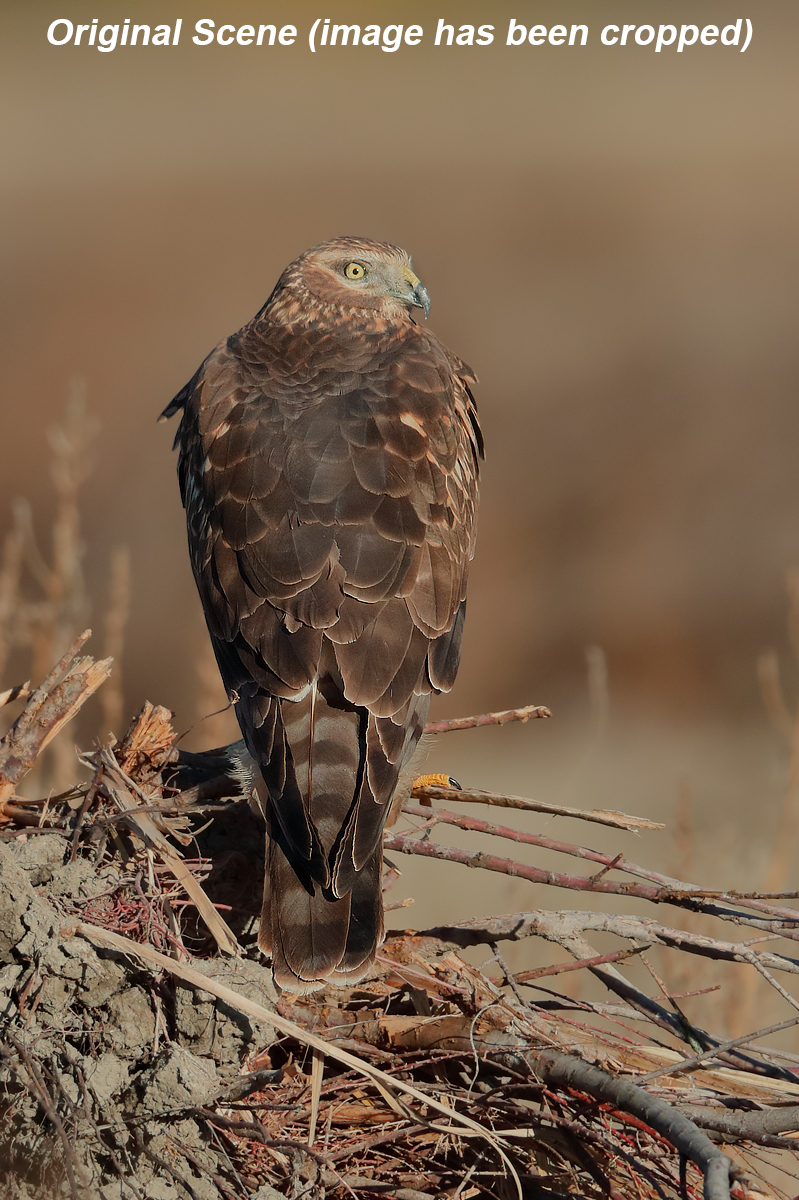
Northern Harrier, EOS-5D Mark IV, EF 600mm f/4 IS II + EF Extender 1.4X III. ISO 800. F/5.6 at 1/3200 sec. shot on BB from the vehicle. processed with DPP 4.5. Image has been cropped
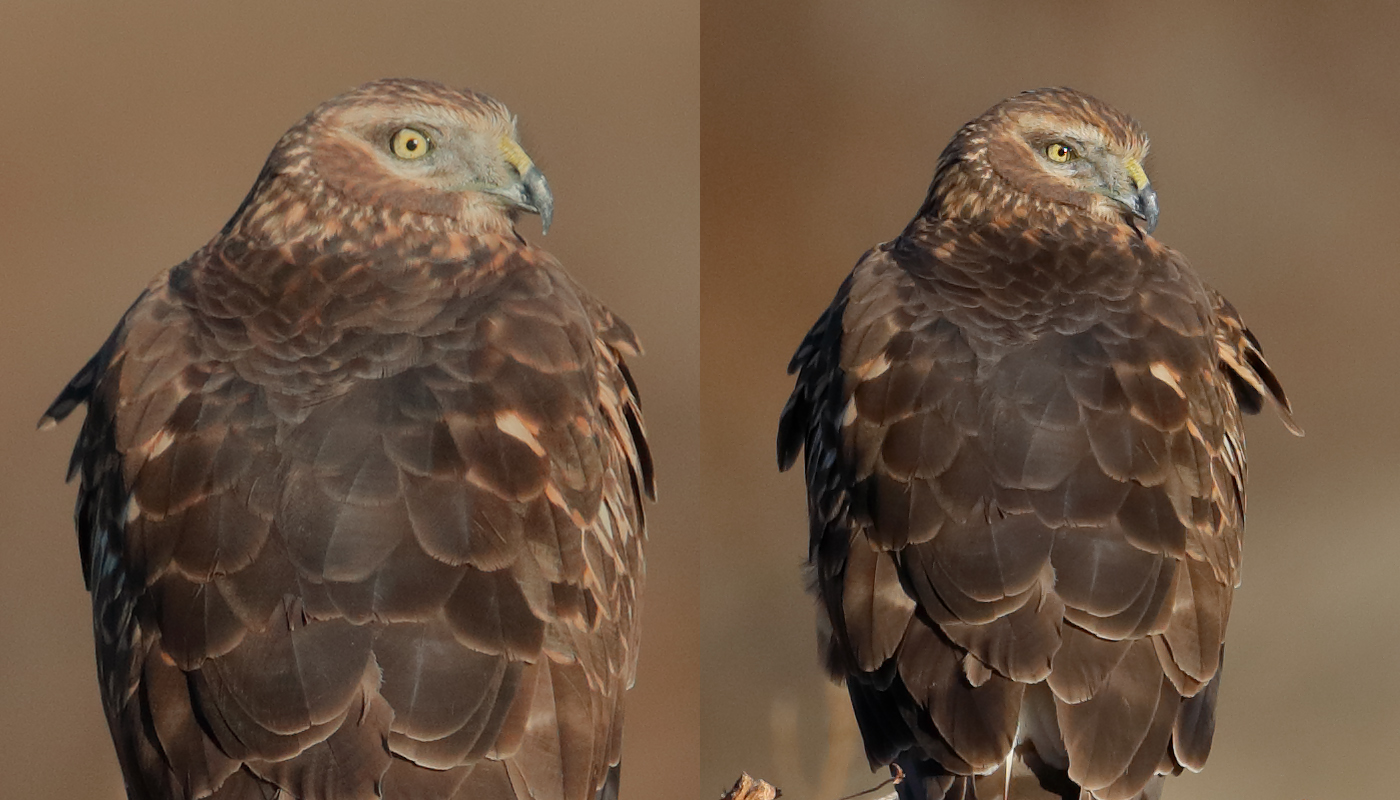
100% Crop from RAW, right: EOS-1D X Mark II, left: EOS-5D Mark IV. Click on the image to expand.
As expected, the EOS-5D Mark IV has ~22% more resolution (resolution scales with square root of # of pixels) than the EOS-1D X Mark II. It is certainly visible but not a ground breaking difference.
This image, (double-crested cormorant) was also shot from approximately the same distance with the same lens+extender combination (EF 400mm f/4 DO IS II + Extender 2X III) at f/8 ISO 3200, but in much lower light. The CR2 files were converted using Canon DPP4.5 with optimal noise reduction settings outlined in the DPP 4 guide. No noise reduction or sharpening applied after RAW conversion.
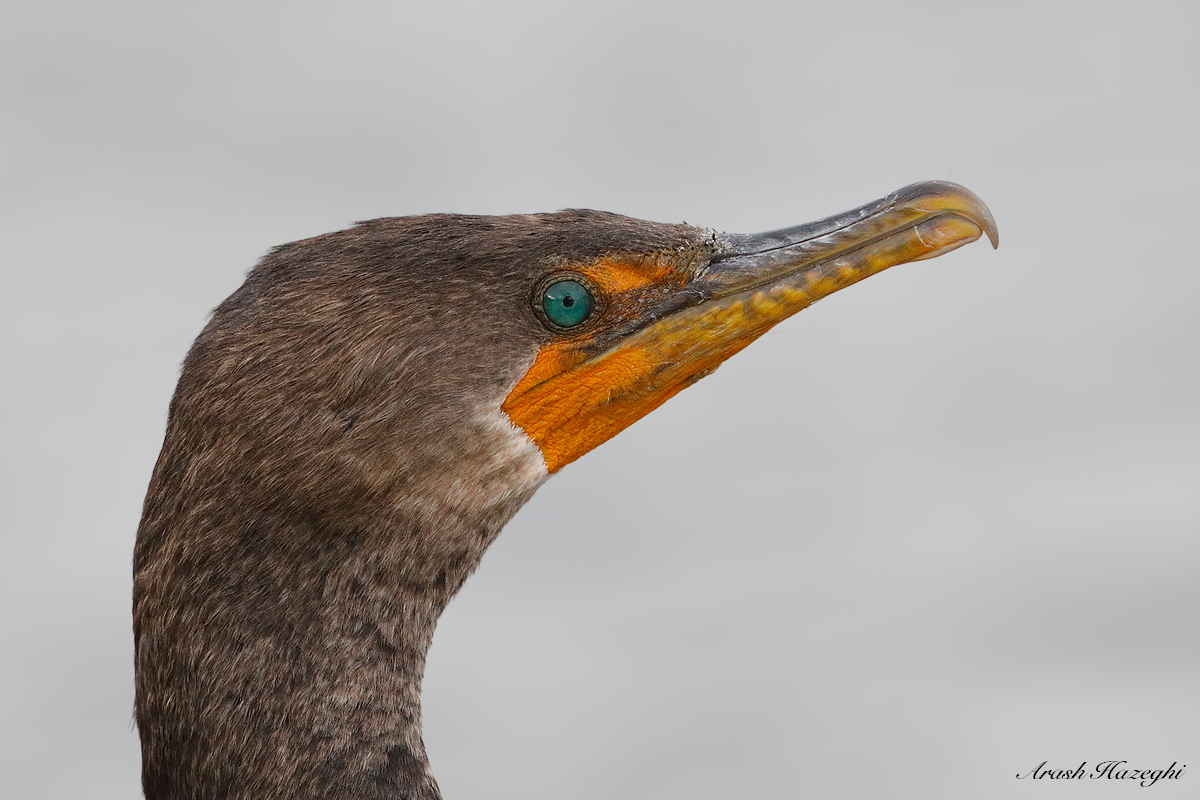
Double-crested cormorant. EOS 5D Mark IV. EF 400mm f/4 DO IS II+ EF Extender 2X III. ISO 3200. f/8 at 1/1250 sec. Hand held. Click on the image to expand.
below is the side-by-side 100% crop from each camera.
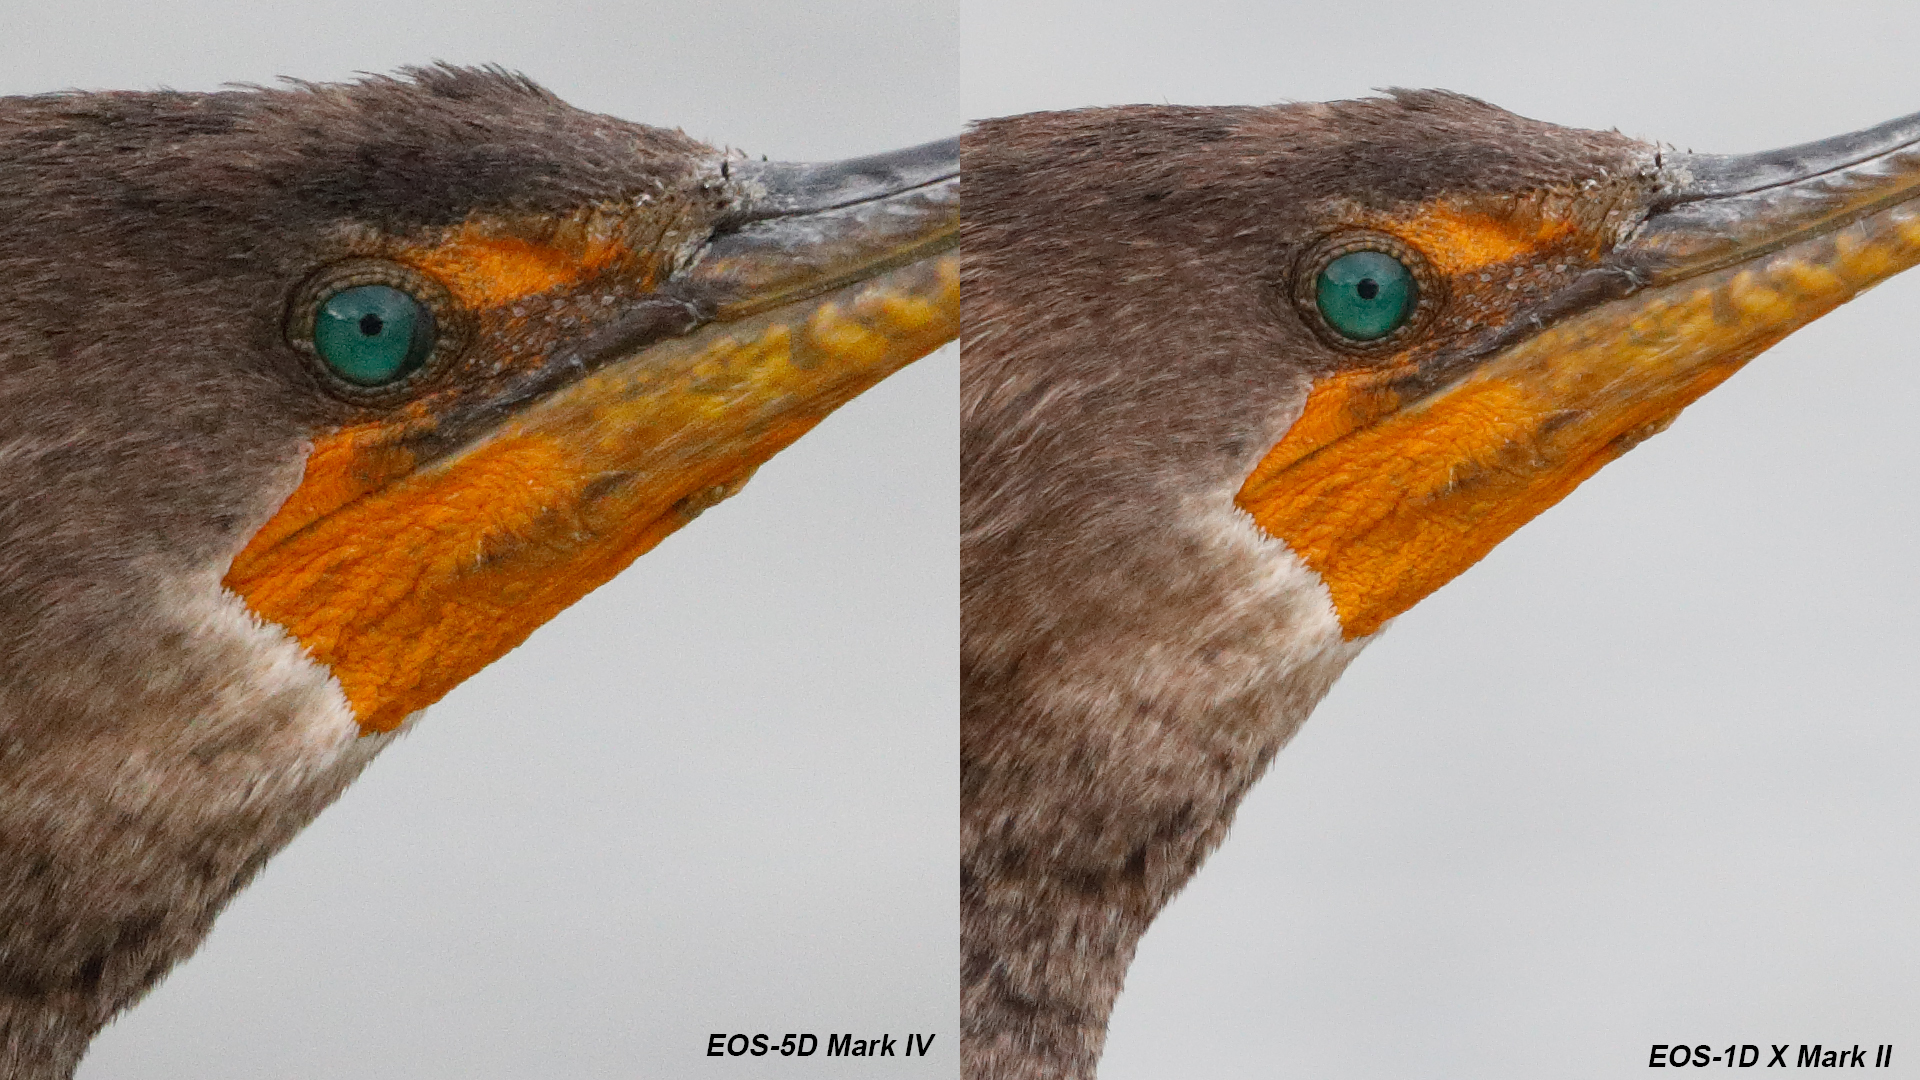
EOS-5D Mark IV (left) vs. EOS-1D X Mark II (right). Double-crested Cormorant. Shot with EF 400mm f/4 DO IS II plus Extender 2X III. ISO 3200. f/8 at 1/1000sec. Hand held. Each image converted in DPP 4.5 with optimal setting to maximize the detail while keeping noise low. Click on the image to expand.
We can see that in low light, the EOS-5D Mark IV image is a bit grainier than the EOS-1D X Mark II but at the same time, it has slightly more detail as well. This is great performance on part of the EOS-5D Mark IV. I didn’t expect it to perform so well at this ISO.
Note that when the subject has dark tones or when the light is not uniform the EOS-5D Mark IV RAW files start to lose contrast and detail earlier than the EOS-1D X Mark II, closing the gap quickly. If you plan to shoot at ISO 3200 and above very frequently I’d still pick the EOS-1D X Mark II as the latter requires less effort to produce a high quality output.
Dual-Pixel RAW
The EOS-5D Mark IV is not the first camera with Canon’s Dual-Pixel CMOS sensor, but is the first one to offer Dual-Pixel RAW recording. In DPCMOS, each pixel is comprised of two individual photo diodes. The camera effectively captures two parallax 30 Mega-pixel images that are slightly shifted with respect to each other. Normally the camera combines the readout from the two diodes in each pixel to deliver a standard RAW (CR2) file. With Dual Pixel RAW (DPRAW) the two parallax images are recorded in a single CR2 file that is approximately twice as large as a standard CR2 file (60 Mega-pixels of data). User can then use these two parallax images to apply a variety of post capture corrections not other wise possible with a single photo diode per pixel architecture. It is basiclaly a crude form of computational photography.
These adjustments include post capture focus micro-adjustment, bokeh shift and ghosting suppression. Canon series II super-telephoto lenses and series III extenders are almost optically perfect so most wildlife and bird shooters will never see ghosting in their images to begin with. The remaining corrections, post-capture focus micro-adjust and the bokeh shift look appealing on paper. In practice, however, the DPRAW has serious limitations: First, The two parallax images are only a few microns shifted with respected to each other (to be precise, half of the pixel pitch or about 2.7 um). This greatly reduces the amount of focus shift that can be applied post capture. The farther the parallax images, the greater the degree of corrections that can be applied post capture.
The other factor is that because each photodiode is about half the size of a pixel, each parallax image effectively receives half the amount of light collected by the sensor. In other words, each parallax image is noisier than the image when data from both photodiodes are combined. When DPRAW corrections are applied at full strength the resulting image becomes a bit noisier. On the plus side DPP4.5 is relatively quick to process and apply corrections to the DPRAW files (when using a capable system).
When I first read about DPRAW, I wasn’t expecting miracles but I was hoping that it would help improve those files that were relatively sharp but not quite tack-sharp. After using the camera for some time, I can’t really find a field example where this feature saved the day. Besides that, the increased file size eats disk space and reduced buffer capacity means that you might actually miss a shot. Overall in its current state I don’t see DPRAW as a productive format for avian and wildlife shooters. Below is an example of DPRAW, I focused on the dog’s eye then converted the DPRAW with a focus micro-adjust of -5 and +5 (max. allowed) and a strength of 5 (choosing a higher value resulted in too much grain at ISO 1600)

Example of post capture focus micro adjust with DPRAW. Click on the image to see the animation. Note how focus slightly moves closer to the camera. The settings used were +5 (far), 0 (as shot) and -5 (close). Shot with EF70-200 f/2.8 L IS II at 160mm, ISO 1600. f/2.8 at 1/1000sec hand held. DPP 4.5. Note: this image is compressed.
As you can see the amount of focus shift is tiny. I found this to be the case with all of my lenses and in most combinations, ultimately, the system is limited by the small shift between the two parallax images. For the same reason, the image-sensor based phase detect AF systems are never as sensitive, responsive and as accurate as a dedicated AF sensor where the split images are projected much farther away from each other. (The distance between AF line sensors is much greater than the distance between neiogboring pixels on the image sensor.)
Performance
The EOS-5D Mark IV is a relatively snappy camera. It’s not a 1D camera by any means but it is not sluggish like the EOS-5DSR either. 7 fps is sufficient for many situations although it may miss the peak-of-action or the most dynamic frame, especially when several birds are interacting in a frame or when shooting fast flying raptors. While photographing raptors and some small song birds in southern California, I noticed a few occasions where the camera’s 7fps fell short of capturing the ideal head angle (HA) at first attempt even when the bird was perched. This is not a big issue if you have repeat opportunities, but if it is a one-time opportunity with a rare bird, I’d stick with the 1DX (MKII).
Fortunately the camera’s continues shooting buffer proved sufficient in most cases. The buffer depth when using a fast CF card (I used SanDisk Extreme Pro 160MB/sec UDMA7 card) is much more than the number quoted by Canon (they use a reference CF card). I was able to get about 35 shots before the camera slowed down, that is 5 seconds of continuous shooting at full speed. Once the buffer is full, it clears really quickly. If you shoot DPRAW however the buffer depth reduces significantly, the camera can only shoot for about a second before it slows down and it can even lock up for short periods. Another reason not to shoot DPRAW for action. Turning on DLO (Digital Lens Optimizer) in-camera also slows down the continuous shooting speed, I would keep it off.
Overall the EOS-5D Mark IV offers a positive experience but it is not an action camera, for that purpose I’d pick the EOS-1D X (Mark II) without any hesitation. Silent shooting is also possible at max burst speed, making it ideal for blind use.
AF
One of the major improvements of the EOS-5D Mark IV over its predecessor is the new reticular II AF module with Canon’s 3rd generation AI-servo algorithms. The sesnor module is the same unit used in the flagship EOS-1D X Mark II This is good news but it doesn’t necessarily mean that the two cameras will have identical AF performance in the field. The EOS-1DX Mark II has a much faster logic circuit powered by dual Digic 6+ processors as well has a higher voltage battery pack that enables high-speed servo drive when a super-telphoto lens is attached. The EOS-5D Mark III was also fitted with the same AF sensor as the original EOS-1D X, yet in practice the 5D was somewhat sluggish compared to the 1D when tracking BIF with a super-telpehot lens, especially with extenders.
First the good news, the EOS-5D Mark IV AF consistency is greatly improved over the EOS-5D Mark III which itself was quite a capable camera in the right hands. With the EOS-5D Mark IV, right off the bat, I noticed a higher percentage of tack sharp files with challenging subjects. It tracks very well against complex backgrounds, like the examples below.

Adult White-tailed kite. EOS-5D Mark IV. EF 600mm f/4 IS II + EF Extender 1.4X III. ISO 800. f/5.6 at 1/3200 sec. hand held. processed with DPP 4.5. Click on the image to see larger.
Adult White-tailed Kite. EOS-5D Mark IV, EF 600mm f/4 IS II + EF Extender 1.4X III. ISO 1600. F/5.6 at 1/2000sec. Hand held. Processed with DPP 4.5. Click on the image to see a high-definition file.
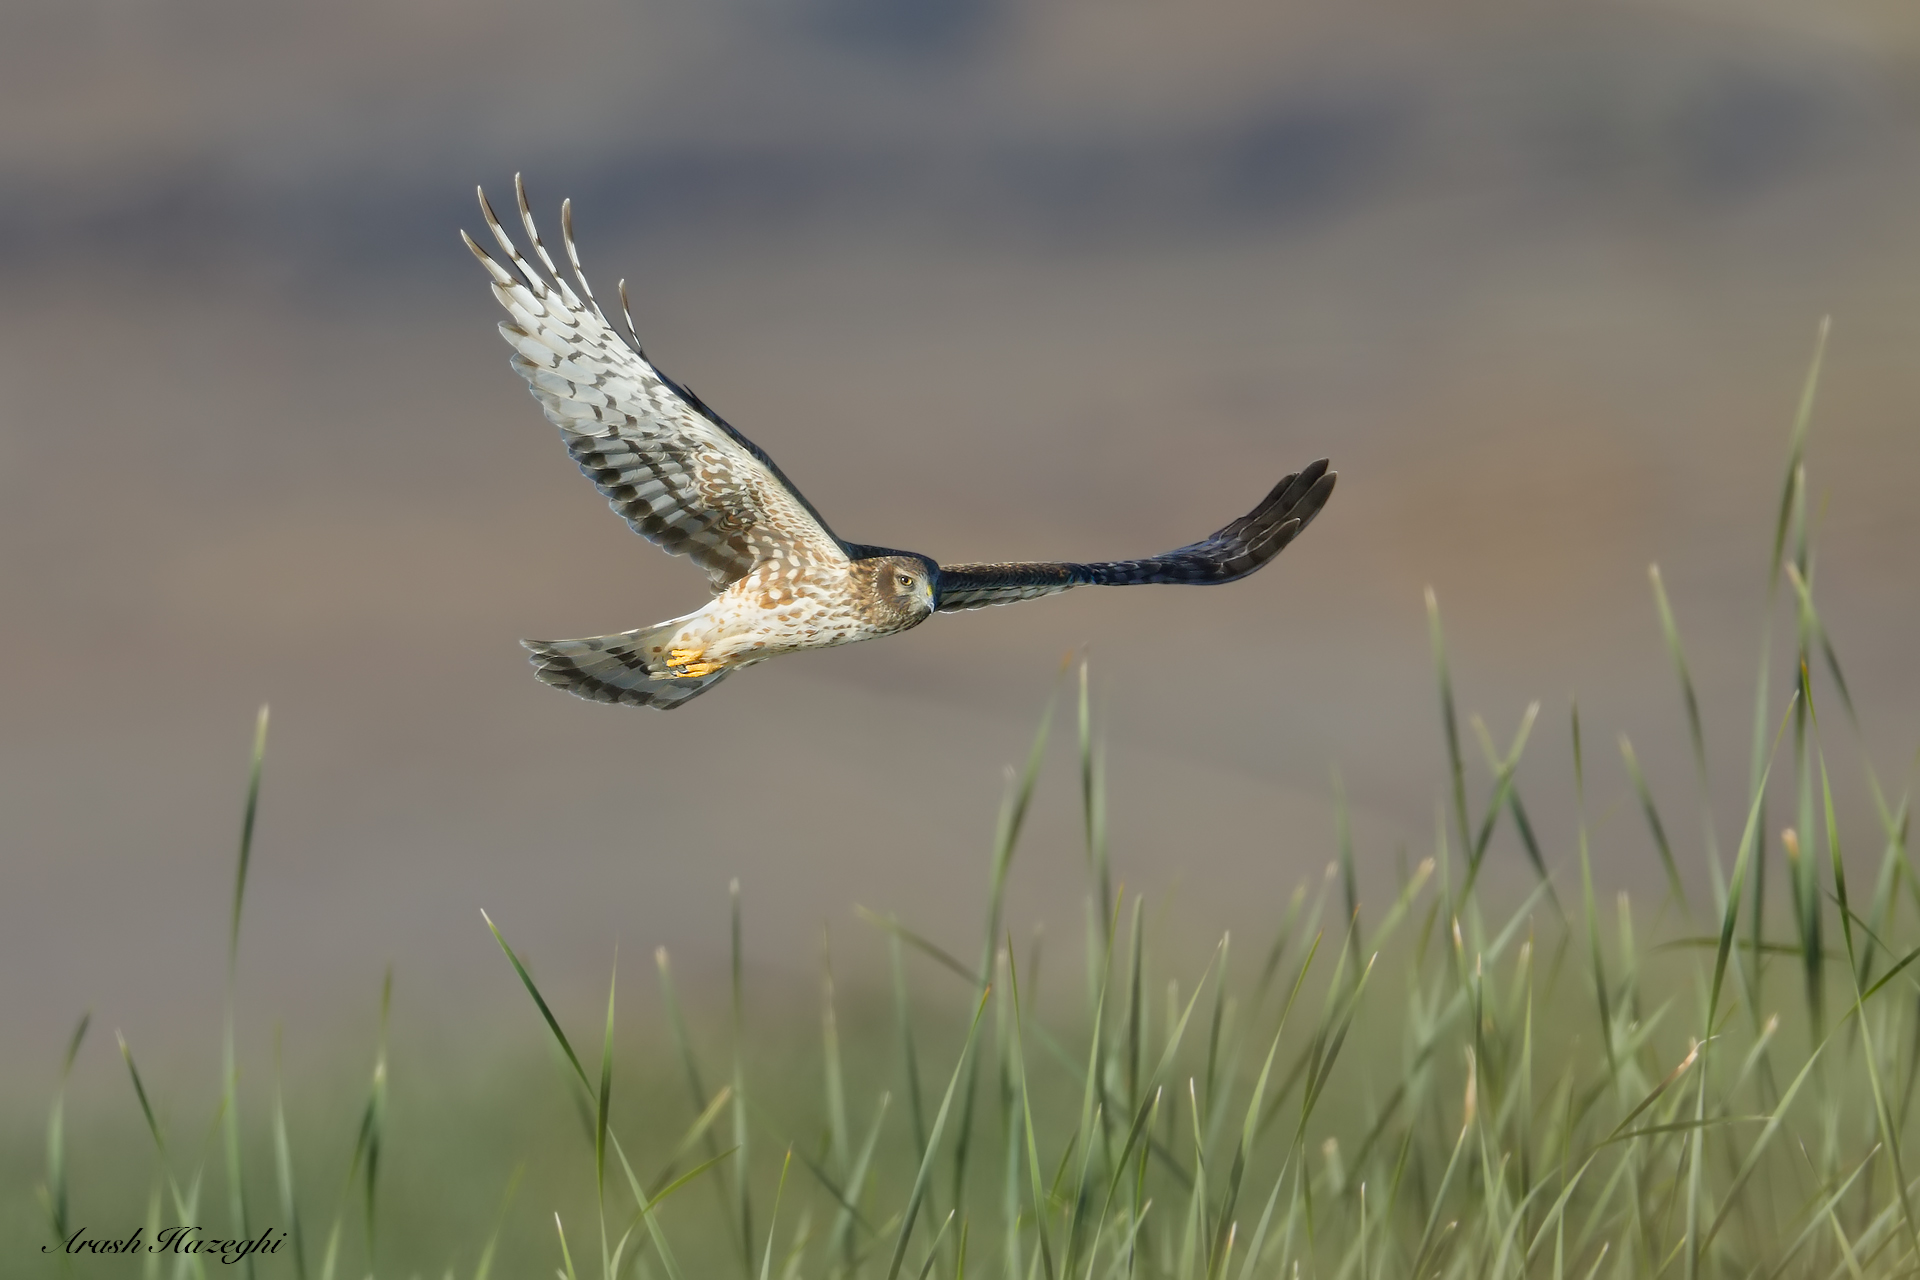
Northern Harriers don’t fly very fast but they are often a challenging subject for the AF to track, as the flight path is very erratic plus they tend to fly very close to the ground. The foreground elements constantly block the line of sight throwing off the servo AF. In the example below you can see that the EOS-5D Mark IV held the focus well on the harrier as the bird entered the area behind the tall reeds.

Adult female Northern Harrier. EOS-5D Mark IV. EF 600mm f/4 IS II + EF Extender 1.4X III. ISO 800. F/5.6 ay 1/3200sec. Hand held. Processed with DPP4.5. click on the image to see in high-definition format (requires large screen).
Camera held the focus on the harrier as it flew behind and the popped from behind the reeds
Adult female Northern Harrier. EOS-5D Mark IV. EF 600mm f/4 IS II + EF Extender 1.4X III. ISO 800. F/5.6 at 1/3200 sec. Hand held. Processed with DPP 4.5. click on the image to see at high definition format (require large screen).
The sequence of 21 frames below is a particularly difficult scenario for AF tracking. The harrier is flying against a varied busy background as it goes into the shade, the AF stayed on the bird when it was in the shade and didn’t lock on the busy background as the bird emerged from the shade. The bird was then partially blocked by the foreground reeds and branches towards the end of the sequence. The AF remains locked on the harrier even when its eye is barely visible between the reeds. In order to get the best results you need to setup your camera properly. I use expansion AF pattern and set the AI-servo sensitivity to locked-on for a scenario like this. I explain my AF setup and technique in detail in Birds in Flight Photography Basics. Click on the image below to display the sequence in animation. It may take a while for the animation to load.
Northern Harrier flight sequence. EOS-5D Mark IV, EF 600mm f/4 IS II + EF Extender 1.4X III. ISO 800. f/5.6 at 1/3200 sec. Hand held. Click on the image to display the animation, it may take a while for the animation to load depending on your internet speed. Note: images heavily compressed in GIF format.
All the 21 frames in the sequence are tack sharp, below is one of the frames from this sequence after I raised the exposure by 3 stops in DPP 4.5.
Frame from the sequence above. Exposure was raised in DPP4.5 by 3 stops.
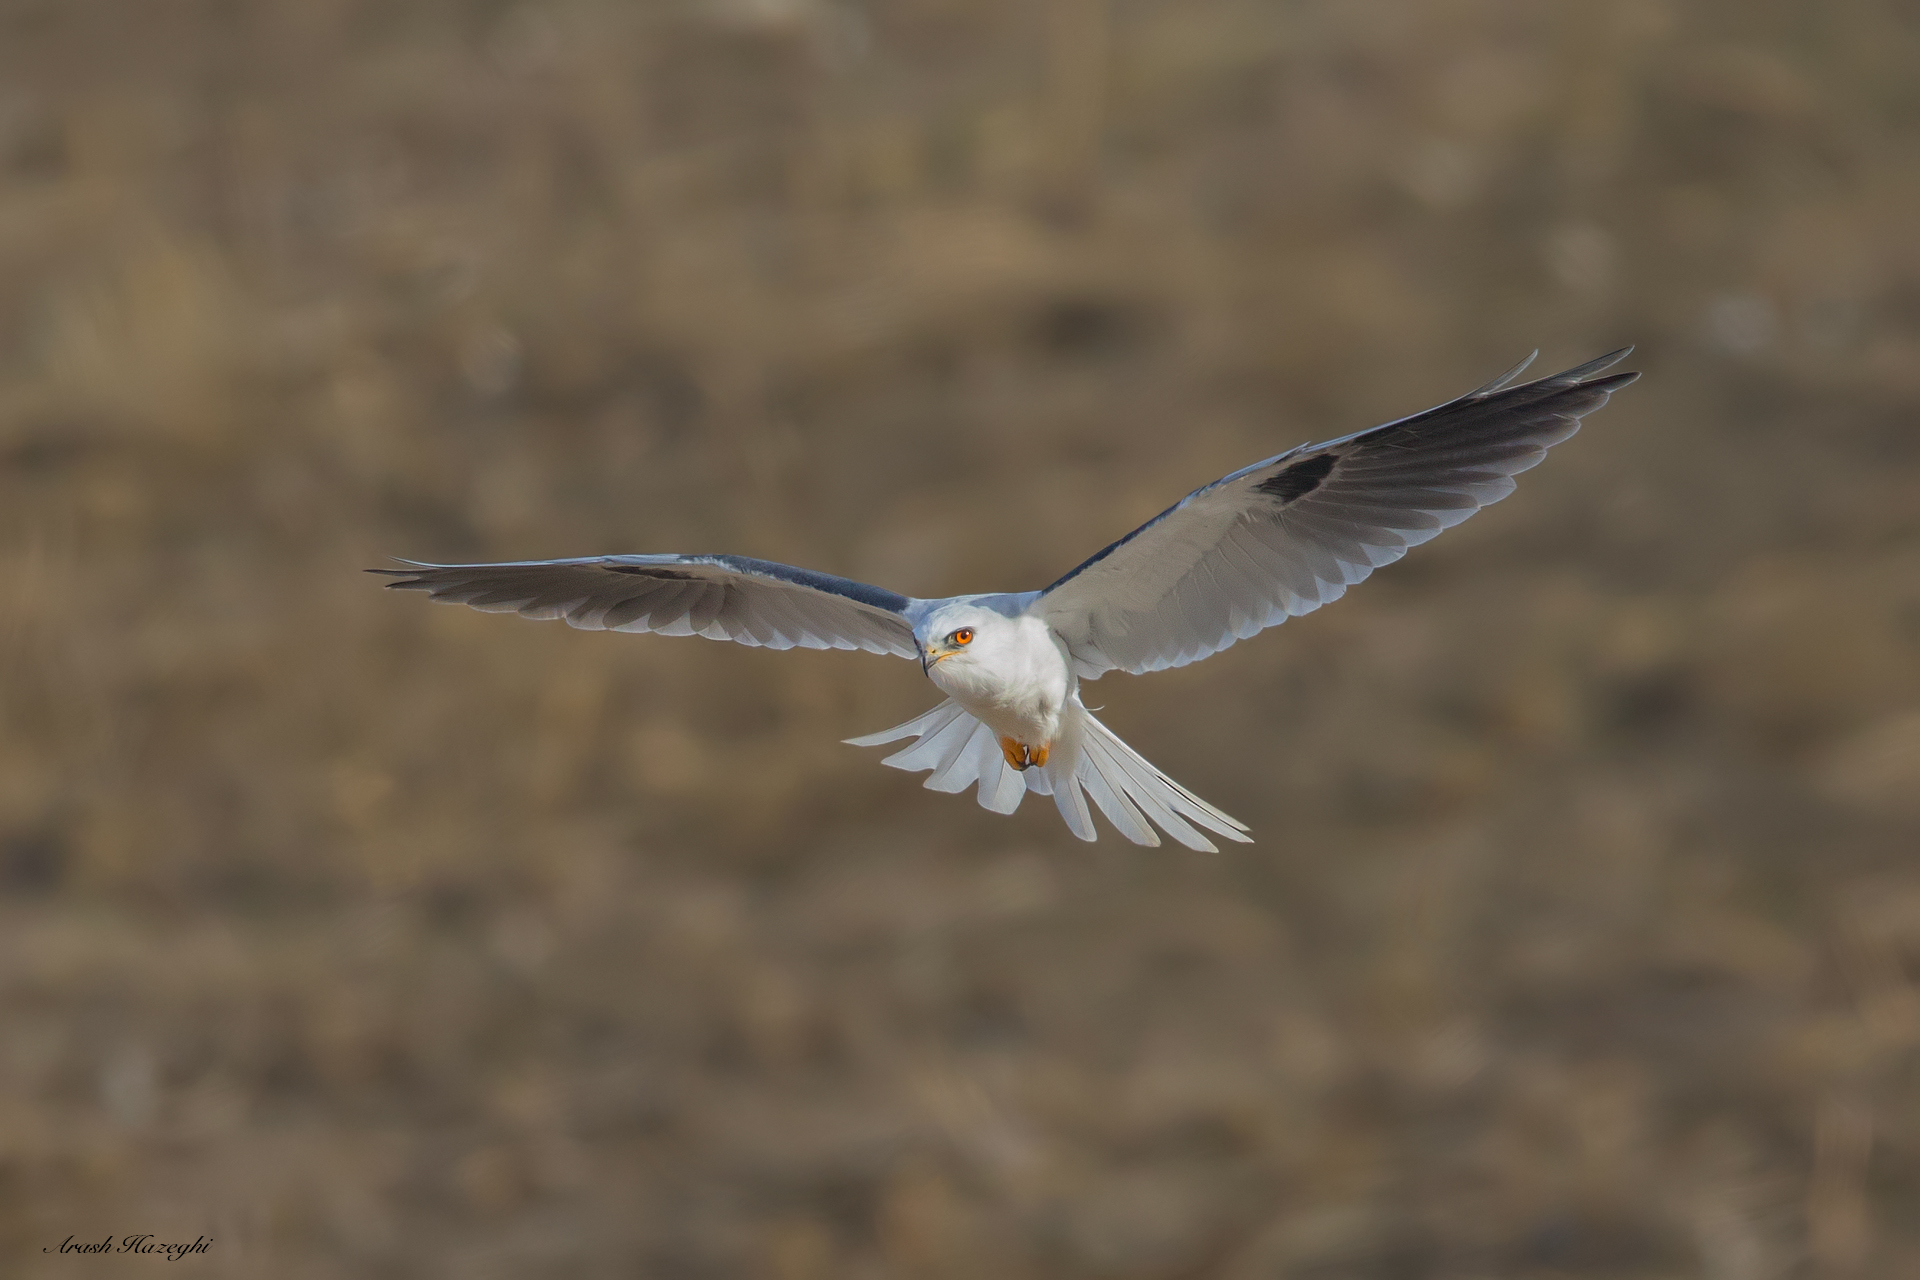
Needless to say plain backgrounds offer no challenge for the new 5D.
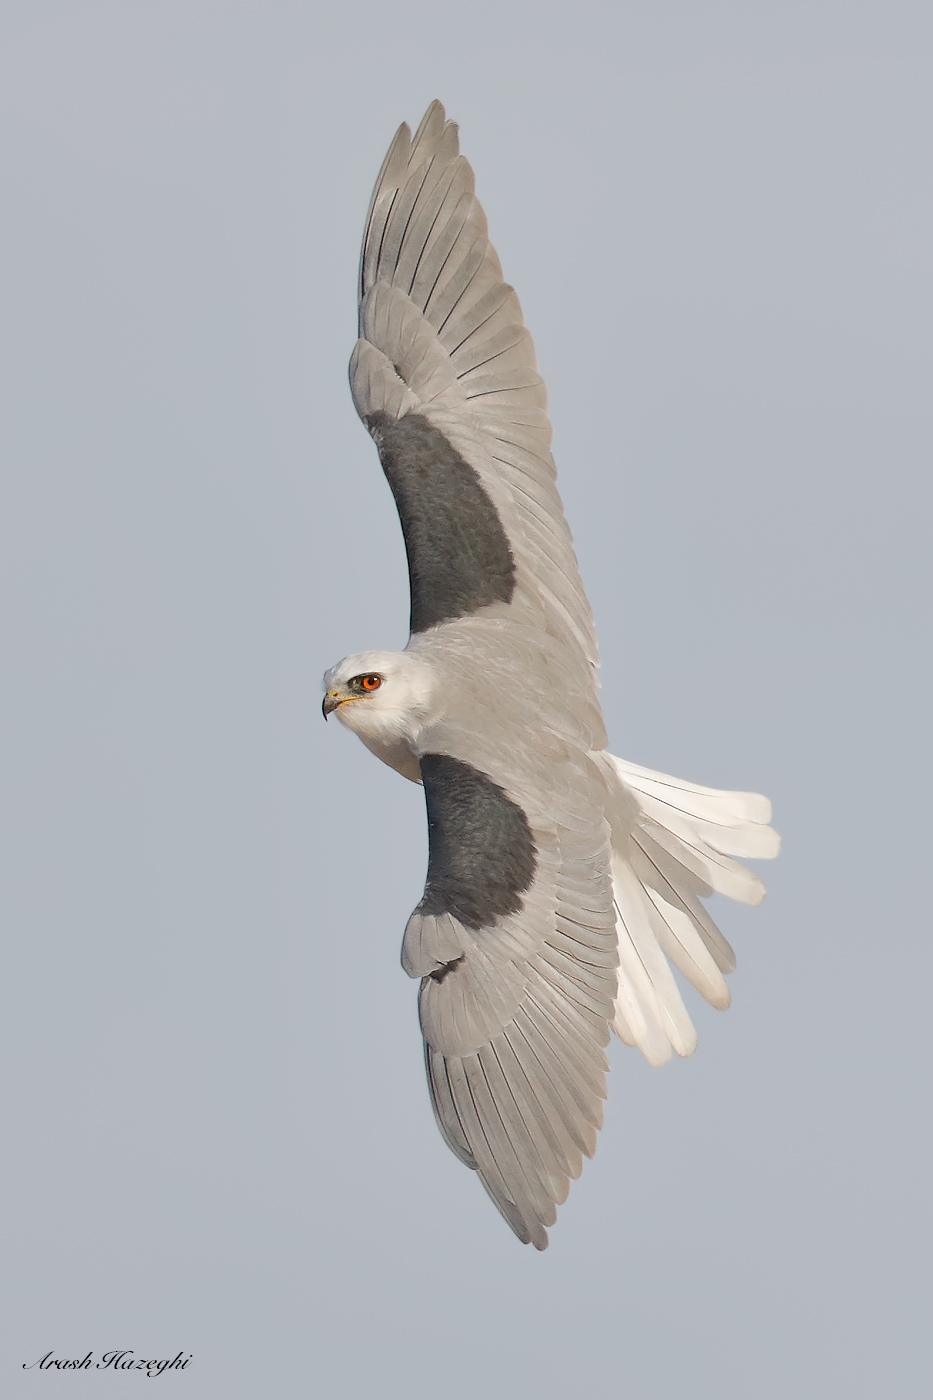
Adult White-tailed Kite. EOS-5D Mark IV, EF 600mm f/4 IS II + Extender EF 1.4X III. ISO 800. F/5.6 at 1/3200 sec, hand held. click on the image to see a high-definitation file (require large screen).
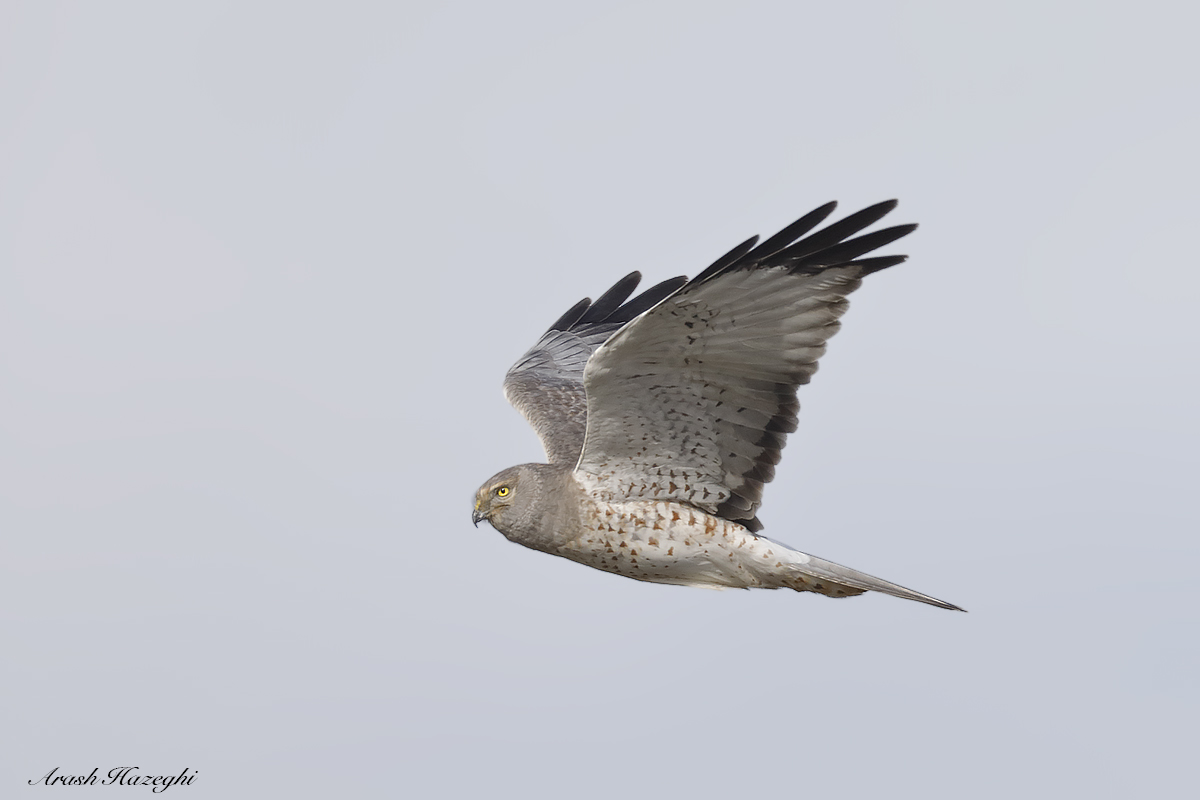
Male Northern Harrier. EOS-5D Mark IV, EF 600mm f/4 IS II + Extender EF 1.4X III. ISO 640. F/5.6 at 1/3200sec. Hand held from vehicle. Click on the image to expand.
Now the not-so good news:
The bare super-telephoto servo drive is pretty fast and doesn’t leave much to be desired, it’s not quite as fast as a EOS-1D X (MKII) but it is certainly fast enough. With the EF Extender 1.4X III added, the servo drive remains quick, it can still keep up with most subjects. With the EF Extender 2X III, however, the story changes a bit. All of the AF points are active at f/8, just like the EOS-1D X Mark II, and the AF remains pretty accurate for static subjects. The servo drive speed and the percentage of critically sharp BIF frames however, takes a noticeable hit. It becomes challenging, and at times frustrating to keep up with BIF once the Extender 2X III is added. In good light, it is certainly possible to lock AF on BIF against complex backgrounds, but the success rate is nowhere as high as the EOS-1D X Mark II and for that matter the EOS-1D X. The AF can lag behind if the bird accelerates too quickly. This was a bit disappointing because otherwise the camera’s excellent 30 Mega-pixel image sensor and compact body could make it a killer light combo when attached to the EF 400mm f/4 DO IS II + Extender 2X III.
BIF shots with the combination of the EOS-5D Mark IV and super-telephoto lens plus the EF Extender 2X III are easiest with simple backgrounds.
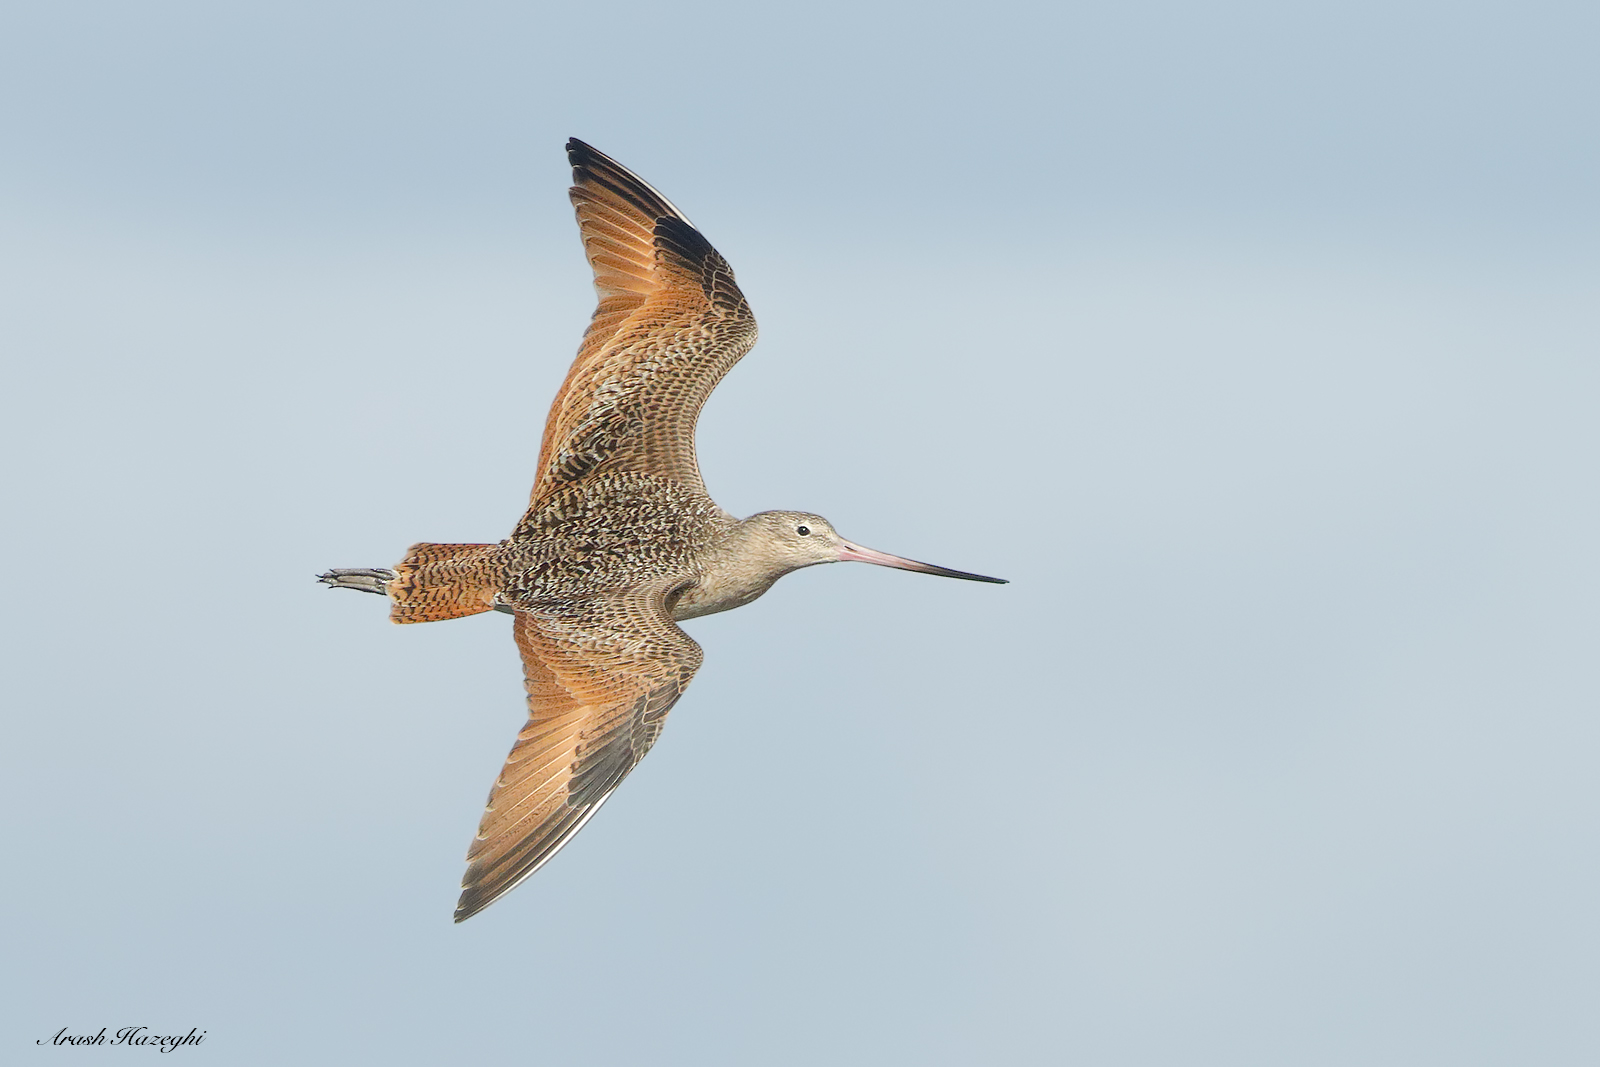
Marbled Godwit. EOS-5D Mark IV, EF 400mm f/4 DO IS II + EF Extender 2X III. ISO 1600. f/8 at 1/4000 sec. Hand held. Processed with DPP 4.5. Click on the image to expand.
Large and slow birds aren’t much of a challenge either, for the EOS-5D Mark IV attached to a super-telephoto lens and the EF Extender 2X III.
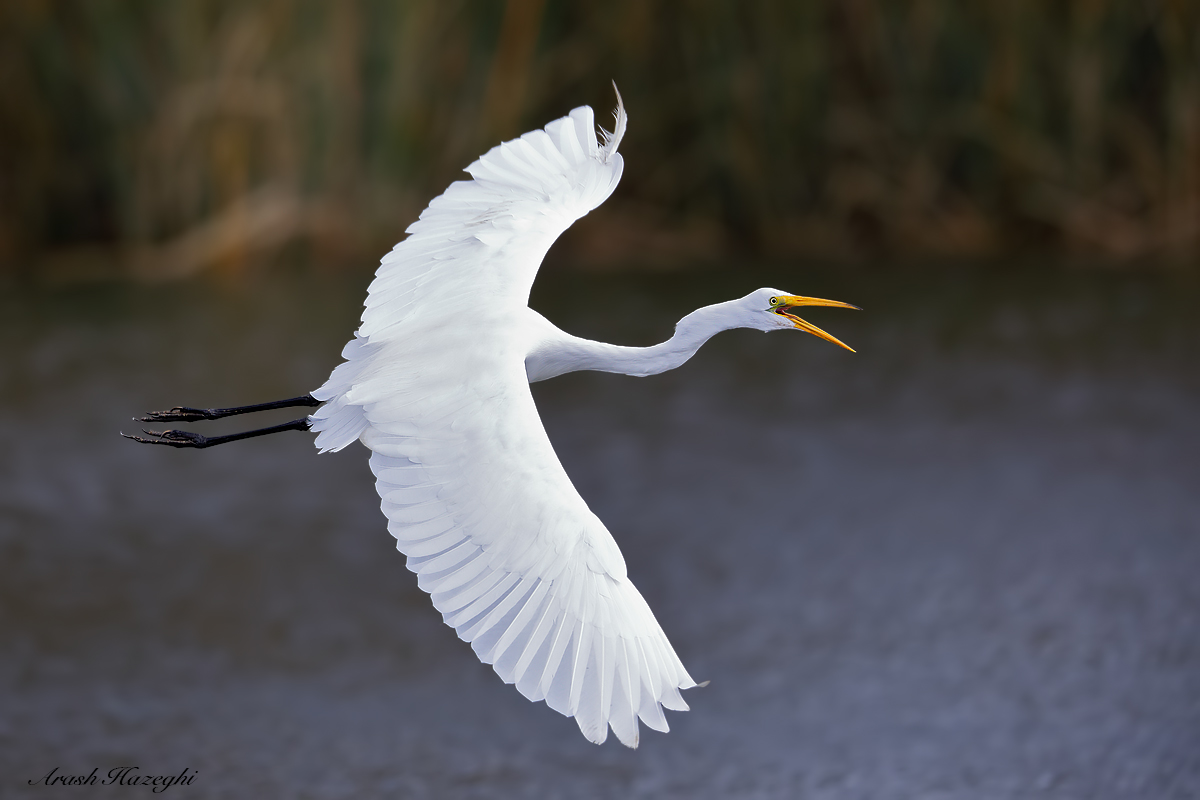
Great Egret. EOS-5D Mark IV, EF 400mm f/4 DO SI II+ EF Extender 2X III. ISO 1600. F/8 at 1/3200 sec. Hand held. Click on the image to expand.
However, images like the example below are hard to come by with the EOS-5D Mark IV when the maximum aperture is f/8 and often test photographer’s technique.
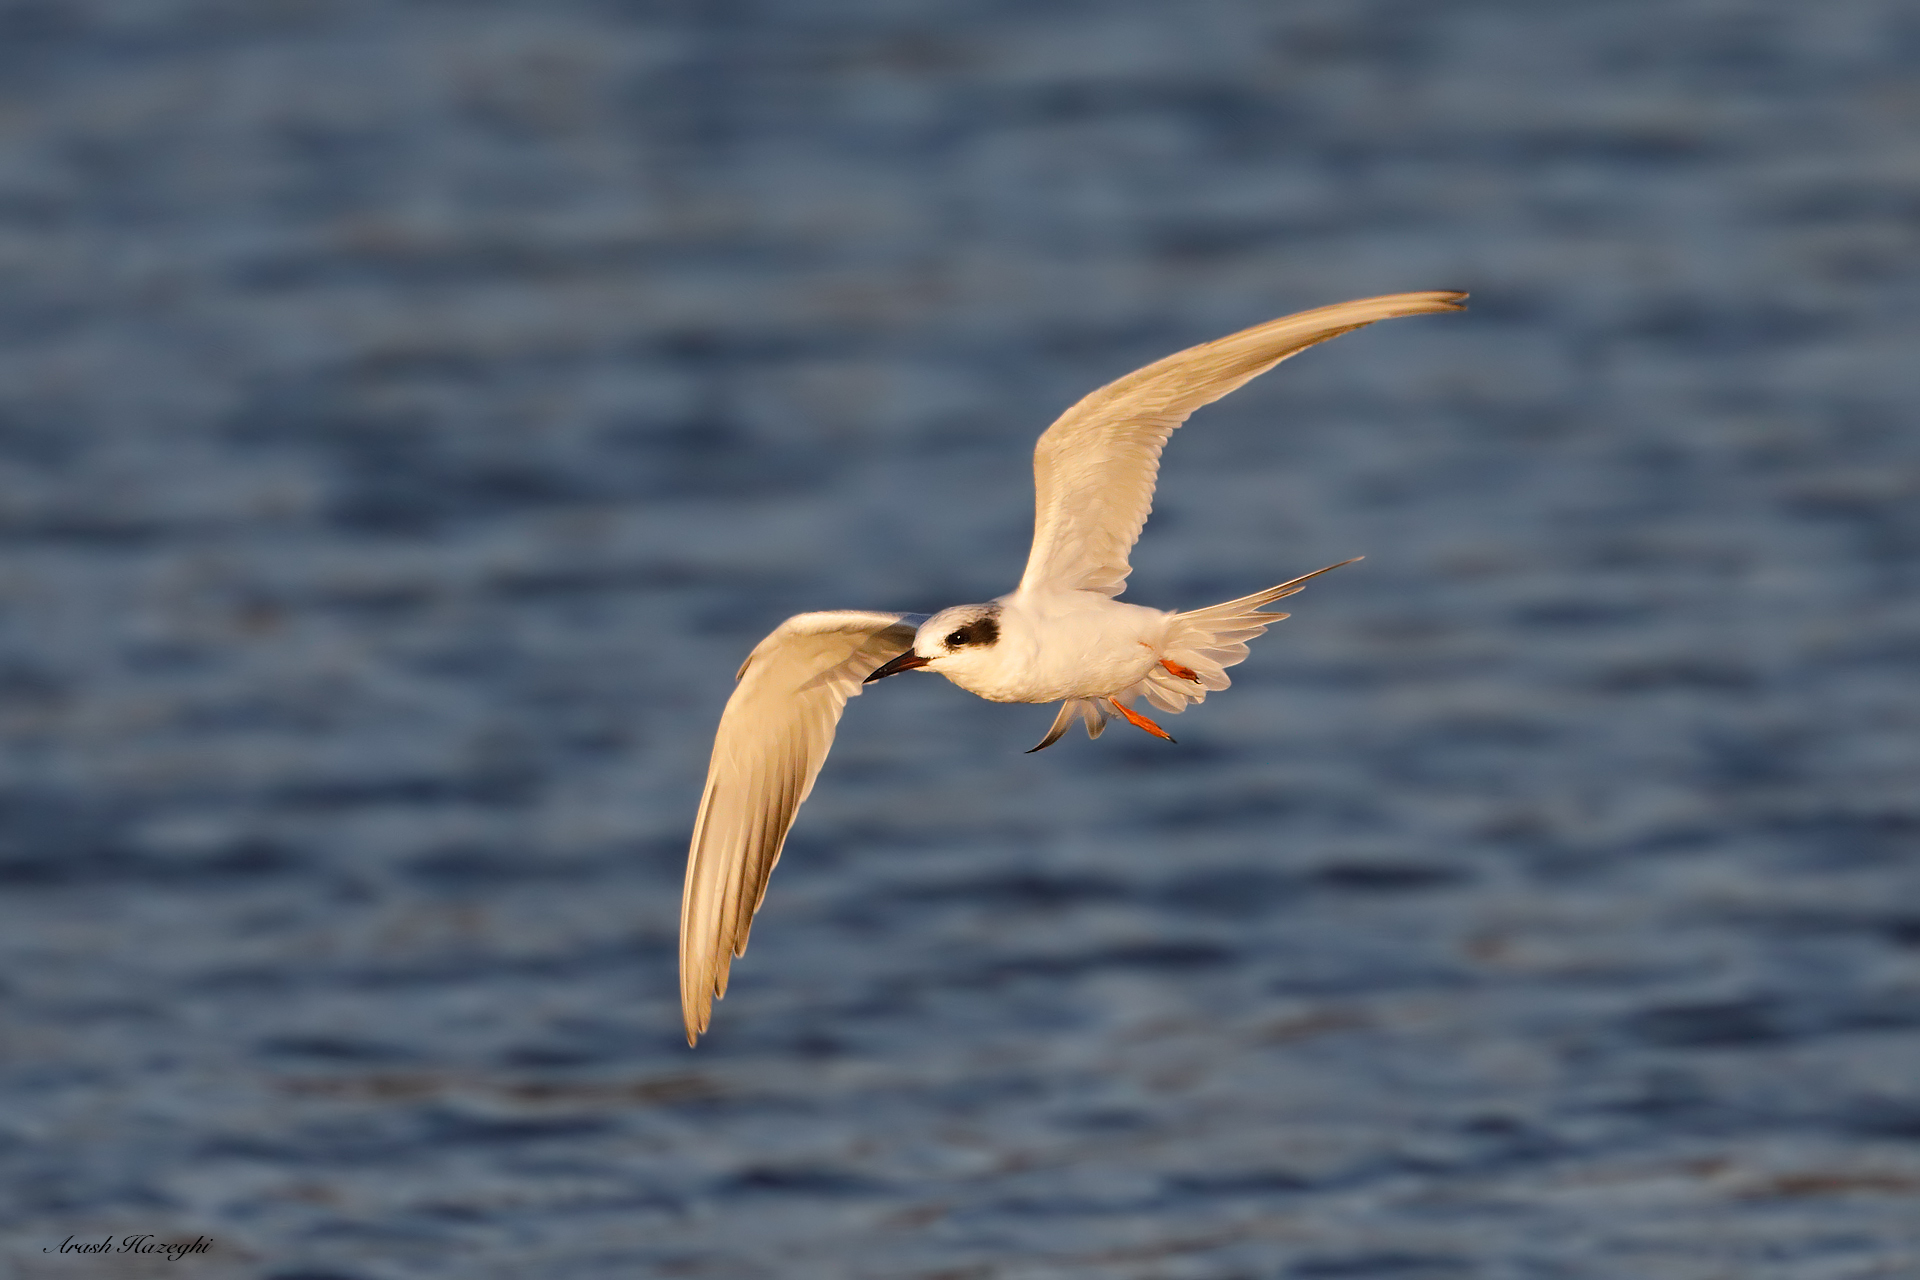
Juvenile Forster’s Tern, EOS-5D Mark IV, EF 400mm f/4 DO IS II+ EF Extender 2X III. ISO 2500. F/8 at 1/3200 sec. Hand held. Processed with DPP 4.5. Click on the image to expand.
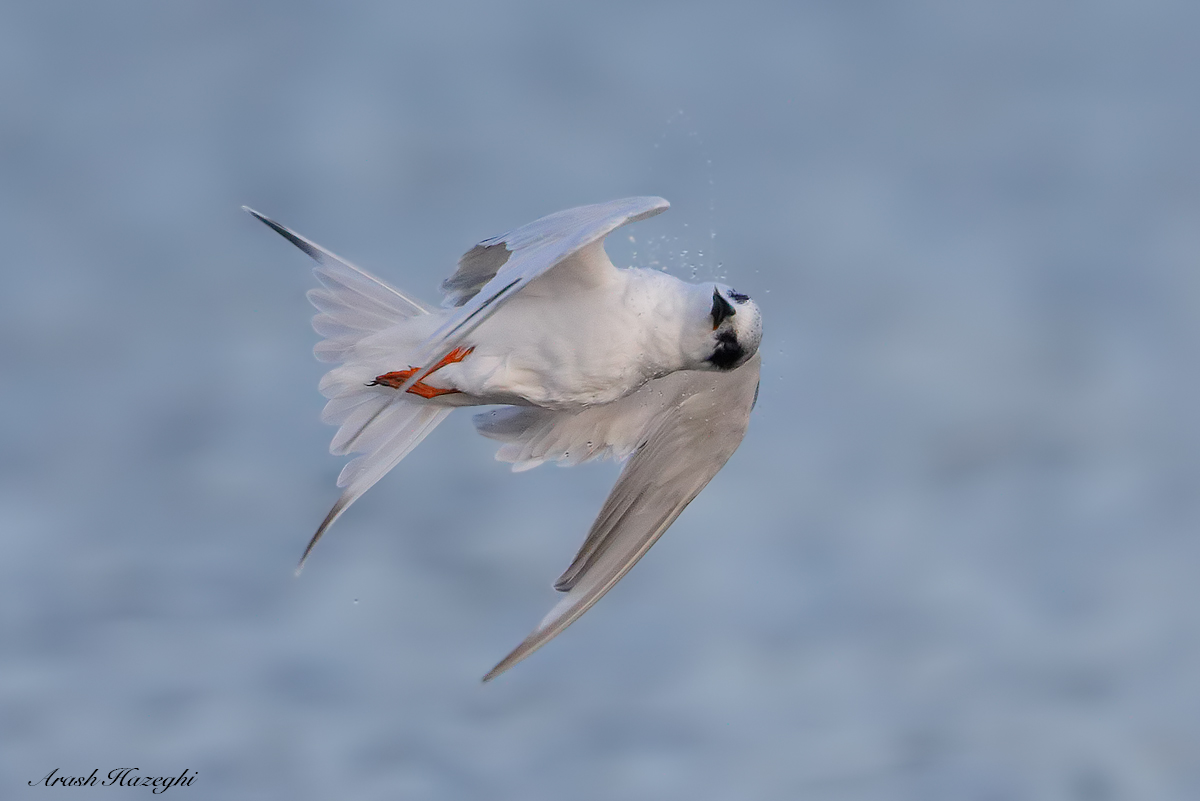
Juvenile Forster’s Tern in a barrel roll. EOS-5D Mark IV, EF 400mm f/4 DO IS II + Extender 2X III. ISO 2500. f/8 at 1/3200sec. Hand held. processed with DPP 4.5 Click on the image to see larger.
Conclusion and Verdict
The EOS-5D Mark IV is a worthy upgrade to the EOS-5D Mark III which improves upon its predecessor in every measurable way. The 4th generation 5D is packed with new features that make it even more productive and fun to shoot with. There isn’t really anything else on the market at the time of writing this review that can directly compete with the EOS-5D Mark IV. There are camera bodies with higher resolution sensors but they are slower and lack the advanced and capable AF fitted in the EOS-5D Mark IV. There are cameras with even better AF and faster performance but they cost twice as much as the EOS-5D Mark IV. The EOS-5D Mark IV is not a specialized camera, it is a Swiss army knife, a jack of all trades and master of some but not all. As a primary action/BIF camera the EOS-1D X Mark II or even the now discontinued EOS-1D X are both better propositions and will get you more dynamic frames. But for perched birds plus some BIF work (with bare super-telephoto lens plus the 1.4X Extender), the EOS-5D Mark IV is on top of my list. The EOS-5D Mark IV delivers excellent resolution and sharpness at pixel level across the ISO range and at the same time is just fast enough for many things that you throw at it. Overall the EOS-5 Mark IV is an excellent complement to the EOS-1D X (Mark II) for the wildlife/avian photographer, I would recommend it with no hesitation.
The EOS-5D Mark IV body only retails for $3500, the same as the EOS-5D Mark III at the time of its introduction.
Pros
-30 Mega-pixel low-noise CMOS sensor: delivers excellent image quality, dynamic range and details across the ISO range.
-Flagship 61-point reticular II AF module: delivers fast, reliable and accurate tracking of BIF at f/5.6 or faster.
-61 AF points at f/8, makes this body ideal for long-distant shots, accurate AF at f/8
-built-in WiFi with NFC and FTP support, Canon’s smartphone app is robust and provides many functions including image review.
-built-in GPS that doesn’t drain the battery like some earlier EOS models.
-Reduced weight and improved weather sealing.
-LCD with responsive capacitive touch.
-Host of video features, 4K video with minimal compression (at the expense of large file sizes).
-Rapid dual-pixel CMOS AF in live view, makes it possible to track moving subjects reliably when shooting video.
-silent shooting is available even at 7fps, great for blind use or shooting skittish wildlife.
Cons
-7fps isn’t slow but isn’t fast either, sometimes it is not fast enough the capture the peak of action, the best pose or the best wing position.
-AF drive at f/8 not as fast as I’d like, becomes very slow in low light.
-Still uses the obsolete CF interface as opposed to CFAST, the SD interface is slow and limits the camera’s performance.
-Battery grip only uses one battery at a time (power from two batteries cannot be combined to speed up AF drive)
-Focusing screen is fixed.
-VF illumination is only in black, unlike EOS-1D X Mark II which is in red making it much easier to see the focus points.
-Dual-Pixel RAW in its current form has very limited use for avian photography.
Excellent review of an excellent camera body Arash!
Very comprehensive review!
Great review as always.
Very informative, good job.
Excellent and very instructive review. I’ve been contemplating getting the 5D MKIV and keep the 5D MKIII as my back up.
Very informative review.
I have a question concerning a comparison of the autofocus system (I mean the overall performances, including shutter lag, camera responsiveness) of the 5d mark IV, with the one of the older 1d mark IV.
In the 1dx review you explained that you prefer the overall performance of the 1d mark IV, over the 5d mark III.
“I purchased an EOS 5D Mark III when it first came out back in spring 2012 for the purpose of testing the new AF system. The new AF system proved quite capable (see one example below) especially in tracking and low-light performance. But overall it failed to provide the same level of experience compared to the EOS 1D Mark IV, mainly due to slow servo drive when coupled to 500mm and 600mm super-telephoto lenses (with and without 1.4X extender III), noticeable shutter lag and slow continuous shooting speed. Given these factors it was not possible to do an apple-to-apple comparison with the EOS 1D Mark IV. As a result I quickly went back to the EOS 1D Mark IV and gave up on the EOS 5D Mark III for flight/action shots.”
Considering the new autofocus sensor of the 5d mark IV, metering system, and autofocus processors (that probably are not digic, but Canon does not publish any longer the camera “white papers”, where this detail was provided), do you find that the autofocus performance of the 5d mark IV is now comparable or even better, with respect to the 1d mark IV (clearly this last one has an advantage in terms of fps)?
Thank you.
Hi Matteo,
yes things have changed a lot since 2012. The 5D MKIV has undoubtedly superior AF compared to 1D MKIV which is now obsolete. It is more accurate and just as fast if not faster. The less-accurate AF of of the 1D4 somewhat negates its advantage in continuous shooting speed (3fps) as the percentage of tack sharp files is lower.
5dIV AF is better than 7dII AF ??
Hi Marco, yes the 5D MK4 is superior to that of 7D II which falls short of meeting my standards for BIF.
Exactly ,I have the 7dii is very speed for birds in fly .The mark4 is some or more ??
Thanks
ok Thanks Ari
Great, in depth review. Thanks. I bought the 5D Mark iv a few weeks ago, but I’ve been finding pixelation’grain and sharpening in my RAW files. Everything is turned off that might sharpen in camera as far as I can tell- I’ve just retained the settings I liked with the 5D mark iii. Have you or anyone else noticed this? Might I have a slightly dodgy sensor? There is much more grain than an equivalent photo even with the 5Dsr at ISO100. I’d appreciate anyone’s input as it’s a bit of a journey to return the camera…
Hi Andy,
You might be using the wrong RAW convertor. Don’t waste your time with ACR/Lightroom as it cannot process Canon RAWs in an optimal way. I recommend using DPP for best results. Check out my DPP4 guide to learn how to process your RAW files. You will get excellent results with your 5D MKIV
Arash, thank you for the review. It’s very informative and complete. I just bought the 5D4 specifically because it offers 30 Mega pixels and can help me with the 500F4 + 2X for more “reach” for close up portraits. I completely agreed with you that for BIF, the 1DX II is my go to camera. I’m holding out for a 600 DO before trading in my 500f4.
thank you so much Arash ….
Excellent review 🙏
As I said, great review Aresh, Question for you. If you were shooting perched birds in decent light would actually prefer the 5D4 over the 1DX2?
Hi Jim, it’s a tough question, if I am in a setup environment I’d pick the 5D4 but if I am in totally wild environment with no repeat opportunity I’d pick the 1DXII as the 5D4 may just miss the shot I like.
best
Thanks Aresh, As I am I have the 1DX and a 7D2 for backup that NEVER gets used. Thinking of either upgrading the X or replacing the backup with a 1D4. Of course I’d like to do both! Only reason thinking of the 4 is some editors request larger files and don’t like them uprezzed. Of course I realize they often are asking for something that will make no difference for their use. Your response is greatly appreciated. Jim
Your review confirms my experience. I bought the camera on Doug Brown’s recommendation and am impressed by the number of top photographers on BPN who are using the 5D4 for avian photography. Thank you.
Great review Arash! Thanks for putting in all the work to write it.
This is a terrific review. Enjoyed reading it.
Do you mind elaborating a little further what main differentiators are with 5D4 over 7D2, especially on AF and the general image quality from your experience, aside from the obvious better high iso? I have 7D2 now and am looking to add a 5D4.
Appreciate it.
Hi Dan,
The 7D MKII AF is unfortunately not up to my standards for in-flight shots, I don’t use it myself and don’t recommend it to photographers who want the best quality. The 5D MKIV AF is the best in class on the other hand, and only second to the 1D series.
Thanks for the review. Especially with the Mark III to Mark IV comparison.
Would you still recommend the 5D4 over the 7D2 for BIF when reach-limited? For instance, when your longest lens is 400mm?
yes, the 7D2 does not meet my standards when it comes to AF performance for Birds in flight.
I appreciate your review. I have been looking for some information on the 5D Mark IV regarding BIF photos. I don’t shoot BIF photos that often but I would like to have a dependable camera when that opportunity arises. I have been using a 5D Mark II and it just doesn’t lock on quickly enough in those situations. It sounds like the Mark IV would be significantly better, especially at 5.6 or faster. You have some great BIF photos in your review, especially the great egret.
Hey Ari,
I am leaning towards a 1dx mk ii and 400mm do ii with extenders. If this is the only kit I am going to have, would the 1dx mk ii still be the way to go over the new 5d? I would definetly be pushing ISO to 3200 or 6400 often and utilizing extenders A LOT, enough that I’m willing to spend the extra on a 1dx mk ii. I know you mentioned if we are using iso 3200 then using the 1dx is probably a better idea.
Thanks
Hi Mike,
If you want to use the 400DO II + extender 2X, then the 1DXII is a no brainer. The AF with the 5D IV is just too slow when the 2X extender is attached and pretty much useless for birds in flight if that’s what you like to photograph.
I purchased your professional processing guide that shows you the settings for canon dpp4 and it does not show settings for the new 5d mark 4. which camera should I use that would be close enough to use for the settings for when I make my recipes? Thanks and love your work.
Hi Richard, I think you have the older guide, please email me so I can send you the updated version.
I have been searching for a detailed analysis of how well the 5D Mk IV handles tracking/focusing for BIF, and found it here on your site. Thank you for that. I shoot mostly landscapes but want I reliable camera for wildlife and BIF. I am looking at the 5D Mk IV for this. I want the 30MP and image quality and I am willing to settle for not quite perfect for tracking/focusing on moving targets; pretty darn good is good enough for me if I get the pixels and image quality. Question: If I shoot BIF with the 5D Mk IV and the Sigma 150-600 Sport f5-6.3 how far below “perfect” do you think the results might be?
Hi James, I don’t use third party lenses so I can’t give you an accurate answer. In general third party lenses do not have the kind of AF hardware and software you find in a high-end Canon lens and for that reason they are significantly cheaper.
Thank you for your reply. Let me ask this a different way. If I wanted to pair the 5D Mk IV with a Canon 600mm f4L or 500mm f4L to shoot BIF and I was willing to settle for pretty good tracking/focusing, do you think the 5D could manage that (realizing “pretty good” is a less than precise measure).
Ari, I love your work (writing & photos). I have a Canon 7Dii, a Canon 100-400ii, and a Canon 1.4x iii extender. I use this for BIF, but am not thrilled with results. Have been thinking about replacing the 7Dii with either a used 1DX or the new Canon 5Div. Which body would you recommend? I’m an enthusiast, and don’t shoot real often, but require sharp photos.
Hi Dave, with your combination of lens I’d recommend the 1DX. The 5D4 AF is not great when it comes to f/8 max. aperture
Sorry about the above request. I think you have already answered this elsewhere, so please disregard.
Hello,
I have a Canon 5D MK IV with a Canon 100-400 mm F 4-5.6 IS II +Canon Extender 1.4x. I have a prolem with the autofocus when I would like to make a photography of bird in fly. 80/90 % of my pictures are Unfocused.
I have read on your article that it was a known problem. You say it’s better with a Canon EOS-1D X Mark II however I have read on a another web site that the autofocus of Canon 5D MK IV is the same of Canon EOS-1D X Mark II. Is it right or not ? Does it come from Canon 5D MK IV firmware that is not optimized ?
I plan to equip myself with a Canon 400mm f/4 IS DO IS II + Canon 1.4 x Extender or 2 x Extender. Will I have the same autofocus problems with this configuration ??
Best regards.
Hi Philippe, what you read is not true, while the AF sensor is identical between 1DX II and 1DX the processing power behind it is not the same. The higher voltage battery pack of the 1DXII also allows for much faster focus drive on the 1DX II.
hope this helps
Hello Ari,
I acquired a 400mm F4 DO for my 5D MK IV. I am very satisfied with the quality of the pictures it provided. Even with an Extender x2 mk III the autofocus reacts very well under all circumstances. The total weight of 2,425Kg is still acceptable for freehand photos @ 800mm F8.
The 100-400mm F 4-5.6 IS II works well but unfortunately it becomes capricious with the extenders. I will use it in the future for other applications.
Best regards.
Hi Ari, would you be so kind as to publish your recommended settings for the 5dmkiv? Thanks.
Hi there all of my settings and tips and techniques are explained in depth in my guides.
What would be your recommendation between 5D IV and 1DX (mark 1)?? I know you mentioned them a couple times. I tend to shoot concerts, portraits, nature, landscape (a bit of everything). I actually have both of these cameras right now and simply cannot decide which to sell…
I feel like the 5D IV is the “smart” choice but when i shoot the 1DX i just feel like “man i can’t give this up.” 1DX for me is like having a Ferrari in the city. I don’t really “need” it but I love having it and those few times i get to let it go it’s awesome. But the 5D IV feel like the BMW sedan…still nice, more practical, but no “wow” factor……
Hi Charlie for my subject if I only had to have one camera it would be the 1DX (I or II) as the 5D4 is just not fast enough for my application. If I was not a bird photographer I would probably pick the 5D4, it works great for “a bit of everything”
best
I cannot believe some one can dedicate so much time and write such a clear and sincere review ! I loved reading your review and you are doing a great service to the community.. I am in the same confusion , whether to upgrade my 5D Mark 3 to Mark 4 or 1 DX Mark 2 (almost not possible from a price point). After reading this, I guess I might go to Mark 4 but not 1 DX now.
[…] prey chase. When I was shooting with Canon, I also preferred the 30-mega pixels files of the EOS-5D Mark IV to the 20-mega pixel files of the EOS-1D X Mark II . However, overall the AF performance of the 5D […]
Hi Arash: Is there a way of changing the written description of each of the 6 case settings on a 5DIV (and 1DxII for that matter) ? I have used your advice to change all the settings on my cameras but it would be useful if I could support that with a changer in the Case description.
Hi Bob, if you are referring to renaming the cases unfortunately it is not possible
Hi Arash, Great images, I aspire to approach what you have achieved. I would like to ask your advise. I have a 7d (not going to sell it). I want a full frame for wildlife and other types of photography. I would like to shoot birds in flight. I have a 400 2.8 ii and 1.4 extender (not going to sell it or trade it). If I want to shoot bif and would like a new camera should I get a new 5div for $2500, a used 1dxii for $3500, (low usage 2000 clicks) or should I forget about getting a full frame and save up money another year or 2 and buy used 600 f4 ii and use it with the 7d. I am not a professional but I would like to increase my keeper rate. Also the 7d is noisy at higher ISOs unless you have a solution to make higher ISO noise a lot less. I was hoping a new camera would increase image quality, at least that is what I am thinking.
Hi Rich the Canon 7D series is not capable of delivering sharp BIF images most of the time, it is pretty much a waste of time to use that camera for BIF IMO, even the 7D MKII is pretty bad and obsolete. If you want to excel at BIF photography with Canon you need a BIF lens AND a BIF body. The lenses you need are the 600mm/500mm f/4 MK III or MK II and the bodies are certainly the 1DX series. anything less is not going to be a noticeable improvement that would justify the money invested and will result in disappointing and buyers remorse.
If you want to excel at BIF with a lower budget I recommend purchasing a Nikon D500 and a 500mm PF lens, this combination is going to get you more image than the Canon gear that costs several times more. you can pick up a D500 for about $900 used and a 500PF for about $3500, amazing combo and price
hope this helps